
Check Best Thermostat Pricing in Amazon
** As an Amazon Associate, I earn from qualifying purchases.
Are you ready to take control of your home’s comfort and save on energy bills? Installing a Sensi Thermostat is easier than you think, even if you’re not a tech expert.
With just a few simple steps, you can upgrade your old thermostat to a smart one that learns your schedule and adjusts temperatures automatically. In this guide, you’ll discover exactly how to install your Sensi Thermostat quickly and safely, so you can start enjoying smarter heating and cooling right away.
Keep reading—your home’s perfect temperature is just a few clicks away.
Gather Required Tools
Gathering the right tools is the first step to install your Sensi Thermostat smoothly. Having everything ready helps you avoid delays and frustration. It also ensures a safe and correct installation.
Below is a list of essential tools you need. Each tool plays a key role in the process. Check your toolbox or buy what is missing before starting.
Smartphone Or Tablet
A smartphone or tablet with Wi-Fi access is needed. You will use it to set up the thermostat app. Make sure the device is charged and connected to the internet.
Screwdriver
A flathead and a Phillips screwdriver are necessary. You will remove the old thermostat and secure the new one. Choose a screwdriver that fits the screws well.
Drill (optional)
A drill helps if you need new holes for mounting. Not all installations require drilling. Use a drill with a small bit to avoid wall damage.
Level Tool
A small level keeps your thermostat straight on the wall. A crooked thermostat can affect wiring and looks. A bubble level or a smartphone app level works fine.
Wire Stripper
A wire stripper is useful to prepare wires for connection. It removes insulation without damaging wires. Use it if the wires are old or too long.
Masking Tape And Pen
Masking tape and a pen help label wires. Labeling prevents confusion during reconnection. Write each wire’s terminal name clearly before removal.
Turn Off Power
Turning off the power is the first and most important step before installing the Sensi Thermostat. It keeps you safe from electrical shocks. It also protects your HVAC system from damage during installation.
Always double-check that the power is off. This step prevents accidents and ensures a smooth installation process.
Locate Your Circuit Breaker
Find the main electrical panel in your home. It is usually in the basement, garage, or utility room. Look for the breaker labeled for your heating and cooling system.
Switch Off The Correct Breaker
Flip the breaker switch to the off position. This stops electricity flow to your HVAC system. Do not guess; make sure it is the right breaker.
Verify Power Is Off
Use a voltage tester or a simple tool to check wires. Confirm no power runs to the thermostat wires. This step keeps you safe before you touch any wires.
Keep Power Off During Installation
Do not turn the power back on until the thermostat is fully installed. Turning on power too soon can cause shorts or damage. Wait until all wires are connected and the thermostat is mounted.
Remove Old Thermostat
Removing your old thermostat is the first step to install the Sensi Thermostat. This step prepares your wall and wiring for the new device. Taking care during removal helps avoid damage to wires and the wall. Safety is important. Switch off the power before starting.
Turn Off Power To The Thermostat
Find the circuit breaker that controls your heating and cooling system. Turn it off to cut the power. Confirm the power is off by trying to change the thermostat settings. No response means it is safe to proceed.
Remove The Thermostat Cover
Most covers snap off or slide up easily. Use gentle force to avoid breaking the cover. Set the cover aside for now. This reveals the thermostat base and wiring.
Take A Picture Of The Wiring
Use your phone or camera to take a clear photo of the wires. This helps you remember where each wire connects. Label wires if needed with small pieces of tape. This step simplifies the new thermostat installation.
Disconnect The Wires
Loosen the screws holding the wires in place. Gently pull each wire free. Avoid letting wires fall back into the wall. Keep the wires straight and ready for the new thermostat.
Remove The Thermostat Base
Unscrew the base from the wall using a screwdriver. Carefully pull the base away from the wall. Patch any holes or marks left behind. The wall is now ready for the Sensi Thermostat installation.

Credit: www.youtube.com
Label Wires
Labeling wires is a key step in installing your Sensi thermostat. It helps you keep track of each wire’s function. This step makes reconnecting wires easier and safer.
Before you remove your old thermostat, take time to label every wire. This will save you from confusion later. Each wire controls a different part of your heating or cooling system.
Switch off power to your HVAC system at the breaker box. This prevents electric shock and damage. Safety first.
Remove Thermostat Cover
Carefully take off the cover of your old thermostat. Expose the wires connected to the terminals. Do this slowly to avoid pulling wires out.
Label Each Wire
Use small stickers or masking tape to label each wire. Write the letter or code from the terminal it connects to. For example, “R,” “W,” or “Y.”
Take A Photo
Snap a clear photo of the labeled wires. This gives you a backup reference. It helps if labels fall off during installation.
Disconnect Wires
Gently disconnect the wires from the old thermostat. Keep the labels on each wire intact. Do not mix up the wires.
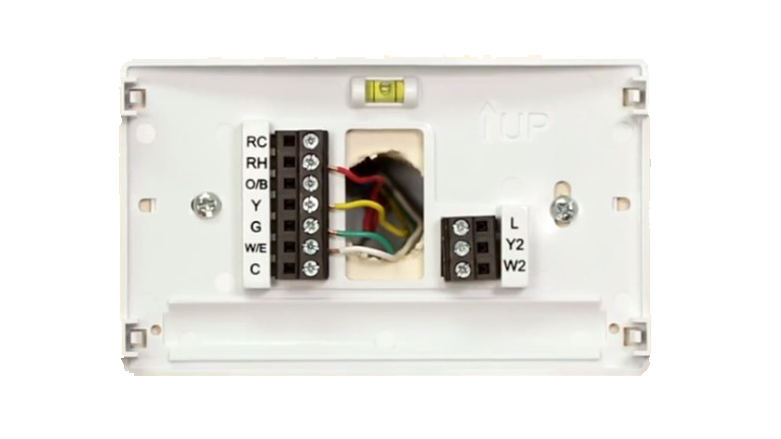
Mount The Sensi Base
Start by attaching the Sensi base to the wall using the screws provided. Make sure it is level for proper thermostat function. Secure the base firmly to ensure stability.
Prepare The Wall For Mounting
Start by choosing a flat surface near your existing thermostat wiring. Clear the area of dust and debris. Use a pencil to mark the holes where you will place the screws. Double-check that the base will sit level on the wall. This helps the thermostat work correctly and look neat.
Attach The Mounting Plate
Hold the Sensi base plate against the wall, aligning it with your pencil marks. Use a drill or screwdriver to insert the screws into the wall anchors or drywall. Tighten the screws until the plate feels secure. Avoid over-tightening to prevent damage to the wall or base.
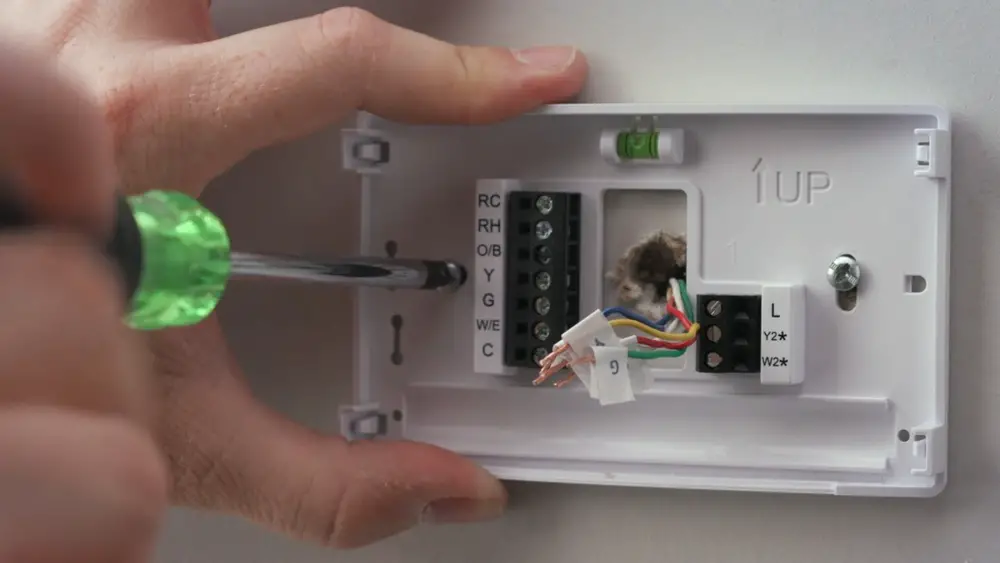
Connect The Wires To The Base
Carefully strip the ends of the thermostat wires if needed. Match each wire to its correct terminal on the Sensi base. Use the labels or the instruction manual for guidance. Insert the wires and tighten the terminal screws to hold them firmly in place. Ensure no wires touch each other to prevent short circuits.
Attach The Thermostat Display
Once the base is mounted and wired, snap the thermostat display onto the base. Press gently until you hear a click. The display should fit snugly without gaps. This step completes the physical installation and readies your device for setup.
Connect Wires To Sensi
Connecting the wires to your Sensi thermostat is a key step. It lets the thermostat communicate with your heating and cooling system. This step requires careful handling to avoid damage or errors. Follow each step slowly and double-check your work.
Before starting, turn off the power to your HVAC system. This prevents shocks or short circuits. Use a screwdriver to remove the old thermostat’s faceplate and expose the wiring. Take a clear photo or label each wire to remember its position.
Identify Each Wire
Look at the wires coming from your wall. Most systems use color-coded wires. Common colors include red, white, yellow, green, and blue. Each color has a specific role in your HVAC system. Matching wires to the right terminals is crucial for proper function.
Check the labels on your old thermostat or the wiring guide in the Sensi manual. Match the wire colors and labels carefully. If any wire is loose or damaged, replace it before proceeding.
Attach Wires To Sensi Terminals
Take the Sensi thermostat base and locate the terminal screws. Each terminal is marked with a letter, like R, W, Y, G, or C. Insert the correct wire into the matching terminal. Tighten the screw firmly to hold the wire in place. Avoid over-tightening, which can damage the wire.
Check Best Thermostat Pricing in Amazon
** As an Amazon Associate, I earn from qualifying purchases.
Double-check each wire connection. Ensure no wires touch each other. A loose or crossed wire can cause the system to malfunction.
Secure The Thermostat Base
Once all wires connect properly, push the wires gently into the wall box. Attach the Sensi base to the wall using screws. Make sure it sits flat and tight. This prevents wires from moving or disconnecting later.
After securing the base, snap the thermostat faceplate onto the base. The unit should fit snugly without gaps.
Attach The Sensi Display
Attaching the Sensi display is a simple step in setting up your thermostat. This part connects the screen to the base, allowing you to control your home temperature easily. The display shows the current temperature, settings, and allows you to make adjustments quickly.
Make sure the base is firmly mounted before attaching the display. The connection should be secure for proper function and responsiveness. Handle the display gently to avoid any damage to the screen or connectors.
Align The Display With The Base
Hold the display close to the base unit. Match the edges so the connectors line up perfectly. This alignment is important for a good electrical connection.
Press The Display Gently Into Place
Push the display towards the base carefully. You will hear a click when it locks into place. Avoid forcing the display to prevent damage.
Check The Connection
Look at the screen for signs of power. The display should light up or show the home screen. If it does not, detach and try reattaching the display again.
Credit: sensi.copeland.com
Restore Power
After installing your Sensi Thermostat, restoring power is the next important step. This step brings your thermostat to life. It allows the device to start working properly.
Restoring power safely ensures your thermostat runs without issues. Follow these simple steps carefully to avoid any electrical problems.
Turn On Circuit Breaker
Locate your home’s circuit breaker panel. Find the switch labeled for your heating and cooling system. Flip the switch to the “on” position. This action restores power to the thermostat.
Check Thermostat Display
Look at your Sensi Thermostat screen. A clear display means power is restored. If the screen stays blank, recheck the circuit breaker.
Test System Operation
Use the thermostat controls to test heating or cooling. Listen for the system to start. Confirm that the thermostat controls the temperature correctly.
Configure Sensi Thermostat
Configuring your Sensi Thermostat is an important step to enjoy its full benefits. This process connects the thermostat to your home system and personalizes settings. The thermostat will work best when properly set up.
Follow these simple steps to configure the Sensi Thermostat. Each part helps you get comfortable with its features. You can control temperature easily and save energy with the right setup.
Connect To Wi-fi
First, connect your thermostat to your home Wi-Fi network. This allows remote control from your phone or tablet. On the thermostat screen, go to settings and select Wi-Fi. Choose your network and enter the password carefully. Wait for the device to confirm connection before moving on.
Set Preferences
Next, set your preferences for temperature and schedule. Choose your preferred heating and cooling range. Set time slots for different temperature settings, like daytime and night. Adjust the fan and other options to match your comfort needs. These preferences help save energy and keep your home cozy.
Download The App
Download the Sensi app on your smartphone or tablet. The app is free and works on both Android and iOS devices. Use the app to control your thermostat from anywhere. It also provides alerts and usage reports. Log in with your account to sync the app with your thermostat.
Test The Thermostat
Testing the Sensi thermostat is an important step after installation. It ensures the device works correctly. You avoid problems with heating or cooling later.
Testing is simple and quick. Follow these steps carefully to check the thermostat functions.
Turn On The Thermostat
Start by powering on the thermostat. Press the power button or switch it on at the circuit breaker. Wait for the screen to light up. A clear display means the thermostat receives power.
Set The Temperature
Choose a temperature different from the current room temperature. Set it higher for heating or lower for cooling. This triggers the HVAC system to start working.
Check The Hvac System Response
Listen for sounds from your heating or cooling unit. Feel the vents for warm or cool air. The system should turn on within a few minutes.
Use The Sensi App For Testing
Open the Sensi app on your phone. Connect it to your thermostat. Adjust the temperature through the app. Confirm the thermostat reacts to your commands.
Verify The Display And Settings
Look at the thermostat screen for correct temperature and mode. Check settings such as fan speed and schedule. Make sure all options work as expected.
Troubleshooting Tips
Troubleshooting your Sensi thermostat can save time and avoid service calls. Small issues often have simple fixes. Understanding common problems helps you keep your system running smoothly.
Check each step carefully to ensure the thermostat works as expected. Use these tips to identify and solve common issues quickly.
Checking Power Supply
Make sure the thermostat has power. Check the circuit breaker and fuse box. A tripped breaker or blown fuse can stop power flow. Replace or reset if needed. Also, verify the thermostat batteries are fresh. Weak batteries cause the device to shut down.
Verifying Wi-fi Connection
Confirm the thermostat connects to your Wi-Fi network. Poor connection causes setup failure and remote control issues. Restart your router to refresh the network. Move the thermostat closer to the router if signal is weak. Enter the correct Wi-Fi password during setup.
Ensuring Correct Wiring
Check the wiring against the installation guide. Incorrect wiring leads to system errors or no response. Turn off power before inspecting wires. Look for loose or disconnected wires. Tighten or reattach any loose connections. Use the labeled terminals for each wire.
Resetting The Thermostat
Resetting can fix software glitches. Find the reset option in the settings menu. Hold the reset button for several seconds. The device will restart and clear temporary errors. After reset, reconfigure your settings as needed.
Updating Firmware
Keep your thermostat software up to date. Updates improve performance and fix bugs. Check for updates in the Sensi app or device menu. Download and install the latest version when available. This step helps maintain smooth operation.

Credit: www.youtube.com
Frequently Asked Questions
What Tools Are Needed To Install Sensi Thermostat?
You need a screwdriver, drill, level, and wire stripper. These tools ensure proper mounting and wiring for your Sensi Thermostat installation.
How Long Does It Take To Install Sensi Thermostat?
Installation typically takes 30 to 60 minutes. Time varies based on your home’s wiring and familiarity with thermostat installation.
Can I Install Sensi Thermostat Without A C-wire?
Yes, Sensi Thermostat supports installation without a C-wire using a power extender kit. This kit ensures continuous power for the device.
How Do I Connect Sensi Thermostat To Wi-fi?
After installation, use the Sensi app to connect your thermostat to Wi-Fi. Follow the in-app instructions for easy setup.
Conclusion
Installing the Sensi Thermostat is simple and saves energy. Follow each step carefully for best results. Double-check connections to avoid common mistakes. Enjoy easy control of your home’s temperature. This small device can make a big difference. Stay comfortable and reduce energy bills every day.
Feel confident managing your new thermostat now.
Check Best Thermostat Pricing in Amazon
** As an Amazon Associate, I earn from qualifying purchases.