
Check Best Thermostat Pricing in Amazon
** As an Amazon Associate, I earn from qualifying purchases.
To install a non-programmable thermostat, first turn off the power to your HVAC system. Then, remove the old thermostat and connect the new one according to the manufacturer’s instructions.
Installing a non-programmable thermostat is a straightforward task that can improve your home’s energy efficiency. These thermostats are user-friendly, cost-effective, and offer precise temperature control. They are ideal for people who prefer a manual approach to managing their home’s climate.
Before starting the installation, gather essential tools such as a screwdriver, wire stripper, and pliers. Always follow safety precautions to avoid electrical hazards. This guide will walk you through each step, ensuring you can complete the installation quickly and efficiently. By following these instructions, you can enjoy a comfortable and well-regulated indoor environment.

Credit: m.youtube.com
- Introduction To Non-programmable Thermostats
- Essential Tools And Materials
- Pre-installation Considerations
- Removing The Old Thermostat
- Installing The New Non-programmable Thermostat
- Securing The Thermostat And Final Touches
- Testing Your New Thermostat
- Maintaining Your Non-programmable Thermostat
- Energy Saving Tips With Non-programmable Thermostats
- Frequently Asked Questions
- Conclusion
Introduction To Non-programmable Thermostats
Non-programmable thermostats are simple and easy to use. They allow you to control your home’s temperature with just a few clicks. These thermostats are perfect for people who prefer manual control over their HVAC systems.
Benefits Of Traditional Thermostats
Non-programmable thermostats offer several benefits. Here are some key advantages:
- Ease of Use: They are straightforward and user-friendly. No programming is required.
- Cost-Effective: These models are usually more affordable than programmable ones.
- Reliability: With fewer features, there is less chance of malfunction.
- Energy Savings: Manual control helps you manage your energy consumption better.
Ideal Use-cases For Non-programmable Models
Non-programmable thermostats are ideal for certain scenarios. Here are some situations where they shine:
- Consistent Schedules: Perfect for homes with a consistent daily routine.
- Rental Properties: Ideal for rental properties where tenants may not want to deal with programming.
- Elderly Users: Great for elderly users who might find programmable units complicated.
- Vacation Homes: Suitable for vacation homes that are not occupied regularly.
| Feature | Non-Programmable Thermostat |
|---|---|
| Ease of Use | Very High |
| Cost | Low |
| Energy Savings | Moderate |
| Reliability | High |
Installing a non-programmable thermostat is a straightforward process. Follow the steps correctly to enjoy its benefits.
Essential Tools And Materials
Installing a non-programmable thermostat can be a straightforward task. To ensure a smooth installation, you need specific tools and materials. This section covers the essential tools and materials required to install your new thermostat effectively.
List Of Required Tools
Here is a list of tools you will need:
- Screwdrivers – Both flathead and Phillips.
- Drill – For making holes if necessary.
- Wire Strippers – To strip the insulation from the wires.
- Level – To ensure the thermostat is mounted straight.
- Plier – For gripping and twisting wires.
- Voltage Tester – To check for live wires.
Safety Equipment And Precautions
Safety should be your top priority. Here are some safety equipment and precautions to consider:
- Safety Glasses – Protect your eyes from debris.
- Insulated Gloves – Prevent electric shocks.
- Turn Off Power – Always switch off the power at the circuit breaker.
- Read the Manual – Follow the thermostat’s instructions carefully.
Having the right tools and safety equipment is crucial. It ensures a smooth and safe installation process. Make sure to gather all required items before starting the installation.
Pre-installation Considerations
Before installing a non-programmable thermostat, consider a few critical aspects. These factors ensure a smooth and successful installation. Let’s explore the essentials.
Compatibility With Heating And Cooling Systems
Check if your new thermostat is compatible with your heating and cooling systems. Most non-programmable thermostats work with single-stage systems. These include gas, oil, electric furnaces, and air conditioners. For complex systems, confirm compatibility in the product manual.
Some thermostats might not work with multi-stage heating or cooling systems. This includes heat pumps or radiant floor heating. Always read the specifications before purchasing. A mismatch can lead to ineffective heating or cooling.
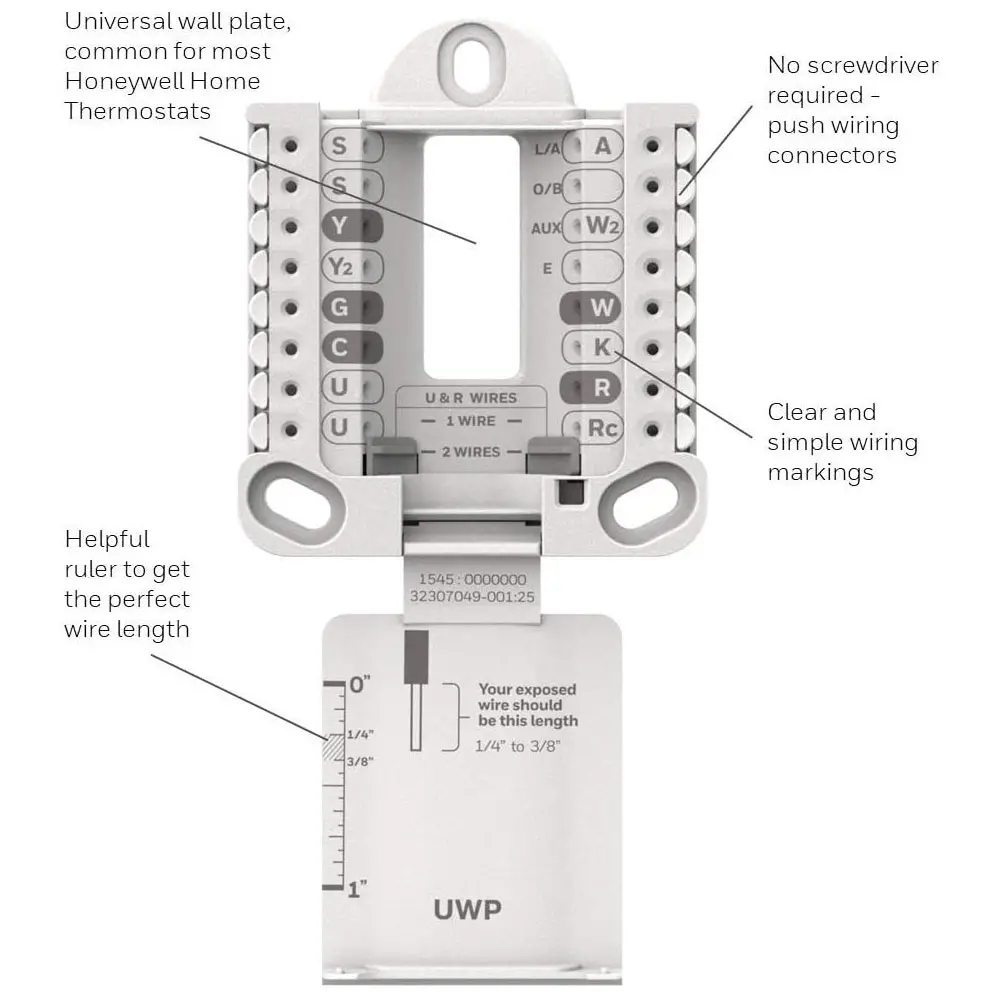
Analyzing Existing Wiring
Before starting the installation, examine your existing thermostat wiring. Understanding the wires helps in making correct connections. Remove the cover of your old thermostat. Note the wire colors and their connections.
Usually, wires are labeled with letters like R, W, Y, G, and C. The R wire is the power wire, and the C wire is the common wire. The other wires control heating, cooling, and fan functions. Label these wires with tape for easy identification later.
Some thermostats have different wiring setups. For instance, older systems might lack a C wire. In such cases, you might need an adapter or professional help. Ensure your new thermostat supports your wiring configuration.
| Wire Label | Function |
|---|---|
| R | Power |
| W | Heat |
| Y | Cool |
| G | Fan |
| C | Common |
Removing The Old Thermostat
Before installing a new non-programmable thermostat, you must remove the old one. This process is crucial for a smooth installation. Follow these steps to ensure safety and efficiency.
Safety First: Power Shutdown
Your safety comes first. Turn off the power to your HVAC system. This will prevent any electrical accidents. Go to your breaker box and locate the switch that controls your thermostat. Flip the switch to the “Off” position. This ensures no power is flowing to the thermostat.
Step-by-step Removal Process
- Remove the thermostat cover: Most covers snap off easily. Use gentle force to avoid breaking it.
- Take a photo of the wiring: This will help you remember where each wire goes. It makes installation easier.
- Label the wires: Use masking tape or small labels. Mark each wire with the corresponding terminal letter.
- Unscrew the mounting plate: Use a screwdriver to remove the screws holding the plate. Keep the screws safe for later use.
- Disconnect the wires: Carefully detach each wire from its terminal. Make sure none of the wires fall back into the wall.
Keep the old thermostat and its parts for recycling or proper disposal. Your new thermostat is now ready for installation!
Installing The New Non-programmable Thermostat
Installing a non-programmable thermostat is a simple task. It enhances your home’s heating and cooling efficiency. Follow these steps to get it done quickly and safely.
Mounting The Thermostat Base
Start by turning off the power to your HVAC system. This step ensures safety. Locate your old thermostat and remove it from the wall.
Next, mount the new thermostat base. Hold the base against the wall where the old unit was. Use a level to ensure it is straight.
Mark the screw holes with a pencil. Drill holes at the marked points if needed. Insert wall anchors if your wall is drywall. Attach the base to the wall using screws. Ensure it is secure but not too tight.
Connecting The Wires
Before connecting the wires, label each wire with masking tape. This step helps remember their positions. Refer to the labels on the new thermostat.
Match the wires to the corresponding terminals on the thermostat. Use the following guide:
| Wire Color | Terminal |
|---|---|
| Red | R |
| White | W |
| Yellow | Y |
| Green | G |
Insert each wire into its terminal. Tighten the screws to secure them. Ensure no wires are touching each other. This prevents short circuits.
Once all wires are connected, attach the thermostat cover. Ensure it clicks into place. Turn the power back on to your HVAC system. Test the thermostat to ensure it works correctly.
Congratulations! You have successfully installed your new non-programmable thermostat.
Securing The Thermostat And Final Touches
After wiring and mounting your non-programmable thermostat, it’s time to secure it and add the final touches. This step ensures your thermostat works efficiently and looks great on your wall.
Check Best Thermostat Pricing in Amazon
** As an Amazon Associate, I earn from qualifying purchases.
Attaching The Thermostat Faceplate
First, attach the thermostat faceplate. This part covers the wiring and internal components. Hold the faceplate and align it with the base. Make sure all the connectors match.
Gently press the faceplate onto the base until you hear a click. This click means the faceplate is securely attached. Double-check that it is snug and properly aligned.
Ensuring A Level Installation
Use a level to ensure your thermostat is straight. Place the level on top of the faceplate. Adjust the faceplate if needed. A level thermostat ensures accurate temperature readings.
Finally, turn the power back on at the breaker. Test your thermostat by setting the temperature. Make sure it responds correctly.
| Step | Description |
|---|---|
| 1 | Attach the thermostat faceplate by aligning it with the base. |
| 2 | Press the faceplate until you hear a click. |
| 3 | Use a level to ensure the thermostat is straight. |
| 4 | Turn the power back on at the breaker. |
| 5 | Test the thermostat by setting the temperature. |
Congratulations! Your non-programmable thermostat is now installed and ready to use.
Testing Your New Thermostat
Once you’ve installed your non-programmable thermostat, it’s crucial to test it. Ensuring it works correctly is essential for maintaining your home’s comfort. Follow these steps to power up and test your thermostat.
Powering Up And Basic Testing
Turn on the power to your HVAC system. Make sure the circuit breaker is switched on. Check the thermostat display. It should light up.
Set the thermostat to heating mode. Adjust the temperature to be higher than the current room temperature. The heating system should start. You should hear the furnace or heating system kick in.
Switch to cooling mode. Set the temperature lower than the room temperature. The air conditioning should turn on. You should hear the compressor and feel cool air from the vents.
Test the fan mode. Set the thermostat to the fan setting. The fan should start blowing air through the vents.
Troubleshooting Common Issues
If the thermostat doesn’t power up, check the batteries. Replace them if needed. Ensure the wires are correctly connected to the terminals.
If the heating or cooling system doesn’t turn on, double-check the wiring. Make sure each wire is in the correct terminal. Refer to the wiring diagram in the thermostat manual.
If the fan mode doesn’t work, inspect the fan relay. It might be faulty. Also, ensure the fan settings on the thermostat are correct.
Consult the thermostat manual for error codes. It can help diagnose specific issues. If problems persist, consider calling a professional HVAC technician.

Credit: m.youtube.com
Maintaining Your Non-programmable Thermostat
Proper maintenance of your non-programmable thermostat ensures efficient home temperature control. Regular care can help extend its lifespan. This guide will help you maintain your thermostat effectively.
Routine Cleaning And Care
Dust and dirt can affect your thermostat’s performance. Routine cleaning is essential to keep it working optimally.
- Turn off the power to the thermostat at the circuit breaker.
- Remove the thermostat cover to access the internal components.
- Use a soft brush or cloth to gently clean the inside.
- Check for any loose wires and secure them if needed.
- Replace the cover and turn the power back on.
Perform this cleaning process every few months to ensure smooth operation. Keeping the thermostat clean prevents malfunctions.
When To Seek Professional Help
Sometimes, your thermostat may need more than routine cleaning. Knowing when to call a professional can save time and money.
| Issue | Action |
|---|---|
| Thermostat not responding | Call a technician to check the wiring and power supply. |
| Inconsistent temperature | Seek help to recalibrate or replace the thermostat. |
| Unusual sounds | Get a professional to inspect the internal components. |
If you notice these issues, a professional can diagnose and fix the problem. Regular maintenance and prompt professional help keep your thermostat in top condition.
Energy Saving Tips With Non-programmable Thermostats
Non-programmable thermostats might not have advanced features, but they can still help you save energy. By managing your thermostat manually, you can reduce energy costs. Here are some tips to help you optimize your non-programmable thermostat for energy savings.
Optimizing Manual Settings
To make the most of your non-programmable thermostat, adjust the settings manually. Here are some steps:
- Set a consistent temperature: Keep your thermostat at a steady temperature during the day and night.
- Lower the temperature at night: Reduce the thermostat setting by 5-10 degrees while you sleep.
- Adjust for vacations: Set the thermostat to a lower temperature when you leave for long periods.
| Time of Day | Recommended Temperature |
|---|---|
| Daytime | 68-72°F (20-22°C) |
| Nighttime | 60-67°F (15-19°C) |
| Vacations | 55°F (13°C) |
Complementary Practices For Efficiency
Besides optimizing your thermostat settings, you can adopt other practices to enhance energy efficiency. These include:
- Seal windows and doors: Ensure windows and doors are properly sealed to prevent heat loss.
- Use heavy curtains: Heavy curtains can help insulate your home and keep heat in.
- Install ceiling fans: Ceiling fans can help distribute heat more evenly throughout your home.
- Insulate your home: Proper insulation can significantly reduce energy costs.
Following these tips will help you save energy and reduce your utility bills. Even with a non-programmable thermostat, you can achieve significant energy savings.

Credit: www.amazon.com
Frequently Asked Questions
Can You Use A Non-programmable Thermostat?
Yes, you can use a non-programmable thermostat. It offers basic temperature control without advanced scheduling features. Suitable for those preferring simplicity.
How To Install A Manual Thermostat?
Turn off power. Remove old thermostat. Mount the new thermostat base. Connect wires to corresponding terminals. Attach cover and restore power.
Can I Install A Thermostat Myself?
Yes, you can install a thermostat yourself. Follow the manufacturer’s instructions carefully. Ensure the power is off before starting. If unsure, consult a professional.
How Do You Replace A Non-programmable Thermostat?
Turn off power to the HVAC system. Remove the old thermostat. Disconnect and label wires. Mount the new thermostat. Connect wires to the new unit. Turn the power back on.
Conclusion
Installing a non-programmable thermostat is a straightforward task. Follow the steps carefully to ensure proper setup. A correctly installed thermostat improves energy efficiency and comfort. Regular maintenance will keep it functioning optimally. Enjoy the benefits of a reliable and efficient heating and cooling system in your home.
Check Best Thermostat Pricing in Amazon
** As an Amazon Associate, I earn from qualifying purchases.