
Check Best Thermostat Pricing in Amazon
** As an Amazon Associate, I earn from qualifying purchases.
Installing a heat pump thermostat can seem tricky. But with the right steps, it’s manageable.
A heat pump thermostat helps control your home’s temperature. It ensures energy efficiency and comfort. Whether you’re replacing an old thermostat or installing a new one, understanding the process is essential. This guide will walk you through each step. You’ll learn how to install your heat pump thermostat safely and correctly.
By the end, you’ll feel confident in your ability to complete the task. Let’s dive in and make your home more comfortable and efficient.
- Introduction To Heat Pump Thermostats
- Tools And Materials Needed
- Safety Precautions
- Removing The Old Thermostat
- Mounting The New Thermostat
- Connecting The Wires
- Configuring The Thermostat Settings
- Testing The Installation
- Troubleshooting Common Issues
- Maintaining Your Heat Pump Thermostat
- Frequently Asked Questions
- Conclusion
Introduction To Heat Pump Thermostats
Installing a heat pump thermostat is a great way to enhance the efficiency of your heating and cooling system. These devices are designed to optimize how your heat pump operates, ensuring you get the most out of your investment. Whether you’re a seasoned DIYer or just starting out, understanding the basics of heat pump thermostats is essential. Let’s dive into what they are and why you might want to install one.
What Is A Heat Pump Thermostat?
A heat pump thermostat is a device specifically designed to control the operation of a heat pump system. Unlike regular thermostats, heat pump thermostats manage both heating and cooling, making them versatile and efficient. They typically feature advanced settings to optimize energy use and maintain comfort levels in your home.
Heat pump thermostats come with various features. Some models offer programmable settings, allowing you to set different temperatures for different times of the day. Others include smart technology, enabling remote control via smartphone apps. This means you can adjust your home’s temperature even when you’re not there.
Benefits Of Installing A Heat Pump Thermostat
There are several benefits to installing a heat pump thermostat. First and foremost, it can help you save on energy bills. By efficiently managing your heat pump’s operation, these thermostats reduce the amount of energy needed to maintain your desired temperature.
Another significant advantage is enhanced comfort. Heat pump thermostats can maintain a more consistent temperature, eliminating the frequent on-and-off cycling that can lead to temperature fluctuations. This ensures your home stays comfortable all day long.
Finally, installing a heat pump thermostat can extend the lifespan of your heat pump. By reducing the frequency of cycles and optimizing performance, these thermostats can minimize wear and tear on your system. This means fewer repairs and a longer-lasting heat pump.
Have you ever found yourself constantly adjusting the thermostat to stay comfortable? With a heat pump thermostat, those days could be over. Why not give it a try and see the difference it can make in your home?
Tools And Materials Needed
Installing a heat pump thermostat requires some tools and materials. Having the right items ready will make the process smoother. This section will guide you through the essential tools and required materials for the installation.
Essential Tools
Before you start, gather these tools. They will help you complete the job efficiently:
- Screwdrivers (both flathead and Phillips)
- Wire stripper
- Needle-nose pliers
- Drill with bits
- Level
- Voltage tester
Using the correct tools ensures a safe and proper installation. Don’t skip this step.
Required Materials
You’ll also need several materials. These are essential for a successful installation:
- New heat pump thermostat
- Mounting screws
- Wall anchors
- Thermostat wiring diagram
- Batteries (if required by the thermostat)
Make sure all materials are in good condition. This will help avoid issues later.
Safety Precautions
Installing a heat pump thermostat involves working with electrical components. Safety is crucial. Follow these safety precautions to avoid accidents and ensure a smooth installation process.
Turn Off Power
Before starting, turn off the power. This prevents electric shock. Locate your home’s circuit breaker. Switch off the breaker connected to the thermostat. Double-check with a voltage tester. Ensure no power is flowing.
Read Manufacturer’s Instructions
Always read the manufacturer’s instructions. Each thermostat model may have different steps. Instructions provide specific guidance. Follow them closely. This ensures proper installation and functionality. Keep the manual handy during the process.
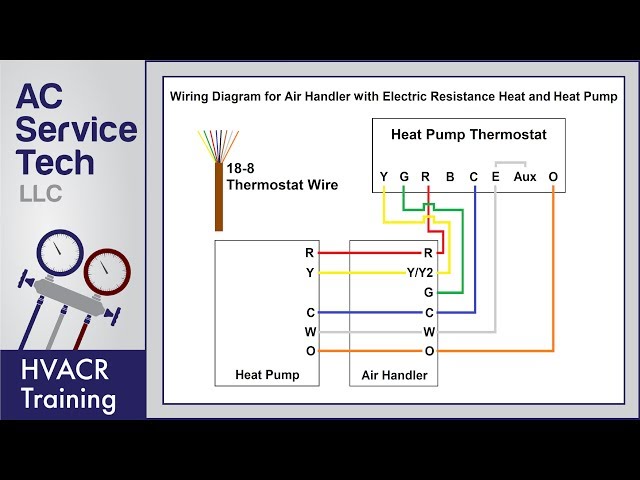
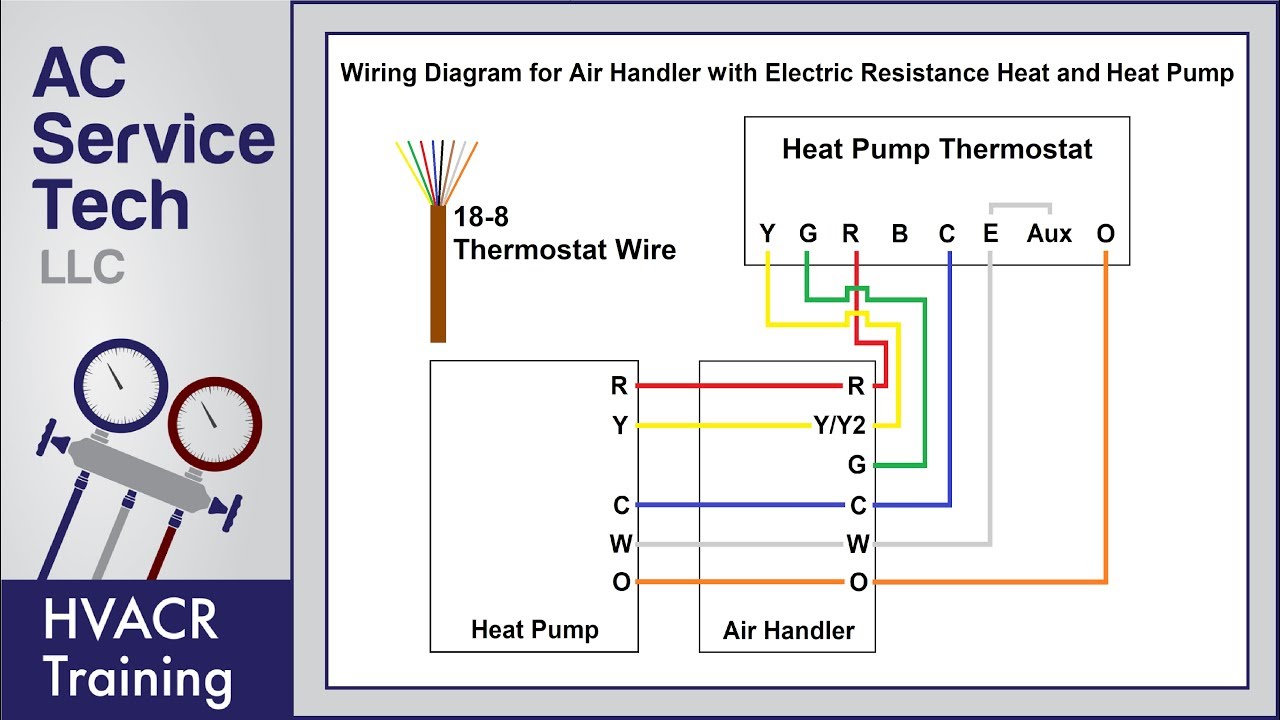
Credit: www.youtube.com
Removing The Old Thermostat
Before you can install a new heat pump thermostat, you must remove the old one. This process may seem daunting, but it is straightforward with the right steps. Follow these simple instructions to ensure a smooth transition to your new thermostat.
Power Down The System
First, turn off your HVAC system’s power. This step is crucial for safety. Find the circuit breaker and switch off the appropriate breaker. This will prevent any electrical mishaps. Double-check by trying to turn on the HVAC system.
Disconnect Wires
Next, remove the thermostat cover to expose the wires. Take a photo of the wiring setup. This will help when connecting the new thermostat. Carefully unscrew the wires from their terminals. Label each wire with tape to remember their positions. This will save time and avoid confusion later.
Mounting The New Thermostat
Mount the new thermostat by connecting the wires to the appropriate terminals. Ensure the device is securely attached to the wall. Follow the manufacturer’s instructions to complete the installation.
Mounting the New Thermostat Installing a new heat pump thermostat can seem daunting, but it’s easier than you think. Mounting the new thermostat is a crucial step that needs careful attention. Let’s break it down into simple steps to ensure you get it right.Positioning The Thermostat
First, consider the location where you’ll position your new thermostat. It should be in a central location, away from direct sunlight, drafts, and other heat sources. This helps maintain an accurate temperature reading. Mount the thermostat at about 5 feet above the floor. This is typically the best height for sensing the average room temperature. Also, avoid placing it near windows or exterior doors to prevent inaccurate readings.Securing The Base Plate
After you’ve chosen the ideal spot, it’s time to secure the base plate. Remove the front panel of the thermostat to expose the base plate. Align the base plate with the mounting holes on the wall. Use a level to ensure it’s straight. Secure the base plate to the wall using screws and wall anchors provided in the thermostat kit. Tighten the screws just enough to hold it firmly without over-tightening. Once the base plate is secure, you can connect the wires to the terminals according to the manufacturer’s instructions. Make sure each wire is connected to the correct terminal to avoid any issues later. Mounting the new thermostat correctly ensures it works efficiently and accurately. Have you ever faced challenges while installing a thermostat? Share your experience in the comments!Connecting The Wires
Learn how to install a heat pump thermostat by connecting the wires correctly. Follow simple steps to ensure efficient operation.
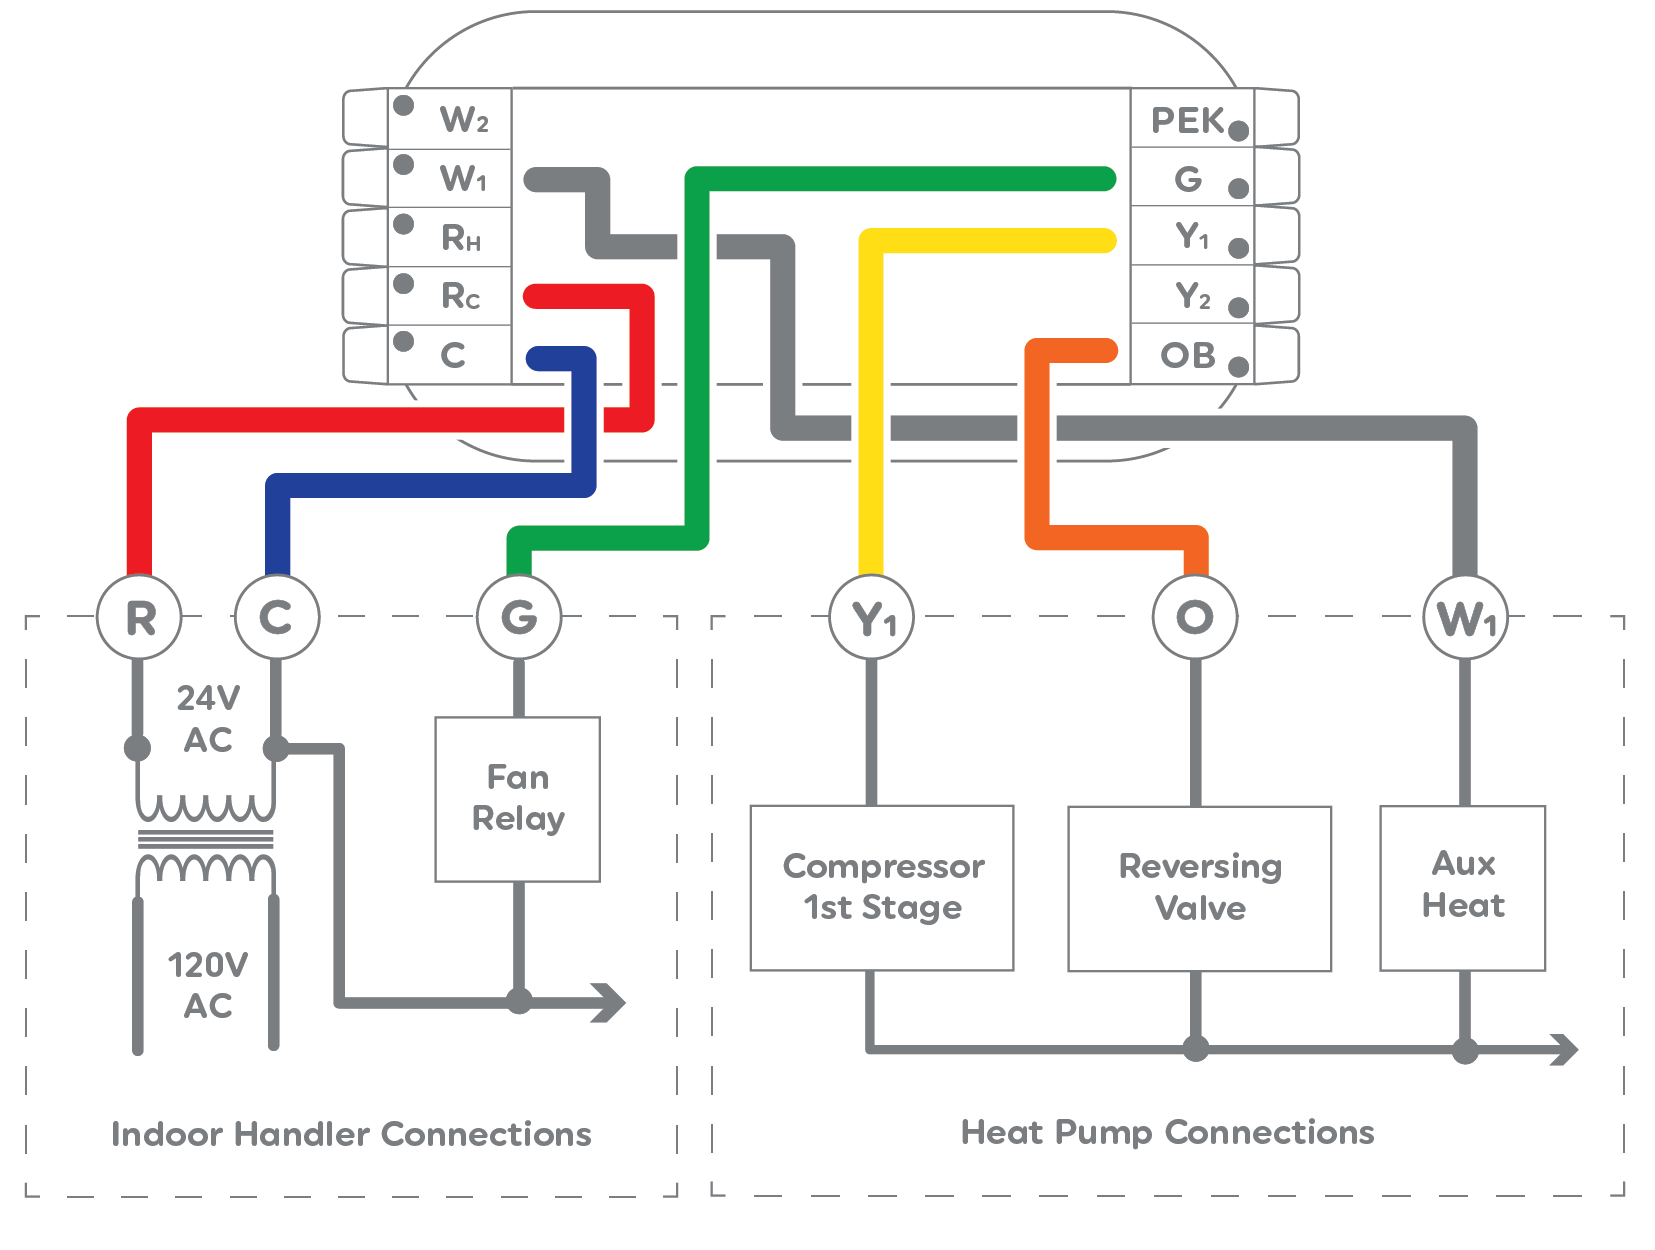
Connecting the wires is a crucial step in installing a heat pump thermostat. Properly connecting the wires ensures the system works efficiently and safely. This section will guide you through identifying and attaching the wires to terminals. Let’s get started.Identifying The Wires
First, you need to identify the wires from your old thermostat. Usually, each wire is labeled with a specific letter. These letters correspond to the terminals on your new thermostat. Common labels include R for power, Y for cooling, W for heating, G for the fan, and C for common. Check your heat pump’s manual to confirm wire labels. Use a small piece of tape to label each wire as you disconnect it. This will help you remember where each wire goes. If the wires are not labeled, take a picture of the old thermostat’s wiring. This visual reference can be very helpful.Attaching The Wires To Terminals
After identifying the wires, you can begin attaching them to the new thermostat. Match each wire to its corresponding terminal. For example, attach the R wire to the R terminal, the Y wire to the Y terminal, and so on. Ensure each wire is securely attached to its terminal. Loose connections can cause your system to malfunction. If your heat pump thermostat has a C-wire terminal, connect the C wire. This wire provides continuous power to your thermostat. If you do not have a C wire, you might need an adapter or a battery-powered thermostat. Once all wires are attached, double-check your connections. Make sure each wire is in the correct terminal. This step is crucial for the safe and efficient operation of your heat pump thermostat.Configuring The Thermostat Settings
Configuring the thermostat settings is a crucial step in ensuring your heat pump operates efficiently. This process can seem daunting, but with the right guidance, you can set up your thermostat to suit your comfort needs perfectly. Let’s break it down into manageable steps.
Setting The Mode
The first step in configuring your thermostat is setting the mode. Typically, thermostats have modes like heat, cool, and auto. The heat mode activates the heat pump to warm your home, while the cool mode triggers the cooling function.
Auto mode is convenient as it automatically switches between heating and cooling to maintain your desired temperature. To set the mode, simply press the mode button on your thermostat until you reach your preferred setting. It’s that simple!
Adjusting The Temperature Settings
Once you have set the mode, it’s time to adjust the temperature settings. This step is straightforward. Use the up and down arrows on your thermostat to set your desired temperature. For instance, if you want your room to be a cozy 72 degrees Fahrenheit, adjust the thermostat until it displays that number.
Remember, setting the right temperature can save energy and reduce your utility bills. Aim for comfortable yet energy-efficient temperatures. Did you know that lowering your thermostat by just one degree can save you up to 3% on your heating bill? Amazing, right?
Have you ever wondered if your thermostat is set correctly? Take a moment to reflect on your comfort levels and adjust accordingly. You might be surprised at how a minor tweak can enhance your home’s comfort.
By following these simple steps, you can ensure your heat pump thermostat is configured correctly, providing you with a comfortable living environment. Enjoy the perfect balance of warmth and efficiency in your home!
Credit: www.youtube.com
Check Best Thermostat Pricing in Amazon
** As an Amazon Associate, I earn from qualifying purchases.
Testing The Installation
After installing your new heat pump thermostat, it’s crucial to test the installation to ensure everything works correctly. This step can save you from potential issues down the road. It’s also a good chance to familiarize yourself with the thermostat’s functions.
Turning The Power Back On
First things first—restore power to your heating and cooling system. Go to your electrical panel and flip the circuit breaker back on. If you have a switch near the unit, make sure it’s turned on as well.
Listen for any unusual sounds once the power is back. A silent system is usually a good sign. If you hear any strange noises, you might need to double-check your wiring.
Verifying The System Functions
Now, it’s time to test the thermostat itself. Set it to both heating and cooling modes to see if it responds correctly. Raise the temperature to test the heating and lower it for cooling.
Pay attention to how the system reacts. It should kick on almost immediately. If there’s a delay, check the thermostat settings and wiring.
Feel the air coming out of the vents. Is it warm when it should be, and cool when expected? This simple check ensures that your installation is correct and the heat pump is functioning as it should.
Don’t forget to test any additional features. If your thermostat has a programmable function, set a schedule and see if it follows it. This is a great way to ensure everything is working as intended.
Have you ever done a DIY project only to find a small oversight during testing? Catching issues early can save you a lot of hassle. Be thorough in your checks to ensure your system runs smoothly.
Troubleshooting Common Issues
Once you’ve installed your heat pump thermostat, it’s not uncommon to run into a few hiccups along the way. Troubleshooting common issues can save you time and stress. Let’s dive into some typical problems and how to fix them.
Thermostat Not Responding
Is your thermostat completely unresponsive? Start by checking the power source. Ensure the thermostat is connected to a working power supply.
If the power is fine, the next step is to reset the thermostat. Many models have a small reset button or require you to turn off the power at the circuit breaker for a few minutes.
Still no luck? It might be a wiring issue. Double-check the connections to make sure everything is secure. Loose wires can cause the thermostat to malfunction.
Inaccurate Temperature Readings
Are the temperature readings off? First, make sure the thermostat is installed in the right location. It should be away from direct sunlight, drafts, and other heat sources.
Another common cause is dirt or dust inside the thermostat. Gently clean the interior with a soft brush or cloth. This can improve accuracy.
If cleaning doesn’t help, you may need to recalibrate the thermostat. Refer to the manual for specific instructions on how to adjust the settings.
Have you ever encountered these issues? How did you handle them? Feel free to share your experiences in the comments. Your insights could help others in the same boat.

Credit: forums.wyze.com
Maintaining Your Heat Pump Thermostat
Maintaining your heat pump thermostat is crucial for ensuring that your HVAC system runs efficiently. It can save you money on energy bills and help you avoid unexpected breakdowns. Let’s dive into some easy maintenance tips to keep your thermostat in top shape.
Regular Cleaning
Dust and grime can accumulate on your thermostat over time. This can interfere with its sensors and buttons. A gentle wipe with a soft cloth can do wonders.
Every few months, make it a habit to clean your thermostat. Use a slightly damp cloth to avoid damaging the electronic components. Avoid using harsh chemicals that could corrode the surface.
Have you ever noticed your thermostat acting up? Sometimes, a simple cleaning can fix minor issues. Think of it as giving your thermostat a little TLC.
Software Updates
Did you know your thermostat might need software updates? These updates can improve performance and add new features. Check your thermostat’s manual or manufacturer’s website for update instructions.
Many modern thermostats have Wi-Fi capabilities. This makes it easy to update software directly from the device. Make sure your thermostat is connected to your home network to receive updates.
Keeping your thermostat software up-to-date ensures it runs smoothly. It’s like updating your smartphone—new features and better security. Don’t miss out on improvements that can make your life easier.
Have you ever thought about how often you maintain your thermostat? Regular cleaning and software updates can make a big difference. What other steps do you take to keep your home comfortable?
Frequently Asked Questions
Does A Heat Pump Need A Special Thermostat?
Yes, a heat pump requires a special thermostat. Choose one designed specifically for heat pumps to ensure efficient operation.
How Many Wires For Heat Pump Thermostat?
A heat pump thermostat typically requires 8 wires. These include R, C, Y, G, O/B, W, and two additional wires for auxiliary and emergency heat.
How To Set A Thermostat For A Heat Pump?
Set the thermostat to “Heat” mode. Adjust the temperature to your desired level. Ensure the fan setting is “Auto. “
Where Is The Best Place To Put A Heat Pump Thermostat?
Place the heat pump thermostat in a central location, away from direct sunlight and drafts. Ideally, mount it on an interior wall. Ensure it is at eye level for easy access. Avoid placing it near kitchens, windows, or doors for accurate readings.
Conclusion
Installing a heat pump thermostat doesn’t have to be difficult. Follow the steps carefully. Make sure to turn off the power first. Match the wires correctly to the new thermostat. Attach everything securely. Test the system once connected. If issues arise, consult the manual or call a professional.
This guide helps you get the job done easily. Enjoy better control over your home’s temperature. Stay comfortable and energy efficient with your new thermostat.
Check Best Thermostat Pricing in Amazon
** As an Amazon Associate, I earn from qualifying purchases.