
Check Best Thermostat Pricing in Amazon
** As an Amazon Associate, I earn from qualifying purchases.
Installing an Ecobee thermostat is simple and can save you money. It helps you control the temperature in your home efficiently.
In this guide, you will learn how to install an Ecobee thermostat step by step. Whether you are new to smart home devices or have some experience, this process is straightforward. A smart thermostat can make a big difference in your home’s comfort and energy use.
With clear instructions, you will soon enjoy the benefits of better temperature control. Let’s get started on making your home smarter and more efficient.
Tools And Materials Needed
Installing an Ecobee thermostat can be a straightforward task. Having the right tools and materials is crucial. This guide will help you gather everything you need. Follow these steps to ensure a smooth installation process.
Essential Tools
Before you begin, gather these essential tools. They will make the installation easier and quicker.
- Phillips Head Screwdriver
- Drill with Bits
- Level
- Wire Stripper
- Needle-Nose Pliers
These tools will help you handle screws, drill holes, and adjust wires. Use the level to ensure your thermostat is straight.
Required Materials
Next, collect the required materials. These will support the installation process.
- Ecobee Thermostat
- Mounting Plate
- Wall Anchors
- Wire Labels
- Power Extender Kit (if needed)
The Ecobee thermostat kit includes most of these materials. The Power Extender Kit is necessary for systems without a C-wire. Use wire labels to identify each wire correctly.
Preparation
Before installing your Ecobee Thermostat, preparation is key. Taking the right steps can ensure a smooth installation process. In this section, we’ll guide you through the initial steps.
Turn Off Power
First, turn off the power to your HVAC system. This step is crucial for safety. Locate your circuit breaker. Flip the switch for your HVAC system to the “off” position. Confirm the power is off by attempting to turn on your heating or cooling system. If it does not activate, you are ready to proceed.
Remove Old Thermostat
Next, remove the old thermostat. Begin by taking off the thermostat cover. Most covers simply snap off. Once the cover is off, you will see the wiring. Note the wire connections or take a picture. This will help during the installation of the Ecobee Thermostat. Carefully disconnect the wires. Unscrew the mounting plate and remove the old thermostat from the wall.
Mounting The Ecobee Thermostat
Mounting your Ecobee Thermostat is an essential step in making your home smarter and more energy-efficient. This process can seem daunting, but with a few clear steps, you’ll be on your way to a more comfortable home. Let’s break down the main tasks involved in mounting your Ecobee Thermostat.
Install The Backplate
The backplate is the foundation for your Ecobee Thermostat. Start by finding a central location on your wall where the thermostat can easily read the temperature of the room.
Once you have chosen the spot, use a level to ensure the backplate is straight. Mark the screw holes with a pencil.
Drill pilot holes at the marked spots. If you’re drilling into drywall, use the provided drywall anchors. Secure the backplate to the wall with the screws.
Attach The Base
After the backplate is securely in place, it’s time to attach the base of your Ecobee Thermostat. Align the base with the backplate and snap it into position.
Make sure all the wires are properly connected to the terminals on the base. Refer to the wiring diagram that came with your thermostat for specific instructions.
Once the base is attached and the wires are connected, you can mount the thermostat unit onto the base. It should click into place easily.
Have you ever installed a thermostat before? Did you find any steps particularly challenging? Share your experiences and tips in the comments below!

Credit: www.stevejenkins.com
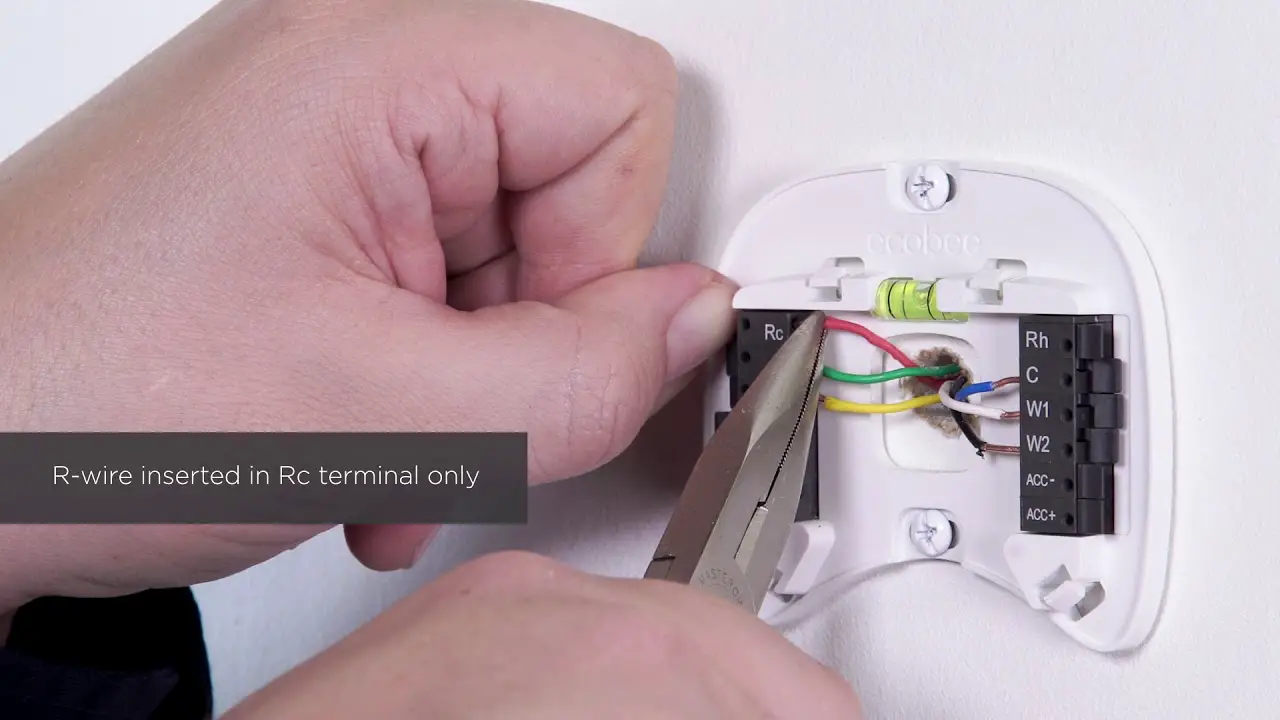
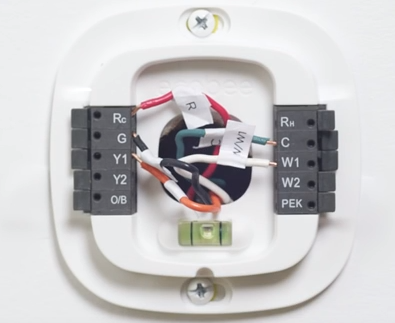
Wiring The Thermostat
Once you have mounted your Ecobee thermostat, the next step is wiring it. Correct wiring ensures your thermostat functions properly. Let’s break it down into two main steps.
Identify Wires
First, turn off the power to your HVAC system. This is crucial for safety. Remove the old thermostat cover. You will see several wires of different colors. Each wire controls a different function. Typically, they are labeled R, G, Y, W, and C. Take a photo of the existing setup. This will serve as a reference.
If the wires are not labeled, use small labels to mark them. Match the colors to their functions. For example, the red wire usually connects to the R terminal. If there is a blue or black wire, it’s often the C wire. This wire provides a continuous flow of power.
Connect Wires To Terminals
Now it’s time to connect the wires to the Ecobee base. Gently insert each wire into the matching terminal. Ensure the wires are snug and secure. The R wire goes to the Rc terminal. The G wire connects to the G terminal. The Y wire should go to the Y terminal. The W wire fits into the W terminal. Lastly, connect the C wire to the C terminal.
Double-check your connections. Make sure no wires are loose. If all looks good, you can attach the Ecobee display to the base. Turn the power back on. Your Ecobee should light up. Follow the prompts on the screen to complete the setup.
Setting Up The Thermostat
After mounting your Ecobee thermostat, you need to set it up. This process involves powering on the system and following the on-screen instructions. Setting up the thermostat is straightforward and user-friendly.
Power On The System
First, ensure the thermostat is correctly connected to your HVAC system. Then, restore power to the system at the circuit breaker. The Ecobee thermostat should light up. If the screen remains blank, check the wiring connections.
Follow On-screen Instructions
Once powered, the thermostat will guide you through the setup. Follow the prompts on the screen. Select your language and connect to your Wi-Fi network. Enter your network password carefully.
The thermostat will then update its software. This might take a few minutes. After the update, you will be asked to register your device. Create an Ecobee account or log in if you already have one.
Next, configure your HVAC system settings. The on-screen instructions will help you identify your system type. This is crucial for the correct operation of the thermostat.
Finally, set your desired temperature preferences. You can schedule heating and cooling periods. This ensures your home stays comfortable while optimizing energy use.
Credit: support.ecobee.com
Connecting To Wi-fi
Connecting your Ecobee Thermostat to Wi-Fi is a vital step to ensure you can control your home’s climate from anywhere. This step-by-step guide will help you breeze through the process. Let’s get started!
Check Best Thermostat Pricing in Amazon
** As an Amazon Associate, I earn from qualifying purchases.
Choose Your Network
On the thermostat screen, tap the menu icon. Select “Settings” and then “Wi-Fi.” A list of available networks will appear.
Take a moment to find your home network from the list. Ensure your router is powered on and broadcasting. If you don’t see your network, tap “Scan Again.”
Once you spot your network, tap on it to proceed to the next step. This part is crucial to establish a stable connection.
Enter Wi-fi Password
After selecting your network, you’ll be prompted to enter your Wi-Fi password. Use the on-screen keyboard to type in the password carefully.
Double-check the password for any typos. Remember, Wi-Fi passwords are case-sensitive, so ensure you have the correct capitalization.
Tap “Connect” once you’ve entered the password. The thermostat will attempt to connect to your Wi-Fi network. This may take a few moments.
If the connection is successful, you’ll see a confirmation message. Congratulations, your Ecobee Thermostat is now online!
If the connection fails, don’t worry. Double-check your password and try again. Sometimes, restarting your router can help resolve connectivity issues.
Having trouble? Think back to a time you solved a tech problem by trying different approaches. Use that same persistence here.
Connecting to Wi-Fi enhances your thermostat’s functionality, allowing remote access and smart home integrations. How will you use this newfound convenience to improve your daily routine?
Configuring Settings
Once you’ve installed your Ecobee thermostat, the next step is configuring its settings. This ensures your home remains comfortable and energy-efficient. Proper configuration tailors the thermostat to your unique needs.
Set Temperature Preferences
Begin by setting your desired temperature preferences. Access the main menu on the Ecobee screen. Choose “Settings” and then “Preferences.” Here, you can set your preferred temperatures for different times of the day. For instance, set a higher temperature during the day and a lower one at night. This helps save energy while ensuring comfort.
Integrate With Smart Home
Ecobee thermostats can integrate with various smart home systems. This integration allows for better control and convenience. Navigate to the “Integrations” section in the settings menu. Select the smart home system you use, such as Alexa, Google Home, or Apple HomeKit. Follow the on-screen instructions to complete the integration.
Once integrated, you can use voice commands to control your thermostat. This adds an extra layer of convenience to your daily routine. Simply say, “Alexa, set the temperature to 72 degrees,” and your Ecobee will adjust accordingly.
Troubleshooting Common Issues
Having trouble with your Ecobee thermostat? You’re not alone. Even the most tech-savvy users can face a few bumps along the way. Let’s dive into some common issues and how to troubleshoot them. This guide will help you get your thermostat working smoothly.
Connection Problems
Experiencing connectivity issues can be frustrating. First, check your Wi-Fi signal. Ensure your router is close to the thermostat.
Weak signals can disrupt the connection. Consider moving the router or using a Wi-Fi extender.
Another common issue is incorrect Wi-Fi credentials. Double-check your network name and password.
If all else fails, try rebooting your thermostat and router. Sometimes, a simple restart can solve the problem.
Temperature Inconsistencies
Is your home feeling too hot or too cold? Start by checking the placement of your thermostat. It should be in a central location, away from direct sunlight and vents.
Improper placement can cause temperature readings to be inaccurate. Also, ensure your sensors are working correctly.
If you have multiple sensors, they should be placed in different rooms for balanced readings. Regularly clean your thermostat and sensors to avoid dust build-up, which can affect performance.
If problems persist, recalibrate your thermostat. This can usually be done via the settings menu.
Remember, a well-functioning thermostat ensures a comfortable home. What other issues have you faced with your Ecobee thermostat? Share your experiences in the comments below!
Credit: www.reddit.com
Frequently Asked Questions
Can I Install The Ecobee Thermostat Myself?
Yes, you can install the ecobee thermostat yourself. Follow the step-by-step instructions provided in the manual. It usually takes about 45 minutes. No professional help is required.
What Wires Are Needed For An Ecobee Thermostat?
You need a C-wire, R-wire, G-wire, Y-wire, and W-wire for an ecobee thermostat. Ensure compatibility with your HVAC system.
Is Installing Ecobee Hard?
Installing an ecobee is straightforward. Follow the step-by-step instructions provided. Most users complete it within an hour.
Do You Need An Electrician To Install An Ecobee?
No, you don’t need an electrician to install an ecobee. Most homeowners can install it themselves with ease.
Conclusion
Installing an Ecobee thermostat is a smart choice for your home. It helps save energy and money. Follow the steps carefully for a smooth installation. Ensure all connections are secure. Test your thermostat to confirm it works properly. Enjoy the comfort and convenience of smart climate control.
Now, your home is more efficient and eco-friendly. Share your experience with friends and family. Happy installing!
Check Best Thermostat Pricing in Amazon
** As an Amazon Associate, I earn from qualifying purchases.