
Check Best Thermostat Pricing in Amazon
** As an Amazon Associate, I earn from qualifying purchases.
Ready to make your home smarter and save on energy bills? Installing the Ecobee Smart Thermostat Premium is easier than you think.
This guide will walk you through every step, so you can enjoy precise temperature control and voice commands in no time. Whether you’re a tech newbie or just want a hassle-free setup, you’ll find simple tips and clear instructions here.
Keep reading to discover how to transform your home’s comfort with your new Ecobee thermostat.
Preparing For Installation
Preparing for the installation of your Ecobee Smart Thermostat Premium is the first step. This ensures a smooth process and avoids common problems. Proper preparation saves time and effort. It helps you feel confident about the setup. Follow the simple steps below to get ready.
Check Compatibility
Make sure your heating and cooling system works with Ecobee. Check the compatibility guide in the manual or on the Ecobee website. Look at your current thermostat wiring and compare it with Ecobee’s requirements. Confirm your system supports common wires like C-wire or use an included power extender kit. This step avoids installation errors and protects your system.
Gather Necessary Tools
Collect all tools before you start. You will need a screwdriver, drill, level, and wire strippers. Have a pencil ready to mark the wall. Keep the Ecobee package nearby with the screws and mounting plate. Having tools on hand helps you work faster and avoid interruptions.
Turn Off Power
Safety is key during installation. Turn off power at the circuit breaker for your HVAC system. Confirm the power is off by testing the current thermostat. This prevents electric shock and protects your equipment. Never skip this step. It keeps you safe and your system secure.
Credit: support.ecobee.com
Removing Old Thermostat
Removing your old thermostat is the first step to install the Ecobee Smart Thermostat Premium. This task prepares your wall for the new device. Taking care during removal helps avoid damage and confusion later. Follow these simple steps to remove your old thermostat safely.
Detach Faceplate
Start by gently pulling the faceplate off the thermostat. Most models snap off easily. Avoid pulling wires or forcing the plate. Set the faceplate aside in a safe place to prevent damage.
Label Wires
Look at the wires connected to the thermostat. Use small labels or tape to mark each wire. Labeling keeps track of where each wire goes. This step is important for connecting wires correctly to the new thermostat.
Remove Mounting Plate
Next, unscrew the mounting plate from the wall. Use a screwdriver to remove all screws. Carefully take the plate down with the wires still attached. Keep the screws for the new thermostat installation.
Wiring The Ecobee Thermostat
Wiring the Ecobee Smart Thermostat Premium is a crucial step. It ensures your thermostat connects well with your HVAC system. Proper wiring helps the thermostat work efficiently and saves energy. Follow clear steps to wire safely and correctly.
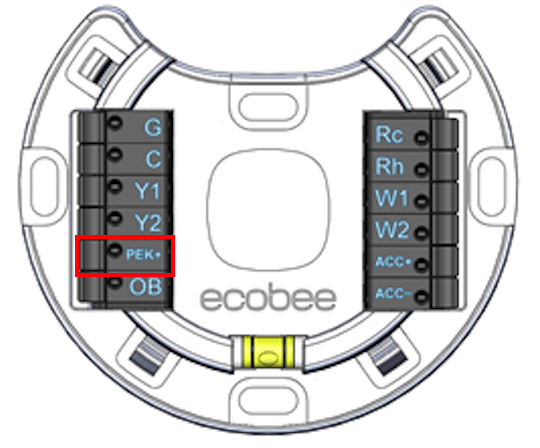
Identify Wire Connections
Start by turning off power to your HVAC system. Remove the old thermostat cover carefully. Look at the wires connected to the terminals. Each wire has a letter label like R, C, W, Y, or G. These letters show what each wire controls. Write down or take a photo of these connections. This record helps match wires to the Ecobee terminals.
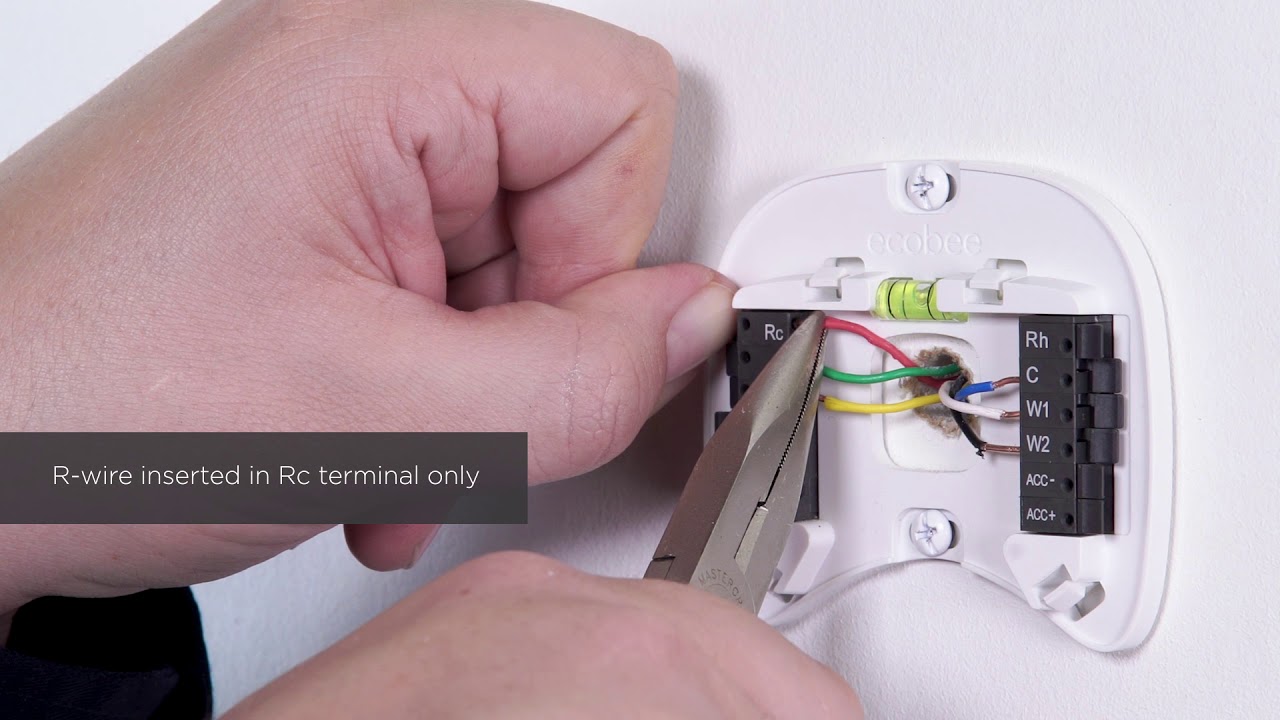
Connect Wires To Ecobee
Check the Ecobee base for terminal labels. Match each wire from your HVAC system to the correct terminal. Insert the wire into the Ecobee terminal and push the tab to secure it. Use the C wire for constant power if available. This wire keeps the Ecobee powered without batteries. Double-check all wires fit snugly in their slots.
Secure Wiring
After connecting wires, tuck them neatly into the wall box. Avoid pinching or bending wires sharply. Attach the Ecobee base firmly to the wall using screws. Ensure the base is level and stable. Reattach the thermostat display to the base by snapping it into place. Turn the power back on to test the connection.

Credit: www.techhive.com
Mounting The Thermostat
Mounting the Ecobee Smart Thermostat Premium correctly is key to its performance. This step ensures the device stays secure and works well. Follow the steps carefully for a smooth setup.
Attach Mounting Plate
Start by holding the mounting plate on the wall. Use a level to keep it straight. Mark holes for screws with a pencil. Drill holes at the marks. Insert wall anchors if needed. Screw the mounting plate firmly into place.
Mount Thermostat Unit
Align the thermostat unit with the mounting plate. Gently press the unit until it clicks. Check that it fits tightly and does not wobble. The screen should face outward for easy use. Your thermostat is now ready for setup.
Powering On And Setup
Powering on and setting up your Ecobee Smart Thermostat Premium starts the journey to a smarter home. This stage is simple but important. Follow each step carefully to ensure smooth installation and operation.
Check Best Thermostat Pricing in Amazon
** As an Amazon Associate, I earn from qualifying purchases.
Restore Power
After installing the thermostat, restore power to your HVAC system. Turn on the circuit breaker or switch to provide electricity. The Ecobee screen will light up, showing it is ready for setup.
Follow Onscreen Instructions
The thermostat guides you through the setup process with clear instructions. Use the touchscreen to select your language and preferences. Input basic information about your home and heating system as prompted.
Connect To Wi-fi
Connecting to Wi-Fi allows your thermostat to work with the app and receive updates. Select your home Wi-Fi network from the list. Enter your password carefully. Once connected, the thermostat confirms the connection and syncs with your account.
Configuring Advanced Settings
Configuring advanced settings on your Ecobee Smart Thermostat Premium lets you customize your home’s comfort. These settings help the thermostat learn your habits and adjust accordingly. It also improves energy efficiency and convenience.
Start by setting your temperature preferences. This step ensures the thermostat matches your comfort needs. Then, enable smart features to enhance automation and energy savings. Finally, install remote sensors to monitor different rooms for better temperature control.
Set Temperature Preferences
Access the thermostat menu and find the temperature settings. Choose your preferred heating and cooling temperatures for different times. Set schedules for morning, day, evening, and night. This helps the thermostat keep your home comfortable all day. Use simple temperature ranges to avoid confusion.
Enable Smart Features
Turn on features like Smart Home/Away and Follow Me mode. Smart Home/Away adjusts settings based on your presence. Follow Me mode uses sensors to focus on occupied rooms. Enable alerts for filter changes and extreme temperatures. These options improve comfort and save energy without extra effort.
Install Remote Sensors
Place remote sensors in rooms where you want precise control. Sensors detect temperature and occupancy to help the thermostat adjust. Mount sensors on walls or shelves, away from direct sunlight. Connect sensors through the thermostat’s settings menu. This gives you a balanced temperature throughout your home.
Troubleshooting Tips
Troubleshooting your Ecobee Smart Thermostat Premium can save time and effort. Some issues appear during or after installation. Knowing how to fix these problems helps keep your home comfortable. Follow simple steps to get your thermostat working right.
Common Installation Issues
One common problem is the thermostat not powering on. Check if the C-wire is properly connected. Another issue is the thermostat not connecting to Wi-Fi. Confirm your network name and password are correct. Sometimes, the screen stays blank after installation. Make sure the power is turned on at the breaker. Incorrect wiring can also cause the system to misbehave. Double-check the wiring against the installation guide.
Resetting The Thermostat
Resetting the thermostat can fix many glitches. To reset, go to the main menu and select Settings. Find the Reset option and choose “Reset All Settings.” This will erase all your preferences but may solve connectivity or software problems. After resetting, follow the setup instructions again. This step often restores normal function quickly.
When To Call Support
Call Ecobee support if problems persist after troubleshooting. If the thermostat still won’t power on, professional help is needed. Issues with HVAC compatibility also require expert advice. Support can guide you through complex wiring or software updates. Don’t hesitate to reach out to avoid damage or prolonged discomfort.
Credit: www.youtube.com
Frequently Asked Questions
How Do I Prepare For Ecobee Smart Thermostat Installation?
Turn off your HVAC system power first. Gather tools like a screwdriver and drill. Review the installation guide carefully before starting.
Can I Install Ecobee Smart Thermostat Myself?
Yes, the Ecobee installation is designed for DIY users. Follow the step-by-step instructions and wiring diagrams for safe setup. If unsure, consult a professional.
What Wiring Is Needed For Ecobee Smart Thermostat?
Ecobee requires a C-wire for continuous power. It also connects to heating, cooling, and fan wires. Check compatibility with your current system before installation.
How To Connect Ecobee To Wi-fi After Installation?
After wiring and powering on, follow on-screen prompts to connect to your Wi-Fi. Ensure your network is stable for smooth thermostat operation.
Conclusion
Installing the Ecobee Smart Thermostat Premium is simple and quick. Follow each step carefully for the best results. You can control your home temperature with ease after setup. Save energy and stay comfortable every day. Enjoy the benefits of smart home technology now.
Keep your instructions handy for future reference. This guide helps you feel confident with your new device. Start enjoying smarter heating and cooling today.
Check Best Thermostat Pricing in Amazon
** As an Amazon Associate, I earn from qualifying purchases.