
Check Best Thermostat Pricing in Amazon
** As an Amazon Associate, I earn from qualifying purchases.
Installing an Ecobee thermostat is easier than you might think. In just a few steps, you can upgrade your home’s heating and cooling system.
Ecobee thermostats are known for their smart technology and energy-saving features. Installing one can help you manage your home’s temperature more efficiently. This guide will walk you through the installation process. Whether you’re a DIY enthusiast or new to home improvement, you’ll find the instructions straightforward.
With an Ecobee thermostat, you can enjoy a comfortable home while reducing energy costs. Let’s get started and make your home smarter.
Preparation
Before you dive into the installation process of your new Ecobee Thermostat, preparation is key. Taking the time to gather the necessary tools and understand the safety measures will save you a lot of hassle. Let’s ensure you have everything you need and are ready to start.
Tools Needed
First, gather all the tools you’ll need for the installation. This will streamline the process and prevent any unnecessary interruptions.
- Screwdriver: A standard Phillips head screwdriver is essential.
- Drill: Useful for mounting the thermostat on the wall.
- Level: Ensures your thermostat is perfectly straight.
- Wire Stripper: Necessary for preparing the wires.
- Smartphone or Tablet: For following the installation steps through the Ecobee app.
Having these tools on hand will make the installation smoother. Missing tools can delay your progress and add frustration.
Safety Measures
Safety should be your top priority when installing the Ecobee Thermostat. Here are some crucial safety measures to follow:
- Turn Off Power: Switch off the power to your HVAC system at the circuit breaker. This prevents any risk of electric shock.
- Check for Live Wires: Use a voltage tester to ensure there is no electricity running through the wires.
- Read the Manual: Familiarize yourself with the Ecobee’s installation guide. It contains important safety information.
Neglecting these safety measures can result in serious injury. It’s always better to be overly cautious.
Have you ever installed a thermostat before? What did you find challenging? Share your thoughts in the comments below. Your experiences can help others in the community.

Credit: www.stevejenkins.com
Choosing The Location
Choosing the right location for your Ecobee thermostat is crucial. A good spot ensures accurate temperature readings and efficient energy use. Let’s explore where to place your thermostat for the best results.
Optimal Placement
Your thermostat should be in a central location. This helps it read the temperature of the entire home. Choose an interior wall about five feet above the floor. This height is best for accurate readings. Avoid corners or enclosed spaces. Open areas work best.
Avoiding Problem Areas
Do not place the thermostat near windows or doors. These spots can cause inaccurate readings. Avoid placing it in direct sunlight. Sunlight can heat the thermostat and give false readings. Keep it away from vents and air ducts. Airflow from these sources can affect its performance.
Stay clear of kitchens and bathrooms. These rooms often have fluctuating temperatures. Electromagnetic interference is another concern. Keep the thermostat away from devices like microwaves and TVs. This ensures it functions properly.
Removing The Old Thermostat
Removing the old thermostat can seem daunting, but with a bit of patience and the right steps, you’ll have your new Ecobee thermostat up and running in no time. Whether you’re a seasoned DIY-er or just starting, this guide will simplify the process. Let’s break it down into manageable tasks.
Power Off
First things first, safety is crucial. Before you start tinkering with any wires, turn off the power to your HVAC system.
Head to your circuit breaker and locate the switch for your heating and cooling system. Flip it off. This ensures you won’t get a shock or damage any components.
Double-check that the power is off by trying to turn on the heating or cooling. If it doesn’t kick in, you’re good to go.
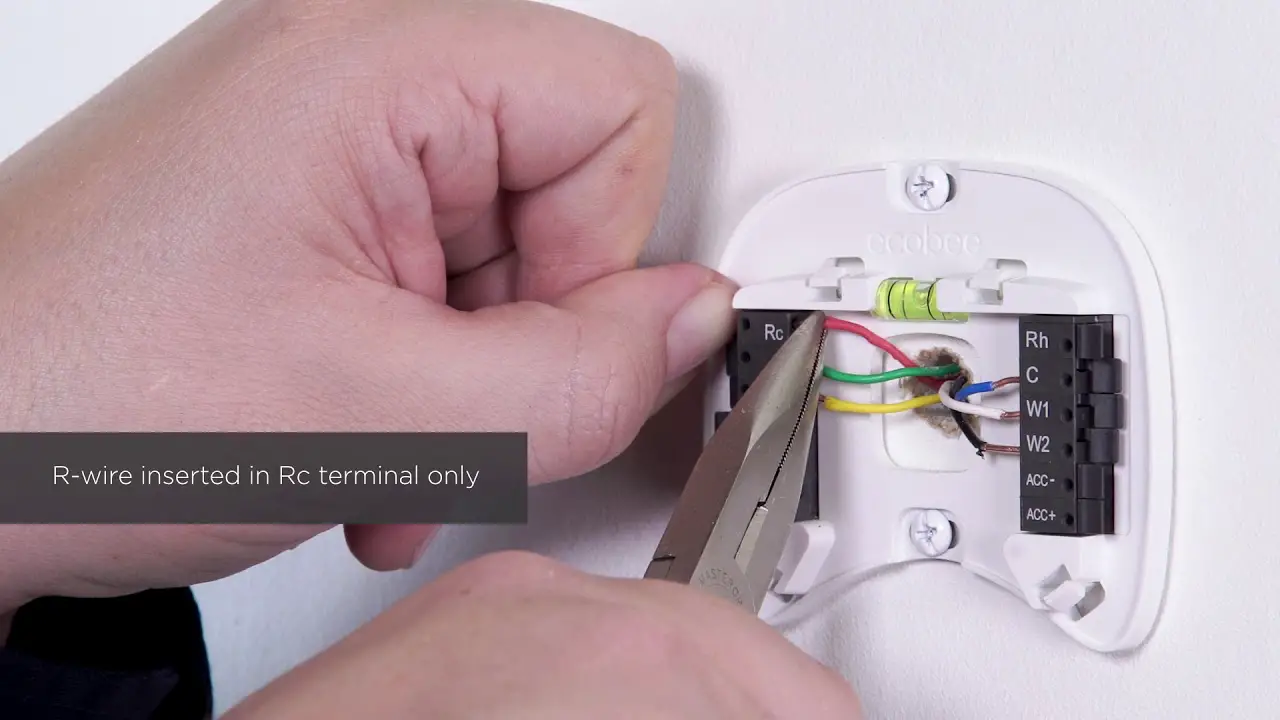
Disconnecting Wires
Next, it’s time to disconnect the wires from your old thermostat. Carefully remove the cover of the old thermostat to expose the wiring inside. You might need a screwdriver for this part.
Take a picture of the wiring setup. This will be your reference to make sure everything is connected correctly later. Trust me, this step saves a lot of headaches.
Label each wire with the provided stickers that come with your new Ecobee thermostat. If you don’t have stickers, use masking tape and a pen. Proper labeling helps you avoid confusion during installation.
Gently disconnect each wire from the old thermostat. Keep them straight and avoid bending them. If you have any questions, the Ecobee support website has great resources.
By following these steps, you’re well on your way to installing your Ecobee thermostat. Ready for the next step? How about sharing any challenges you’ve faced so far in the comments? Your experience could help someone else!
Installing The Ecobee Thermostat
Upgrading to an Ecobee thermostat can help you save energy and money. The installation process is simple and can be done in a few steps. Let’s get started!
Mounting The Base
First, turn off the power to your heating and cooling system. This is important for your safety. Next, remove the old thermostat. Keep the wires exposed and ready for the new installation.
Now, attach the Ecobee base to the wall. Use the provided screws and anchors. Make sure it is level. A level base ensures the thermostat works correctly.
Connecting Wires
Look at the wires you exposed earlier. Each wire should be labeled. Match each wire to the corresponding terminal on the Ecobee base. Push the wires into the terminals until they click.
Double-check that all wires are secure. Loose wires can cause the thermostat to malfunction. After all wires are connected, attach the thermostat faceplate to the base.
Check Best Thermostat Pricing in Amazon
** As an Amazon Associate, I earn from qualifying purchases.
Finally, turn the power back on. The Ecobee thermostat should light up. Follow the on-screen instructions to complete the setup. Enjoy your new smart thermostat!
Configuring The Thermostat
Installing an Ecobee thermostat involves mounting the device on the wall and connecting it to your HVAC system. Follow the step-by-step instructions to ensure proper configuration and energy savings. Enjoy a smarter, more efficient home with your new thermostat.
Configuring your Ecobee thermostat is the final step to ensure your home environment is comfortable and energy-efficient. It’s not just about setting the temperature; it’s about making sure your device is connected and ready to work with your home’s specific needs. Let’s break down the steps, starting with the initial setup and then connecting it to your Wi-Fi.Initial Setup
Once you’ve mounted your Ecobee thermostat, it’s time to start the initial setup. Power up the thermostat by turning on the circuit breaker. You’ll see a welcome screen, guiding you through the setup process. You’ll be prompted to select your preferred language. Choose your language and follow the on-screen instructions to set the date and time. This step is crucial for accurate scheduling and energy reports. Next, the thermostat will ask you to configure your HVAC system. You’ll need to enter details about your heating and cooling setup. If you’re unsure, consult your HVAC system’s manual or look for labels on your equipment.Wi-fi Connection
Connecting your Ecobee thermostat to Wi-Fi is essential for smart features and remote access. On the thermostat screen, navigate to the Wi-Fi settings. Select your home network from the list of available networks. Enter your Wi-Fi password using the on-screen keyboard. Make sure it’s correct to avoid connection issues. Once connected, the thermostat will update its firmware to the latest version. This might take a few minutes, so be patient. Updating ensures your device has the latest features and security updates. Have you experienced any challenges connecting smart devices to Wi-Fi? Share your tips in the comments below!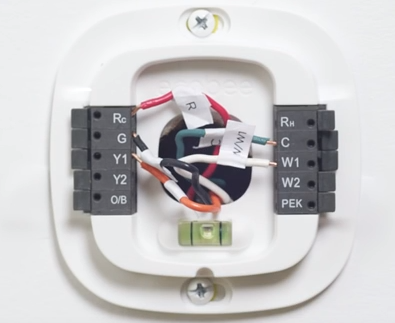
Credit: support.ecobee.com
Setting Preferences
Setting preferences on your Ecobee thermostat is crucial for optimizing comfort and energy efficiency. You can tailor the temperature settings and scheduling to suit your lifestyle. Let’s dive into the details!
Temperature Settings
First, navigate to the temperature settings on your Ecobee’s touchscreen. You’ll see options to set your desired temperatures for different scenarios, such as home, away, and sleep.
Adjust the temperatures to match your comfort levels. For instance, you might prefer a cooler temperature for sleeping and a warmer one when you’re home.
If you’re unsure, start with common ranges: 68-72°F for home, 60-65°F for away, and 65-70°F for sleep. You can always tweak these later based on your experience.
Scheduling
Setting a schedule allows your thermostat to automatically adjust the temperature based on your daily routine. This not only enhances comfort but also saves energy.
Begin by accessing the scheduling menu on your Ecobee. Here, you can set different temperature preferences for various times of the day and days of the week.
For example, you might set a warmer temperature for weekday mornings when everyone is getting ready and a cooler one for weekday afternoons when the house is empty. Weekends might have a different schedule altogether.
Have you considered how your schedule changes on weekends compared to weekdays? Tailoring the schedule to fit these variations ensures maximum efficiency.
By customizing your temperature settings and scheduling, you’re not just creating a comfortable environment, but also making a smart move towards energy conservation. How will you adjust your settings to best suit your lifestyle?
Testing The Installation
After installing your Ecobee thermostat, it’s crucial to test the installation. This ensures everything works correctly. Let’s go through the steps to test your new thermostat.
Power On
First, power on your Ecobee thermostat. Attach the faceplate to the base. Ensure it clicks into place. Then, turn on the power from your circuit breaker. The Ecobee logo should light up. If it doesn’t, double-check your wiring and connections.
Functionality Check
Next, perform a functionality check. Navigate through the menu on the thermostat. Set a desired temperature. Wait and see if your HVAC system responds. You should hear the system start. If it doesn’t, verify your settings and wiring again.
Check other features like the fan. Turn it on and ensure it works. Also, test your thermostat’s Wi-Fi connectivity. Connect it to your home network. This allows you to control it via the app. If you encounter issues, consult the manual or support.
Credit: www.reddit.com
Troubleshooting
Installing an Ecobee thermostat can improve your home’s comfort and efficiency. Yet, you might face some issues during the process. This section will guide you through troubleshooting common problems. Let’s ensure your installation goes smoothly.
Common Issues
Some users may experience issues with their Ecobee thermostat. Here are a few common problems:
- Power Problems: The thermostat might not turn on. Check the wiring and the power source.
- Wi-Fi Connection: The device may not connect to Wi-Fi. Ensure your network is working. Check your Wi-Fi password.
- Temperature Readings: Incorrect temperature readings can occur. Make sure the thermostat is placed away from heat sources.
- Sensor Issues: Sensors might not detect presence. Check if the sensors are properly installed and unobstructed.
Support Resources
If the issues persist, various support resources can help:
- Ecobee Support: Visit the official Ecobee support website. They offer guides and FAQs.
- Community Forums: Join Ecobee user forums. Share experiences and solutions with other users.
- Customer Service: Contact Ecobee customer service. They can provide direct assistance.
- Professional Help: If all else fails, seek professional installation help.
Using these resources can resolve most issues. Enjoy the benefits of your new Ecobee thermostat.
Frequently Asked Questions
Can I Install The Ecobee Thermostat Myself?
Yes, you can install the ecobee thermostat yourself. Follow the step-by-step instructions provided in the manual. Most users find the process straightforward. Ensure you turn off the power before beginning the installation. If unsure, consult a professional.
What Wires Are Needed For An Ecobee Thermostat?
An ecobee thermostat typically requires a C-wire (common wire) for power. Additionally, you need R, G, Y, and W wires for heating and cooling systems. Check your HVAC system’s compatibility and wiring diagram for specific requirements.
Do You Need An Electrician To Install An Ecobee?
You don’t need an electrician to install an ecobee. Most people can handle the installation themselves. However, if you’re uncomfortable with wiring, hiring a professional is a safe choice.
Is Installing Ecobee Hard?
Installing an ecobee is generally easy. Follow the step-by-step instructions provided. Most users can complete it in under 45 minutes.
Conclusion
Installing an Ecobee thermostat is simple and straightforward. Follow the steps carefully. You’ll enjoy a more efficient home in no time. Remember to double-check connections and settings. This ensures your thermostat works perfectly. With your new Ecobee, you can save energy and money.
Plus, you’ll have better control over your home’s climate. Ready to enjoy a smarter home? Start with your Ecobee thermostat today.
Check Best Thermostat Pricing in Amazon
** As an Amazon Associate, I earn from qualifying purchases.