
Check Best Thermostat Pricing in Amazon
** As an Amazon Associate, I earn from qualifying purchases.
Are you ready to take control of your home’s temperature with ease? Installing a Sensi Smart Thermostat is simpler than you might think, and it can save you money while making your life more comfortable.
Imagine adjusting your thermostat from anywhere, setting schedules that fit your routine, and enjoying energy savings—all at your fingertips. In this guide, you’ll find clear, step-by-step instructions that make the installation process straightforward, even if you’ve never done it before.
Keep reading, and you’ll be on your way to smarter, more efficient heating and cooling in no time.
Tools And Materials Needed
Before installing your Sensi Smart Thermostat, gather the right tools and materials. Having everything ready makes the process smooth and fast.
These tools help you safely remove the old thermostat and connect the new one. The materials ensure your new thermostat works well and stays secure.
Basic Tools Required
- Flathead screwdriver for removing screws
- Phillips screwdriver to tighten screws
- Wire stripper to prepare the wires
- Drill with drill bits for mounting
- Voltage tester to check power safety
Materials Needed
- Sensi Smart Thermostat unit
- Mounting screws and wall anchors
- Thermostat base plate
- Label stickers for wires
- Batteries (usually AA or AAA)
Optional Helpful Items
- Masking tape to hold wires temporarily
- Level tool to mount thermostat straight
- Smartphone or tablet for setup
- Manual or printed installation guide
Preparing Your Hvac System
Preparing your HVAC system is the first step to install a Sensi smart thermostat. Proper preparation keeps you safe and protects your equipment. It also makes the installation smooth and fast.
Turn Off Power
Start by turning off the power to your HVAC system. Find the circuit breaker panel in your home. Switch off the breaker that controls your heating and cooling system. This stops electricity from flowing to the thermostat. Working without power prevents shocks and damage.
Remove Old Thermostat
Next, take off the old thermostat from the wall. Remove the cover gently to expose the wires. Take a clear photo or label each wire to remember where it connects. Unscrew the base plate and pull it away from the wall. Be careful not to let wires slip back inside.
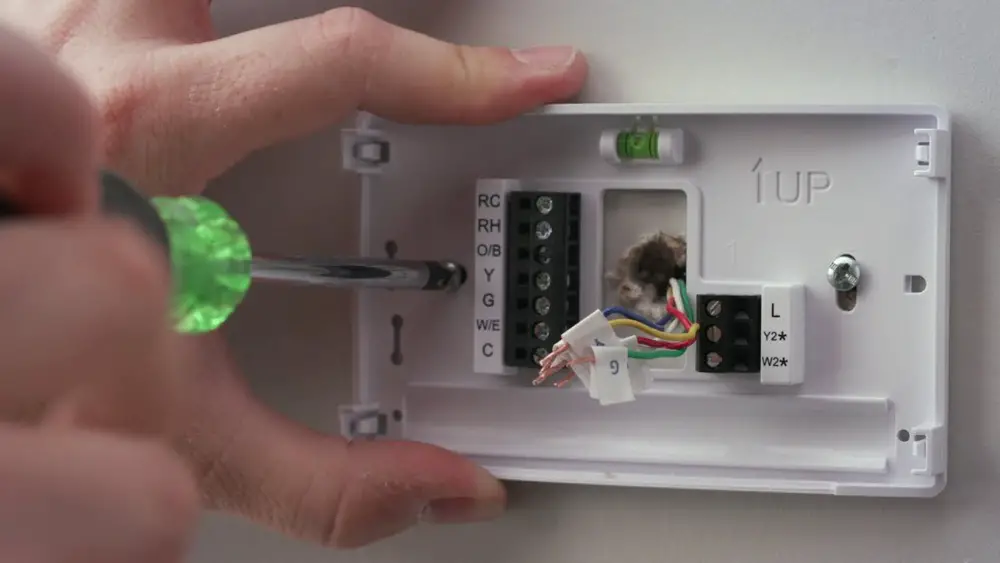
Identifying Your Wiring
Identifying the wiring is the first step in installing your Sensi Smart Thermostat. Knowing which wire does what helps avoid mistakes. It makes the installation safer and smoother.
Before you start, turn off the power to your HVAC system. This stops any electrical issues while you work. Next, remove the old thermostat cover to see the wires clearly. Take a good look at each wire and its connection point.
Label Wires
Use small pieces of tape or labels to mark each wire. Write down the letter on the terminal where the wire connects. Common letters include R, W, Y, G, and C. This labeling helps you match wires to the new thermostat.
Take a photo of the wires before you remove them. This picture is a handy reference during installation. Keep the labels on the wires until you finish connecting them to the new thermostat.
Check Compatibility
Not all HVAC systems work with the Sensi Smart Thermostat. Check your system type and wiring against the Sensi compatibility list. Look for features like heat pump or conventional system support.
Confirm your system has a C-wire, or common wire, for continuous power. If missing, the thermostat may not work properly. Use the Sensi app or website to verify compatibility before starting the installation.

Credit: sensi.copeland.com
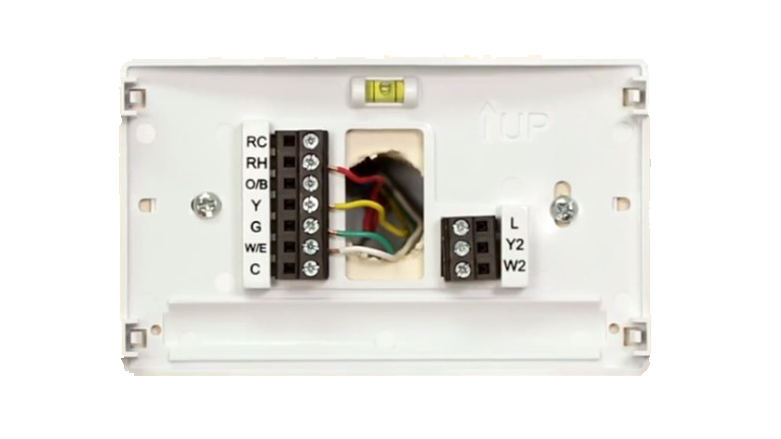
Installing The Sensi Thermostat
Installing the Sensi thermostat is a simple process anyone can follow. The device fits most HVAC systems and replaces your old thermostat easily. This guide breaks down the steps to get your new thermostat up and running quickly.
Mounting The Base
Start by turning off power to your heating and cooling system. Remove your old thermostat from the wall. Use the included screws and anchors to mount the Sensi base. Ensure the base is level for accurate temperature readings. Keep wires organized through the base’s center hole.
Connecting Wires
Match each wire from your wall to the labeled terminals on the base. The Sensi uses clear labels like R, C, W, and Y. Insert wires firmly into their slots and tighten screws. Double-check that no wires touch each other. Proper connection avoids system errors.
Attaching The Thermostat
Align the thermostat display with the mounted base. Press the thermostat gently until it clicks into place. Restore power to your HVAC system. The thermostat will power on and guide you through setup steps. This includes connecting to Wi-Fi and setting your preferences.
Powering Up And Setup
Powering up your Sensi smart thermostat is the next step after installation. This process brings your device to life and prepares it for use. Proper setup ensures the thermostat works smoothly and connects to your home network.
Follow these simple steps carefully. They will help you get your thermostat ready without any trouble. The goal is to have a fully functional system that you can control easily.
Restore Power
First, turn the power back on at your circuit breaker. This action sends electricity to the thermostat. Watch for the display to light up. If the screen stays dark, double-check the breaker switch.
The thermostat should show a welcome screen. It means power is restored correctly. Wait a few moments for the device to start up fully. Avoid pressing any buttons during this time.
Initial Configuration
Once powered, the thermostat asks for initial settings. Begin by selecting your preferred language. Use the touchscreen to make choices easily. Next, set the date and time accurately.
Connect the thermostat to your Wi-Fi network. This connection allows remote control from your phone. Enter your network name and password carefully. The thermostat confirms the connection with a message.
Check Best Thermostat Pricing in Amazon
** As an Amazon Associate, I earn from qualifying purchases.
Finally, configure your heating and cooling preferences. Set temperature ranges that fit your comfort. Save all settings to complete the setup. Your Sensi thermostat is now ready to use.

Credit: www.youtube.com
Connecting To Wi-fi
Connecting your Sensi Smart Thermostat to Wi-Fi allows remote control from your phone. This step is essential for enjoying all smart features. Follow the simple process to get your thermostat online quickly.
Download The Sensi App
Start by downloading the Sensi app on your smartphone. It is available for both iOS and Android devices. Search for “Sensi” in the app store and install it. The app guides you through the setup and controls your thermostat remotely.
Pair Thermostat With App
Open the Sensi app and create an account or log in. Follow the on-screen instructions to add a new thermostat. The app will search for your device nearby. Select your thermostat model from the list.
Connect the thermostat to your home Wi-Fi by entering the network name and password. Wait for the app to confirm the connection. Your thermostat is now paired and ready to use through the app.
Testing And Calibration
Testing and calibration are essential after installing your Sensi Smart Thermostat. They ensure the device works correctly and keeps your home comfortable. Proper testing prevents errors and saves energy. Calibration helps the thermostat understand your home’s temperature better.
Testing The Thermostat Connection
Check if the thermostat powers on and connects to your Wi-Fi. The display should be clear and responsive. Use the Sensi app to confirm the device syncs with your phone. If the connection fails, restart the thermostat and router.
Verifying Temperature Accuracy
Compare the thermostat’s reading with a reliable thermometer. Place both in the same room for accuracy. The readings should be close. If not, adjust the thermostat’s calibration settings through the app.
Adjusting Calibration Settings
Open the Sensi app and find the calibration option. Enter the difference between the thermostat and the thermometer readings. Save the new settings. This adjustment helps the thermostat control your home’s temperature better.
Testing Heating And Cooling Functions
Switch your system between heating and cooling modes. Check if the thermostat activates the furnace or air conditioner correctly. Feel the vents to confirm warm or cool air flows. This test ensures your system responds properly to commands.
Credit: sensi.copeland.com
Troubleshooting Common Issues
Installing a Sensi Smart Thermostat usually goes smoothly. Sometimes, small issues can happen during or after installation. Troubleshooting helps fix these common problems quickly. This section covers easy fixes for typical issues.
Incorrect Wiring Connections
Check all wires carefully before powering on. Make sure each wire matches the terminal labels. Loose or wrong connections cause the thermostat not to work. Tighten wires and double-check colors and labels.
Thermostat Not Connecting To Wi-fi
Verify your Wi-Fi network name and password. The thermostat must be close enough to the router. Restart the thermostat and router to refresh the connection. Use the Sensi app to re-enter Wi-Fi details.
Thermostat Screen Not Turning On
Confirm the thermostat has power from the HVAC system. Check the circuit breaker and fuse for issues. Remove the thermostat and reattach it to the base securely. A weak or missing C-wire may cause power problems.
Heating Or Cooling Not Responding
Check the thermostat settings for correct mode and temperature. Make sure the HVAC system is switched on. Reset the thermostat by turning it off and on. Inspect furnace and air conditioner for power or error lights.
App Not Syncing With Thermostat
Ensure the thermostat is connected to Wi-Fi. Update the Sensi app to the latest version. Close and reopen the app to refresh the connection. Log out and log back in if syncing still fails.
Frequently Asked Questions
How Do I Install A Sensi Smart Thermostat?
Turn off power, remove old thermostat, connect wires to Sensi terminals, mount the device, and restore power. Follow the Sensi app instructions for setup and Wi-Fi connection.
What Tools Are Needed For Sensi Thermostat Installation?
You need a screwdriver, drill, wire stripper, and a voltage tester. These tools help safely remove the old thermostat and install the new one.
Can I Install Sensi Thermostat Myself?
Yes, Sensi thermostats are designed for DIY installation with clear instructions. However, if unsure, consult a professional to ensure safety and proper setup.
How Do I Connect Sensi Thermostat To Wi-fi?
After installation, use the Sensi app to follow step-by-step Wi-Fi setup. Ensure your network is 2. 4 GHz and enter your password when prompted.
Conclusion
Installing a Sensi Smart Thermostat is simple and saves energy. Follow each step carefully for best results. You can control your home temperature from anywhere. This device helps keep your home comfortable and lowers bills. Take your time and double-check connections during installation.
Enjoy the convenience of smart heating and cooling today.
Check Best Thermostat Pricing in Amazon
** As an Amazon Associate, I earn from qualifying purchases.