
Check Best Thermostat Pricing in Amazon
** As an Amazon Associate, I earn from qualifying purchases.
Hooking up a Honeywell thermostat is straightforward. You can do it yourself with some basic tools.
This guide will walk you through the steps. Installing a thermostat may seem daunting, but it’s manageable. A Honeywell thermostat helps control your home’s temperature. It saves energy and adds comfort. In this post, we will guide you through the process step-by-step.
We’ll explain which tools you need and how to connect the wires. Understanding the basics can make the task easier and quicker. By the end of this guide, you’ll have your Honeywell thermostat up and running. Let’s dive into the details and get your home comfortable.
Preparation
Setting up a Honeywell thermostat can make your home more comfortable and energy-efficient. Before you start, it’s important to prepare properly. This ensures a smooth installation process and helps prevent any issues. Let’s dive into the steps you need to take for a successful setup.
Gather Tools
First, collect all the tools you need for the job. You will need a screwdriver, wire stripper, and a drill. Make sure you have the thermostat and its manual handy. Having everything ready will save you time and frustration.
Turn Off Power
Safety is crucial. Turn off the power to your heating and cooling system. Find your circuit breaker and switch off the relevant circuit. This step prevents electric shocks and protects your equipment.
Credit: www.youtube.com
Remove Old Thermostat
Removing your old thermostat is an essential step when upgrading to a new Honeywell thermostat. It’s not just about yanking it off the wall. You need to do it correctly to avoid damaging your HVAC system or creating more work for yourself later.
Detach Cover
Start by carefully detaching the cover of your old thermostat. Most covers simply snap off. Use gentle pressure to avoid cracking or breaking any parts.
Remember to turn off the power to your HVAC system at the circuit breaker before you begin. This will ensure your safety and prevent any electrical mishaps.
Once the cover is off, you’ll see the wires connected to your thermostat. Don’t be alarmed by the colorful spaghetti-like mess! Each wire has a purpose, and we’ll sort through them next.
Label Wires
Labeling the wires is a crucial step. You don’t want to mix them up. Use small pieces of masking tape or pre-made wire labels to tag each wire according to the terminal it connects to.
Take your time with this step. Write clearly and double-check your labels. This will save you a headache when connecting your new Honeywell thermostat.
While doing this, you might notice some dust and debris. Take a moment to clean the area with a soft cloth. A clean workspace helps you see what you’re doing and keeps your new thermostat clean.
Have you ever thought about what might go wrong if you skip labeling the wires? It could lead to your HVAC system not working properly, or worse, getting damaged. So, don’t rush through this part!
These steps are straightforward but vital. Now that your old thermostat is removed, you’re ready to start installing your new Honeywell thermostat. Ready to make your home smarter and more energy-efficient?
Install New Mount
Installing a new mount for your Honeywell thermostat is a crucial step in ensuring your device functions properly. This process might seem daunting, but with clear instructions, it becomes quite manageable. Let’s break it down into simple steps that you can follow easily.
Attach Mounting Plate
First, you need to attach the mounting plate to the wall. The mounting plate is the base that holds your thermostat in place. Make sure to position it at a comfortable height, usually around eye level.
Align the plate over the hole where the wires come out. Use a level to ensure it’s straight. This step is important because a crooked thermostat can affect its functionality.
Take the wires through the center hole of the mounting plate. This helps keep them organized and prevents any damage. It also makes connecting the wires to the thermostat much easier.
Secure With Screws
Once the mounting plate is in position, it’s time to secure it with screws. Use the screws provided in your Honeywell thermostat package. These are designed to fit perfectly and provide a firm hold.
Insert the screws into the pre-drilled holes on the mounting plate. Tighten them until the plate is firmly attached to the wall. Be careful not to over-tighten, as this can crack the plate or damage the wall.
Double-check to ensure the plate is still level after securing the screws. A slight adjustment might be necessary. If the plate is uneven, it could affect the accuracy of your thermostat’s readings.
Have you ever had trouble with a misaligned thermostat affecting your home’s temperature? Share your experiences or tips in the comments below!
Connect Wires
Connecting wires to your Honeywell thermostat is a crucial step. It ensures your system runs smoothly. This process may seem complex, but it’s manageable with the right guidance. Here’s how to connect the wires correctly.
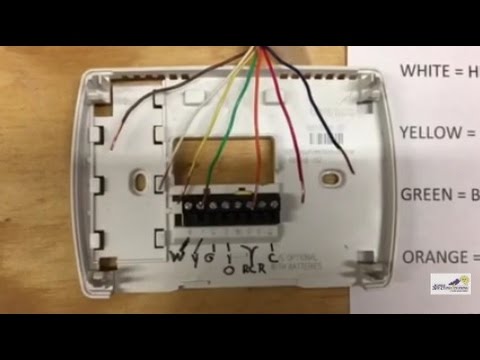
Match Wire Colors
First, identify the colors of your wires. Each color represents a different function. Match the wire colors to the corresponding terminals on the thermostat. For example, the red wire often goes to the ‘R’ terminal. The white wire usually connects to the ‘W’ terminal. Check your thermostat’s manual for the exact color code.
Take your time with this step. Incorrectly matched wires can cause issues. It might even damage your thermostat. Write down the wire colors and their functions if needed. This can help you stay organized.
Tighten Connections
Once the wires are matched, it’s time to connect them. Insert each wire into the correct terminal. Use a screwdriver to tighten the connections. Ensure each wire is secure. Loose wires can lead to poor performance.
Give each wire a gentle tug. This checks if they are firmly in place. Double-check all connections before moving on. Properly connected wires ensure your thermostat works efficiently.
Check Best Thermostat Pricing in Amazon
** As an Amazon Associate, I earn from qualifying purchases.
Attach Thermostat
Attaching your Honeywell thermostat is a crucial step in setting up your device. This process ensures that your thermostat is securely mounted and aligned. Proper attachment also ensures your thermostat functions correctly. Let’s walk through the steps to attach your Honeywell thermostat.
Snap Onto Mount
Start by aligning the back of the thermostat with the wall plate. Carefully snap the thermostat onto the mount. Ensure you hear a click to confirm it’s securely in place. This step is vital for a stable and secure installation.
Check Alignment
Once snapped in, check the alignment of the thermostat. It should be straight and level. If it looks crooked, adjust it slightly. Proper alignment ensures accurate temperature readings and efficient operation. Make sure it fits snugly against the wall with no gaps.
Power On
After installing your Honeywell thermostat, the next step is powering it on. This stage is crucial. It ensures the thermostat is ready for use. Follow these simple steps to power on your device.
Restore Power
First, go to your circuit breaker panel. Find the switch that controls your HVAC system. Flip the switch to the “on” position. This restores power to your system and thermostat. Ensure the switch stays in the “on” position.
Verify Display
Look at your thermostat’s display. It should light up and show information. If the display is blank, check the power connections. Ensure the thermostat is correctly connected. If problems persist, consult the user manual.
Configure Settings
Once you have installed your Honeywell thermostat, it’s time to configure the settings. Proper configuration ensures your home stays comfortable and energy-efficient. Let’s break down the key settings you need to adjust.
Set Temperature
First, set the desired temperature for your home. This is the temperature at which you want your thermostat to maintain. Use the up and down arrows on the thermostat to set your preferred temperature. For energy savings, set it a few degrees lower in winter and higher in summer.
Program Schedule
Next, program a schedule for your thermostat. This allows your thermostat to automatically adjust temperatures based on your daily routine. Select the “Schedule” button on your thermostat. You can set different temperatures for different times of the day.
For example, you might want it cooler at night while sleeping. Or warmer during the day when you’re at home. Customize each day of the week to match your lifestyle. Confirm your schedule to save the settings.
Congratulations! Your Honeywell thermostat is now configured to keep your home comfortable and efficient.

Credit: www.reddit.com
Test Functionality
Once you have hooked up your Honeywell thermostat, the next crucial step is to test its functionality. This ensures your heating and cooling systems respond correctly to the thermostat’s settings. It can save you from future headaches and potential discomfort during extreme weather. Let’s dive into how you can test the functionality of your Honeywell thermostat effectively.
Check Heating
To test the heating function, set your Honeywell thermostat to a temperature higher than the current room temperature. This will prompt the heating system to kick in.
Listen for the sound of your heating system turning on. You should feel warm air coming from your vents within a few minutes.
If the heating system does not turn on, double-check your wiring connections. Make sure the circuit breaker is not tripped. Ensure you have correctly set your thermostat to “Heat” mode.
Check Cooling
To test the cooling function, set your Honeywell thermostat to a temperature lower than the current room temperature. This will prompt the cooling system to activate.
Listen for the sound of your cooling system starting up. You should feel cool air blowing from your vents shortly.
If the cooling system fails to activate, verify your wiring connections. Check if the circuit breaker related to the cooling system is properly set. Ensure the thermostat is set to “Cool” mode.
Testing the functionality of your Honeywell thermostat is a straightforward yet essential step. Have you ever had to test your thermostat during an extreme weather condition? Share your experiences and any tips you might have!

Credit: diy.stackexchange.com
Frequently Asked Questions
What Color Wire Goes Where On A Honeywell Thermostat?
Connect the red wire to the R terminal, white to W, yellow to Y, green to G, and blue to C.
How Many Wires Are Needed For A Honeywell Thermostat?
A Honeywell thermostat typically needs two to five wires, depending on the model and features.
How Do I Connect My Honeywell Home Thermostat?
Connect your Honeywell home thermostat by downloading the Honeywell Home app, creating an account, and following the on-screen instructions. Ensure your Wi-Fi is on.
What Wires Do You Hook Up On A Thermostat?
Connect the red wire (R) to power, white (W) for heat, yellow (Y) for cooling, and green (G) for the fan.
Conclusion
Installing a Honeywell thermostat is straightforward and enhances home comfort. Follow the steps carefully for success. Connect wires as instructed and ensure secure connections. Double-check settings for optimal performance. Enjoy energy savings and a cozy environment. Regular maintenance keeps your thermostat functioning well.
Happy heating and cooling with your new Honeywell thermostat!
Check Best Thermostat Pricing in Amazon
** As an Amazon Associate, I earn from qualifying purchases.