
Check Best Thermostat Pricing in Amazon
** As an Amazon Associate, I earn from qualifying purchases.
Are you looking to disconnect your thermostat safely and quickly? Whether you’re upgrading to a new model or troubleshooting an issue, knowing how to disconnect your thermostat is an essential skill.
It might seem tricky at first, but with the right steps, you can do it yourself without any stress or damage. Keep reading, and you’ll discover simple, clear instructions that make the whole process easy to follow. By the end, you’ll feel confident handling your thermostat like a pro.
Let’s get started!
Safety Precautions
Always turn off the power before disconnecting a thermostat. Use a voltage tester to ensure no electricity flows. Handle wires carefully to avoid shocks or damage.
Turn Off Power
Always turn off the power before disconnecting a thermostat. This stops electric shocks and damage. Find the circuit breaker that controls your heating system. Switch it off completely. Double-check by trying to turn on your thermostat. No power means it is safe to work on.
Gather Necessary Tools
Prepare all tools before starting. You will need a screwdriver, a voltage tester, and wire labels. The voltage tester confirms no electricity flows. Wire labels help remember where each wire goes. Having tools ready makes the job safer and faster.

Credit: www.reddit.com
Locate The Thermostat
Finding your thermostat is the first step to disconnecting it safely. Most thermostats sit on walls in common areas like living rooms or hallways. They are usually easy to spot because of their display and buttons. Knowing exactly where your thermostat is helps prevent mistakes during disconnection.
Identify The Model
Look closely at your thermostat to find the brand and model number. This information is often on the front or inside the cover. The model helps you find the right instructions for disconnecting it. Different models may have different wiring setups and safety needs.
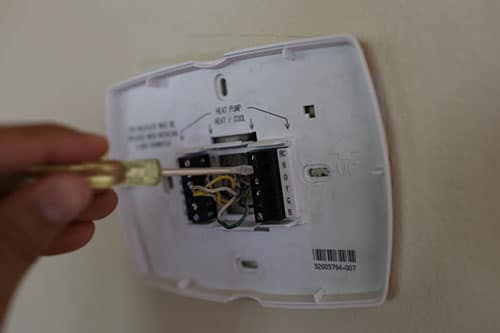
Access The Wiring
Turn off your heating or cooling system before touching any wires. Remove the thermostat cover by gently pulling or unscrewing it. Behind the cover, you will see the wiring connected to the thermostat. Take a clear photo or note the wire positions. This helps during reinstallation or troubleshooting later.
Remove Thermostat Cover
Removing the thermostat cover is the first step to disconnecting your thermostat safely. This part protects the internal components. Taking it off gives you access to the wiring and batteries inside. Handle this step with care to avoid damage.
Unscrew The Cover
Start by locating the screws holding the cover in place. Most thermostats have small Phillips screws. Use a screwdriver that fits well to avoid stripping the screws. Turn the screws counterclockwise to remove them. Keep the screws in a safe place. Some covers may snap off without screws. Gently pry the edges with your fingers or a plastic tool. Avoid using metal tools to prevent scratches.
Handle The Display Carefully
The display is fragile and can break easily. Hold the cover by its edges to protect the screen. Do not press hard on the display area. Set the cover down on a flat, soft surface. Avoid placing heavy objects on it. This will keep the display safe while you work on the thermostat.
Disconnect The Wiring
Disconnecting the wiring is a crucial step in removing your thermostat safely. It ensures the device is completely separate from your home’s electrical system. Handle each wire with care to avoid damage or confusion later.
Start by organizing the wires. This makes reinstallation easier and prevents mistakes. Always work slowly and carefully during this process.
Label The Wires
Use small pieces of tape or labels to mark each wire. Write down the terminal letter or color code. This helps you remember where each wire connects. Clear labels save time and prevent errors in the future.
Detach The Connectors
Gently pull the wire connectors off the thermostat terminals. Avoid yanking or pulling hard, which can damage wires. Use a small screwdriver if needed to release clips. Keep the wires separated and secure once detached.
Remove The Mounting Plate
Removing the mounting plate is an essential step to disconnect your thermostat safely. The mounting plate holds the thermostat to the wall and covers the wiring behind it. Removing it carefully helps prevent damage to the wires and the wall.
Check Best Thermostat Pricing in Amazon
** As an Amazon Associate, I earn from qualifying purchases.
Unscrew The Plate
Locate the screws holding the mounting plate on the wall. Use a screwdriver to loosen and remove these screws. Keep the screws in a safe place for later use. Gently pull the mounting plate away from the wall. Avoid pulling too hard to protect the wires behind it.
Inspect The Wall
After removing the mounting plate, check the wall for any damage. Look for holes or cracks around the mounting area. Clean the wall surface to remove dust or debris. This step prepares the wall for reinstalling the thermostat or plate. Make sure the wiring is intact and not loose or frayed.
Final Steps
After disconnecting the thermostat wires, some important final steps remain. These steps ensure safety and prepare your system for future use. Follow these carefully to avoid problems.
Cap The Wires
Use wire nuts to cover each exposed wire. This stops wires from touching each other or metal parts. Safety first. Capping the wires prevents short circuits and electrical shocks. Double-check that each wire is tightly capped and secure. Label the wires if you plan to reconnect the thermostat later. This saves time and confusion.
Restore Power
Turn the power back on at the circuit breaker. This powers your heating and cooling system. Watch for any unusual sounds or smells. These signs may mean a problem exists. If everything seems normal, test your HVAC controls. Ensure your system runs without the thermostat connected. This confirms a safe, clean disconnection.
Troubleshooting Tips
Troubleshooting a thermostat disconnection can feel tricky. Small issues often cause big problems. Simple checks can save time and effort. Follow these tips to identify common problems.
Check For Power Issues
Start by ensuring your thermostat has power. Check the circuit breaker or fuse box. A tripped breaker can cut off electricity. Look at the thermostat display for signs of power. No display means no power. Replace batteries if your model uses them. Loose wiring can also cause power loss. Inspect wires for damage or poor connections.
Verify Wire Labels
Correct wiring is crucial for proper thermostat function. Each wire connects to a specific terminal. Labels help identify wires easily. Match wires to the correct terminals carefully. Mixing wires can cause errors or damage. Take a photo before disconnecting wires. This helps during reinstallation. Use a voltage tester to confirm wire status. Always handle wires with care to avoid shocks.

Credit: homerepairtutor.com
Credit: www.artofmanliness.com
Frequently Asked Questions
How Do I Safely Disconnect A Thermostat?
Turn off the power at the circuit breaker. Remove the thermostat cover carefully. Unscrew the mounting plate and disconnect the wires. Label each wire for easy reconnection later. Handle wires gently to avoid damage.
Can I Disconnect A Thermostat Without Professional Help?
Yes, you can disconnect a thermostat safely if you follow proper steps. Always turn off power before starting. Use labels on wires for easy reinstallation. If unsure, consult a professional to avoid risks.
What Tools Are Needed To Disconnect A Thermostat?
You will need a screwdriver, voltage tester, and wire labels. The voltage tester ensures power is off. Screwdriver helps remove mounting screws. Wire labels keep track of connections for later use.
How To Avoid Damage When Disconnecting Thermostat Wires?
Turn off power completely before touching wires. Use wire labels to mark connections. Handle wires gently without pulling. Avoid cutting wires unless necessary. Follow manufacturer instructions for your thermostat model.
Conclusion
Disconnecting your thermostat is simple when you follow the right steps. Always turn off the power first to stay safe. Use the right tools and keep track of wires. Take your time and work carefully. This helps avoid mistakes and damage.
After disconnecting, you can replace or repair your thermostat easily. Remember, safety and patience make the task easier. Now, you are ready to handle your thermostat with confidence.
Check Best Thermostat Pricing in Amazon
** As an Amazon Associate, I earn from qualifying purchases.