
Check Best Thermostat Pricing in Amazon
** As an Amazon Associate, I earn from qualifying purchases.
Connecting thermostat wires to a furnace is a straightforward task. First, identify the wires.
Next, match them to the correct terminals. A thermostat helps control your home’s temperature efficiently. But, incorrect wiring can lead to malfunction or damage. Knowing how to connect thermostat wires to a furnace can save you time and money. In this guide, we’ll explain the steps clearly.
You don’t need to be an expert to follow along. This guide aims to simplify the process for everyone. Whether you are new to home repairs or looking for a refresher, you’ll find this information helpful. Ready to get started? Let’s make your home comfortable and your furnace function smoothly.

Credit: support.rfwel.com
Tools And Materials
Gather screwdrivers, pliers, wire strippers, and a voltage tester. Ensure you have the right thermostat and furnace wiring diagrams.
Connecting thermostat wires to your furnace is a straightforward task if you have the right tools and materials. Having the correct equipment not only makes the job easier but also ensures that everything is connected safely and functions properly. In this section, we will cover the essential tools and required materials you will need to get the job done efficiently.Essential Tools
First off, let’s talk about the essential tools you’ll need. These tools are typically found in most households, but if you don’t have them, they are easily available at any hardware store.- Screwdriver Set: A variety of flathead and Phillips screwdrivers will be needed to remove and secure screws on the furnace and thermostat.
- Wire Strippers: These are crucial for stripping the insulation off the ends of the wires for a proper connection.
- Voltage Tester: Safety first! Use a voltage tester to ensure the power is off before you start working with the wires.
- Drill: A drill may be needed if you have to make new holes to mount the thermostat.
Required Materials
Now, let’s move on to the required materials. These are the items that will complete the installation process.- Thermostat: Make sure you have the right thermostat for your furnace. Check the compatibility before purchasing.
- Thermostat Wires: Typically, you’ll need 18/5 or 18/8 thermostat wires. The numbers refer to the gauge and number of wires inside the cable.
- Mounting Screws: These will be used to secure the thermostat to the wall.
- Wire Nuts: These are used to secure the wire connections. They come in different sizes, so ensure you have the right size for your wires.
Credit: www.youtube.com
Safety Precautions
Connecting thermostat wires to a furnace can be simple. But safety should always be your first priority. Follow these steps to ensure you stay safe while working on your furnace.
Power Off
First, turn off the power. This is a crucial step. Locate the circuit breaker for your furnace. Switch it to the “off” position. This prevents electrical shocks. Double-check that the power is off before you continue.
Use Safety Gear
Wear safety gear. Put on gloves to protect your hands. Safety glasses shield your eyes from dust and debris. Consider wearing a mask if you have allergies. Proper gear keeps you safe from harm.
Follow these safety tips. They help you avoid accidents while connecting thermostat wires.
Identify Thermostat Wires
Identify thermostat wires easily. Match the wire colors to the labeled terminals on your furnace. Secure connections firmly for proper operation.
Identifying thermostat wires can be a daunting task, especially if you are not familiar with wiring. However, understanding the basics can make the process smoother and safer. Let’s break it down into simple steps so you can confidently connect your thermostat wires to your furnace.Color Codes
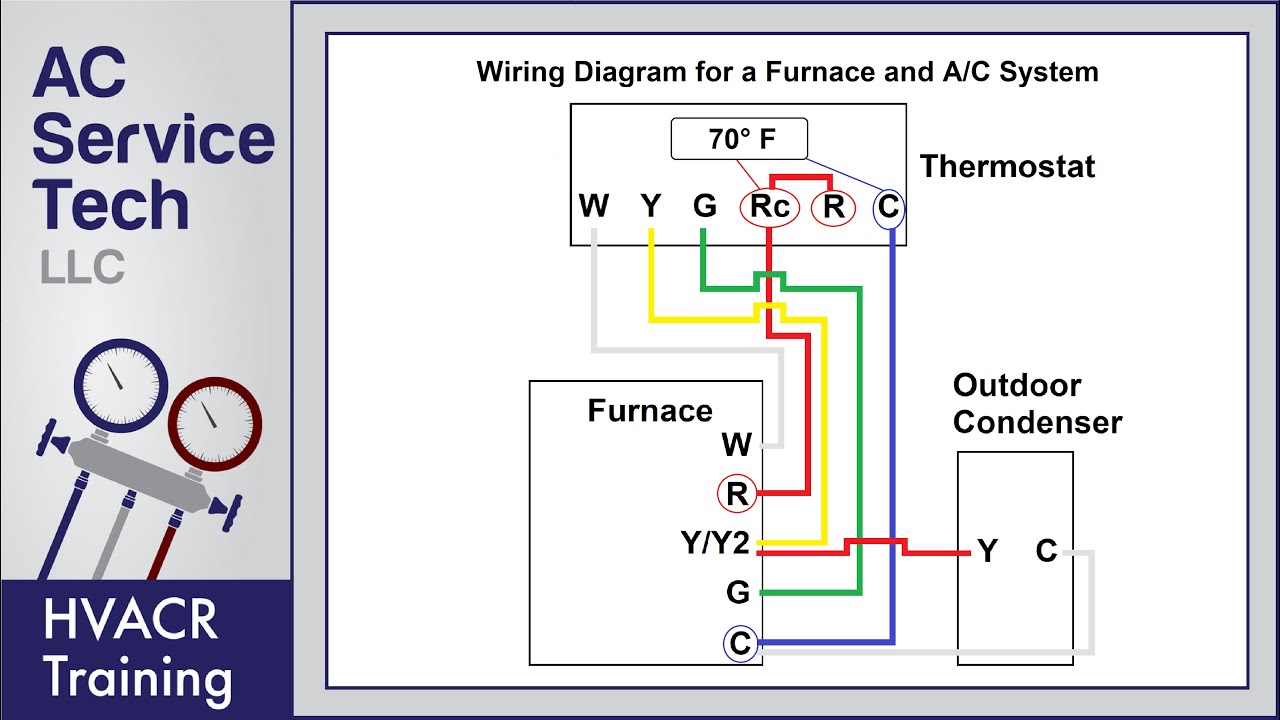
Most thermostat wires follow a color-coding system. These colors help you identify the function of each wire. Typically, the red wire (R) supplies power, while the white wire (W) connects to the heating system. The yellow wire (Y) is for cooling, and the green wire (G) operates the fan. Imagine you are looking at a bundle of wires in your thermostat. Knowing the color codes can save you a lot of time and prevent costly mistakes. Have you ever wondered why these colors are standardized? It’s to ensure safety and consistency across different brands and models.Labeling Wires
Labeling your wires is an essential step. Before you disconnect any wires from your old thermostat, label each one with a piece of tape. Write the corresponding terminal letter on the tape. This simple trick can save you from a lot of confusion later. Think about the last time you assembled furniture with unclear instructions. Labeling wires is like having a clear manual. It guides you through the process and ensures you connect each wire to the correct terminal on your new thermostat. Have you ever connected thermostat wires to your furnace? What challenges did you face, and how did you overcome them? Share your experiences in the comments below!
Credit: forums.wyze.com
Access Furnace Panel
Connecting thermostat wires to your furnace starts with accessing the furnace panel. This step is crucial for ensuring proper installation and safety. Follow these steps to locate and open the furnace panel.
Locate Panel
First, find the furnace in your home. It is usually in the basement or utility room. Look for a metal box with a door or cover. This is the furnace panel. It houses the control board and other components.
Open Panel
To open the panel, you may need a screwdriver. Some panels have screws that secure the cover. Use the screwdriver to remove these screws. Keep them in a safe place. Once the screws are out, gently pull the panel cover. Be careful not to damage any wires.
With the panel open, you will see the control board. This is where the thermostat wires connect. Take a moment to familiarize yourself with the layout. Knowing where each wire goes will help in the next steps.
Connect Wires To Thermostat
Connecting thermostat wires to a furnace involves matching wire colors to terminals. Ensure the power is off before starting. Attach each wire to its corresponding terminal.
Connecting the wires to your thermostat is an essential step in ensuring your furnace works efficiently. While it might seem like a daunting task, it can be made simple by following a clear and systematic approach. Here’s how you can connect the thermostat wires to your furnace without any hassle.Follow Diagram
The first step is to follow the wiring diagram that comes with your thermostat. This diagram is your roadmap. It will guide you on where each wire should go. Make sure you have the correct diagram for your specific model. Double-check the wire colors and their corresponding terminals.Secure Connections
After connecting the wires as per the diagram, ensure each connection is secure. Loose connections can lead to malfunctioning of the thermostat. You can use a screwdriver to tighten the terminals. Give each wire a gentle tug to check if it’s firmly in place. When I first installed my thermostat, I overlooked the importance of secure connections. It led to intermittent heating, which was frustrating. Don’t repeat my mistake. Remember, if the wires are not secured properly, it can result in short-circuits or even damage to your thermostat. Have you ever connected something only to find it doesn’t work because of a loose wire? It’s a common issue but easily avoidable. A securely connected wire will ensure that your thermostat communicates effectively with your furnace. Tightening the connections might seem trivial, but it’s a crucial step in the installation process. By following the diagram and securing the connections, you can ensure that your thermostat and furnace work together seamlessly. This will keep your home comfortable and energy-efficient.Connect Wires To Furnace
Connecting thermostat wires to your furnace can seem daunting. But with the right steps, it’s manageable. It’s crucial to ensure the connections are secure for optimal performance. This guide will walk you through the process.
Match Terminals
First, identify the terminals on the furnace control board. These terminals are usually labeled with letters. Common labels include R, W, Y, G, and C. These letters correspond to the wires coming from the thermostat.
Next, match each wire to the correct terminal. For example, the red wire often goes to the R terminal. The white wire usually connects to the W terminal. Make sure each wire matches its designated terminal.
Tighten Screws
After matching the wires, it’s time to secure them. Loosen the terminal screws on the furnace control board. Insert the end of each wire into its corresponding terminal. Ensure the wire is well-seated.
Once the wire is in place, tighten the screw. This ensures the wire stays connected. Repeat this for each wire. Make sure all screws are tight, but not overly so. This prevents damage to the wires.
Finally, double-check all connections. A loose wire can cause the thermostat to malfunction. Properly tightened screws ensure a reliable connection.
Testing Connections
Once you’ve connected the thermostat wires to the furnace, the next crucial step is testing the connections. This ensures that your hard work pays off and everything functions as it should. Let’s dive into the steps to verify that all systems are go.
Turn On Power
First and foremost, it’s time to turn the power back on. Head to your circuit breaker and switch on the power to the furnace.
Check Best Thermostat Pricing in Amazon
** As an Amazon Associate, I earn from qualifying purchases.
If you turned off the power at the furnace itself, make sure to flip the switch back to the ‘on’ position. This step is essential for ensuring the thermostat and furnace communicate properly.
Once the power is back on, keep an eye on the furnace and listen for any unusual sounds. These could indicate issues that need troubleshooting.
Check Thermostat Function
With the power on, it’s time to test the thermostat. Set the thermostat to your desired temperature.
Wait a few moments to see if the furnace kicks in. You should hear the furnace start and feel warm air coming from the vents.
If nothing happens, double-check your wiring connections. A loose wire could be the culprit.
Also, make sure the thermostat is set to the correct mode—heat in winter, cool in summer. It’s an easy oversight that can save you a lot of frustration.
Does the thermostat display any error messages? If so, refer to the user manual for troubleshooting tips.
If everything seems to be working fine, congratulations! You’ve successfully connected your thermostat to your furnace.
Testing your connections is a vital part of the process. Have you ever skipped this step and faced issues later? Share your experiences in the comments!
Troubleshooting Tips
Connecting thermostat wires to your furnace can sometimes be tricky. You might face issues that can make the process frustrating. Don’t worry; with the right troubleshooting tips, you can resolve most common problems quickly.
Common Issues
One common issue is the thermostat not turning on. This could be due to loose connections. Make sure each wire is firmly attached to the correct terminal.
Another issue is the furnace not responding to thermostat settings. Check if the wires are correctly connected. Sometimes, wires can get mixed up, causing the furnace to ignore commands.
You might also encounter short cycling. This means the furnace turns on and off rapidly. This could be due to incorrect wiring or a thermostat placed in an unsuitable location.
Quick Fixes
First, double-check your wiring. Ensure each wire is in the correct terminal. A simple mistake here can cause many issues.
If the thermostat is not turning on, check the batteries. Replacing them might solve the problem. Also, inspect the fuse and circuit breaker to ensure there’s no power issue.
If your furnace isn’t responding, try resetting the thermostat. Turn off the power, wait a few minutes, and then turn it back on. Sometimes, a simple reset can resolve communication issues.
For short cycling, try relocating the thermostat. Avoid placing it near heat sources or in direct sunlight. This can help in getting more accurate temperature readings.
Remember, always refer to your furnace and thermostat manuals for specific instructions. What other issues have you faced when connecting thermostat wires? Share your experiences!
Frequently Asked Questions
What Color Wires Go Where On A Furnace?
On a furnace, the red wire goes to the R terminal, white to W, green to G, and yellow to Y. Ensure power is off before wiring.
What Color Wires Go Where On A Thermostat?
Red wire connects to the R terminal. White wire goes to the W terminal. Green wire attaches to the G terminal. Yellow wire connects to the Y terminal. Blue or black wire is often used for the C terminal. Always check the thermostat manual for specific instructions.
Does The R Wire Go To The Rc Or Rh Thermostat?
The R wire connects to either RC or Rh on the thermostat. RC is for cooling, Rh is for heating.
How Many Wires Are Needed For A Furnace Thermostat?
A furnace thermostat typically needs 2 to 5 wires. Common wire types include R, W, C, Y, and G.
Conclusion
Connecting thermostat wires to a furnace may seem challenging at first. Follow the steps carefully. Use the right tools and double-check connections. Ensure wires are secure and properly placed. Take your time to avoid mistakes. A well-connected thermostat improves home comfort.
Enjoy the benefits of a properly functioning heating system. Stay warm and cozy with your new setup. Happy wiring!
Check Best Thermostat Pricing in Amazon
** As an Amazon Associate, I earn from qualifying purchases.