

Check Best Thermostat Pricing in Amazon
** As an Amazon Associate, I earn from qualifying purchases.
Connecting a Honeywell thermostat can be simple. You just need the right steps.
First, ensure you have the correct model and tools. Then, follow the instructions carefully. Honeywell thermostats offer comfort and energy savings. Connecting them may seem complicated at first. But with a clear guide, it becomes easy. This post will help you with step-by-step instructions.
You’ll learn how to connect your thermostat to your heating and cooling system. By the end, you’ll enjoy a well-regulated home temperature. So, let’s get started on making your home more comfortable.
Preparation
Begin by gathering essential tools and instructions. Ensure the thermostat is compatible with your HVAC system. Carefully follow the Honeywell manual for installation steps.
Connecting a Honeywell thermostat is a straightforward process, but preparation is key to ensure a smooth installation. By taking the time to gather necessary tools and follow safety precautions, you can avoid common pitfalls and set yourself up for success. ###Tools Needed
Before you start, make sure you have the right tools on hand. Having everything ready will save you time and frustration. – Screwdriver: A Phillips and flathead screwdriver will be essential. – Drill: You might need this to mount the thermostat base on the wall. – Wire Stripper: This helps in dealing with the wires cleanly. – Level: Ensuring your thermostat is level will help it work accurately. – Smartphone or Tablet: Useful for setting up Wi-Fi and controlling the thermostat. ###Safety Precautions
Safety should always be your top priority. Working with electrical components can be dangerous if you’re not careful. – Turn off the Power: Always turn off the power at the breaker before you start. This will prevent any accidental shocks. – Verify Power is Off: Use a voltage tester to confirm that the power is actually off. – Follow Manufacturer Instructions: Honeywell provides a detailed manual. Follow it closely to avoid issues. – Handle Wires Carefully: Avoid touching exposed wires with your bare hands. Have you ever had a DIY project go wrong because you skipped the prep work? It’s frustrating and often avoidable. Taking these simple steps can make the difference between a quick install and a headache. Are you ready to get started? Gather your tools and follow these safety tips for a smooth experience.Installation
Installing a Honeywell thermostat can seem daunting. But with clear steps, it becomes easy. This guide simplifies the process. Follow these steps for a smooth installation. Let’s start with removing the old thermostat.
Removing Old Thermostat
First, turn off the power to your thermostat. This prevents any electrical accidents. Next, remove the cover of your old thermostat. Use a screwdriver if needed. Carefully note the wires and their connections. Take a picture for reference. Label each wire with tape. This will help during the Honeywell thermostat installation. Disconnect the wires one by one. Finally, remove the old thermostat from the wall.
Mounting Honeywell Thermostat
Now, it’s time to mount the new Honeywell thermostat. Start by attaching the base plate to the wall. Use the provided screws and anchors. Ensure the base is level. This ensures accurate temperature readings. Next, connect the labeled wires to the corresponding terminals. Refer to the picture you took earlier. Tighten the screws to secure the wires. Attach the thermostat unit to the base plate. Make sure it clicks into place. Finally, turn the power back on. Test the thermostat to ensure it works. Follow the on-screen instructions for initial setup.
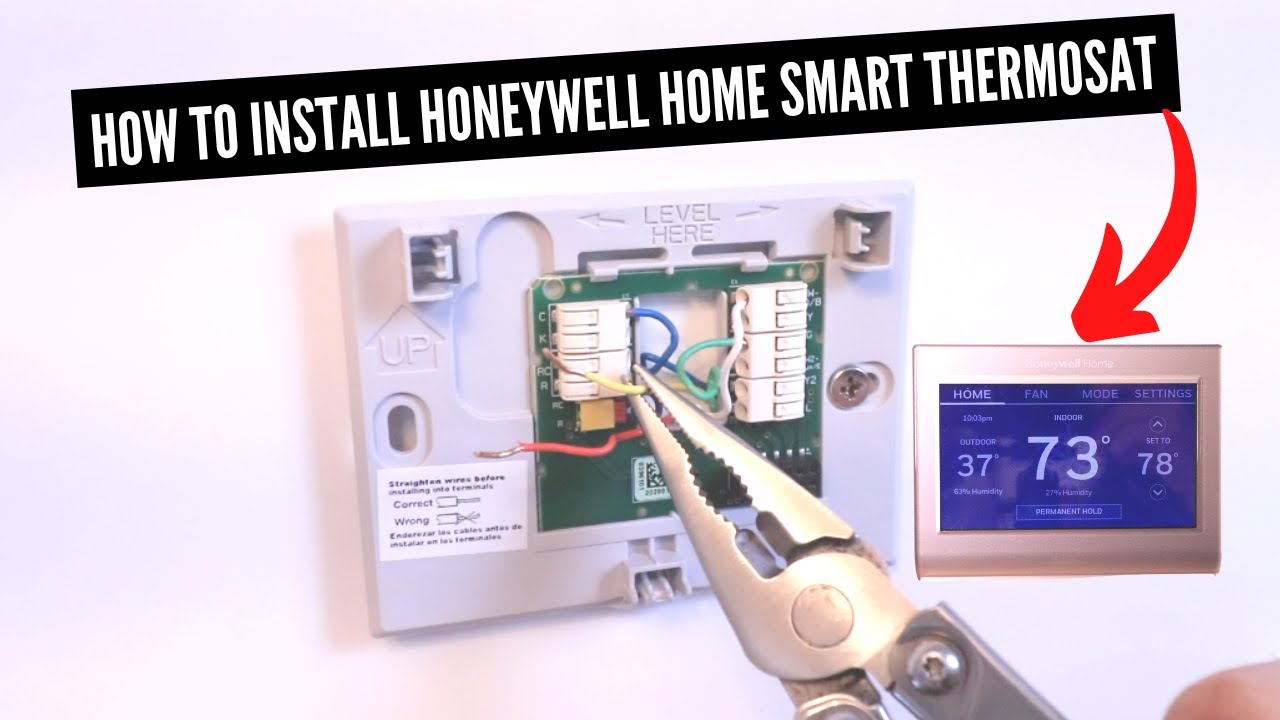
Wiring
Connecting your Honeywell thermostat requires understanding the wiring process. Proper wiring ensures your thermostat works smoothly. Follow this guide for a hassle-free setup.
Identifying Wires
First, turn off the power to your HVAC system. This prevents any electrical accidents. Next, remove the cover from your old thermostat. Look for the wires connected to it.
Typically, you will see wires of different colors. Each color represents a different function. Common colors include red (power), white (heat), yellow (cool), green (fan), and blue or black (common). Take a picture of the wiring setup. This helps you remember where each wire goes.
Connecting Wires
After identifying the wires, disconnect them from the old thermostat. Now, take your Honeywell thermostat and find the corresponding terminals. Each terminal is labeled for easy identification.
Connect the red wire to the terminal marked “R” or “Rh”. Attach the white wire to the “W” terminal. Connect the yellow wire to the “Y” terminal and the green wire to the “G” terminal. If you have a common wire, connect it to the “C” terminal.
Ensure each wire is securely connected. Loose connections can cause the thermostat to malfunction. Once all wires are connected, you can proceed to attach the thermostat to the wall and power up your HVAC system.
Setting Up
Connect your Honeywell thermostat easily by following simple steps. Set up Wi-Fi and adjust settings for optimal comfort. Enjoy a smarter home environment.
Setting up a Honeywell Thermostat is a straightforward process, but it does require attention to detail. Whether you are a tech enthusiast or a beginner, the right guidance can make the entire setup smooth and hassle-free. Here, we’ll break down the steps to ensure your thermostat is correctly powered on and configured.Powering On
To start, ensure your thermostat is connected to a power source. This usually involves inserting batteries or connecting to a C-wire, which provides continuous power from your HVAC system. Check your wiring setup and follow the instructions specific to your Honeywell model. If your thermostat uses batteries, make sure they are fresh and properly inserted. A quick tip: keep a pack of AA or AAA batteries handy for this purpose. If you’re using a C-wire, ensure it’s securely connected and that the power to your HVAC system is turned off before working with the wires. This will prevent any electrical mishaps. Once everything is connected, turn on the power to your HVAC system.Initial Configuration
Once powered on, your thermostat will guide you through the initial setup process. This usually involves selecting your preferred language, setting the date and time, and connecting to your Wi-Fi network. Start by following the on-screen prompts. Choose the language you’re most comfortable with. Next, set the correct date and time to ensure your thermostat’s scheduling features work accurately. Connecting to Wi-Fi is crucial for accessing remote features and software updates. Have your network name and password ready. If you encounter any issues, double-check your network settings and try again. Personal story: The first time I set up my Honeywell Thermostat, I was overwhelmed by the options. But taking it step-by-step made it much simpler. What about you? Have you found any tricks that make the process easier? Setting up your Honeywell Thermostat doesn’t have to be complicated. With these steps, you can ensure your device is ready to provide comfort and efficiency to your home. What part of the setup do you find most challenging? Share your thoughts below.Connecting To Wi-fi
Connecting your Honeywell thermostat to Wi-Fi is a simple process. This guide will walk you through the steps. Once connected, you can control your thermostat from your smartphone. Let’s get started with the connection process.
Accessing Settings
First, access the thermostat’s menu. Tap on the screen to wake it up. Then, look for the settings icon. It usually looks like a gear. Tap on the gear icon to enter the settings menu.
Entering Wi-fi Credentials
In the settings menu, find the Wi-Fi option. Tap on Wi-Fi to view available networks. Select your home network from the list. Enter your Wi-Fi password carefully. Double-check it to avoid errors. Once entered, tap ‘Connect.’ Your thermostat will now connect to the Wi-Fi network. Wait for the confirmation message. This might take a few seconds. Once connected, you can now control your thermostat remotely.

Credit: www.reddit.com
Using The App
Using the Honeywell app makes connecting your thermostat easy. The app guides you through each step. Follow these simple instructions to get started.
Downloading App
First, download the Honeywell app on your smartphone. Search for “Honeywell Home” in your app store. Tap “install” to begin downloading. The app is free to download.
Once downloaded, open the app. Create an account if you don’t have one. If you do, log in. Follow the on-screen prompts to set up your account.
Check Best Thermostat Pricing in Amazon
** As an Amazon Associate, I earn from qualifying purchases.
Pairing With Thermostat
Next, pair your thermostat with the app. Go to the app’s main menu. Select “Add Device.” Choose “Thermostat” from the list.
The app will ask you to enter your thermostat model. Find this on the thermostat itself or in the manual. Enter the model number in the app.
Make sure your thermostat is on and in pairing mode. The app will search for the thermostat. Once found, follow the prompts to complete the pairing.
After pairing, you can control your thermostat from your phone. Adjust the temperature, set schedules, and more. All from the app.
Troubleshooting
When setting up your Honeywell Thermostat, you might encounter a few bumps along the road. These hiccups can be frustrating, but don’t worry. Troubleshooting can help you resolve most issues quickly and easily.
Common Issues
One of the most frequent problems is the thermostat not connecting to Wi-Fi. Ensure your Wi-Fi network is functioning properly and that you have the correct password. Sometimes, simply restarting your router can resolve connectivity issues.
Another common issue is incorrect temperature readings. Make sure the thermostat is not placed near heat sources or in direct sunlight. This can cause inaccurate readings and affect your home’s comfort.
If the thermostat is not responding, check the batteries. Weak or dead batteries can cause the device to malfunction. Replace them and see if the issue persists.
Contacting Support
If troubleshooting common issues doesn’t work, it might be time to contact support. Honeywell’s customer service is available to help you resolve persistent problems. They can guide you through more complex troubleshooting steps.
Before reaching out, have your thermostat model number and details about the issue ready. This information will help the support team assist you more efficiently.
Sometimes, a quick call or chat with a support representative can save you hours of frustration. Don’t hesitate to seek their help if you’re stuck.
Have you faced any unique challenges while setting up your Honeywell Thermostat? Share your experiences in the comments below. Your story might help others facing similar issues!
Credit: m.youtube.com

Credit: diy.stackexchange.com
Frequently Asked Questions
How Do I Connect My Honeywell Thermostat?
To connect your Honeywell thermostat, first turn off the power. Then, attach the wires to the corresponding terminals. Secure the thermostat to the wall and restore power. Finally, follow the setup instructions on the thermostat screen or app.
How Do I Reconnect My Honeywell Home Wireless Thermostat?
To reconnect your Honeywell home wireless thermostat, press and hold the “Fan” and “Up” buttons. Follow the on-screen instructions to complete the process. Ensure your Wi-Fi is working properly.
How Do I Know Which Wires To Connect To My Thermostat?
Check the thermostat manual for wiring diagrams. Match wire colors to corresponding terminals. If unsure, consult a professional electrician.
How Do I Pair My Wireless Thermostat?
To pair your wireless thermostat, follow these steps: Turn on the thermostat, access pairing mode, select your network, enter the password, and confirm the connection. Check the manufacturer’s instructions for specific details.
Conclusion
Connecting a Honeywell thermostat is straightforward. Follow the steps carefully. Start with the basics. Ensure power is off. Identify wires correctly. Connect them as instructed. Use the app for smart features. Test the thermostat functions. Make adjustments if needed. Enjoy better control of your home’s temperature.
Regular maintenance is key. Check connections periodically. Understand your thermostat’s features. Save energy and increase comfort. Troubleshooting tips help resolve issues. With these steps, your Honeywell thermostat will work efficiently. Keep this guide handy for future reference.
Check Best Thermostat Pricing in Amazon
** As an Amazon Associate, I earn from qualifying purchases.