

Check Best Thermostat Pricing in Amazon
** As an Amazon Associate, I earn from qualifying purchases.
Connecting your Honeywell Home Thermostat to WiFi is straightforward. First, ensure your thermostat is powered on.
Next, follow the on-screen prompts to connect to your WiFi network. In today’s smart home era, having a thermostat connected to WiFi offers convenience and control. It allows you to adjust temperature settings remotely, receive alerts, and integrate with other smart devices.
Whether you want to save on energy bills or enjoy a comfortable home environment, connecting your Honeywell thermostat to WiFi is a crucial step. This guide will walk you through the process, making it simple and stress-free. Get ready to enjoy seamless connectivity and enhance your home’s efficiency.
Check Compatibility
Before connecting your Honeywell Home Thermostat to WiFi, ensure it’s compatible. Different models have different requirements. Checking compatibility first saves time and avoids frustration. This section will guide you through the essentials.
Compatible Models
Honeywell offers a range of thermostats. Not all models support WiFi connectivity. Common compatible models include the Honeywell T9, T10, and RTH9585WF. Check your thermostat’s model number. This is usually found on the back or in the manual.
System Requirements
Your thermostat must meet certain system requirements for WiFi connection. Ensure your home network is 2.4 GHz. Most Honeywell thermostats do not support 5 GHz networks. Also, check that your WiFi password is handy. You will need it during setup.
Your thermostat might need a C-wire. This common wire provides continuous power. It helps maintain the connection to your WiFi. If unsure, consult your user manual or contact Honeywell support.

Credit: www.amazon.com
Gather Required Tools
Connecting your Honeywell Home Thermostat to WiFi can seem tricky. But with the right tools, the process becomes simple. This section will guide you through gathering the necessary tools. It will set you up for a smooth installation.
Necessary Equipment
First, you need the right equipment. Gather a few basic items. Here’s what you need:
- Screwdriver
- WiFi-enabled device (phone or tablet)
- Your Honeywell Home Thermostat
- Access to your WiFi network name and password
These items will help you complete the setup quickly.
Preparation Steps
Next, prepare your tools and space. Ensure your WiFi-enabled device is charged. Verify that your WiFi network is working. If needed, note down the network name and password. Place your Honeywell Home Thermostat near your router. This ensures a strong signal during setup.
With everything ready, you can move on to the next steps. Now, you are well-prepared to connect your Honeywell Home Thermostat to WiFi.
Locate Thermostat
Connecting your Honeywell Home Thermostat to WiFi starts with locating the thermostat. This step is simple but crucial. Knowing the exact location will help with the setup process.
Finding The Thermostat
First, identify the main thermostat in your home. It is usually placed in a central location. Common areas include hallways or living rooms. Make sure it is easy to access.
Ensuring Accessibility
Ensure the thermostat is in an accessible spot. You will need to see the screen clearly. This will help you follow the on-screen instructions. Clear any obstructions if needed.
Check for a stable WiFi signal in that area. Weak signals can cause connection issues. If the signal is weak, you might need a WiFi extender.
With the thermostat located and accessible, you are ready for the next steps. This ensures a smooth setup process.

Credit: www.youtube.com
Access Wifi Settings
Connecting your Honeywell Home Thermostat to WiFi is easy. It allows you to control the temperature from anywhere. First, you need to access the WiFi settings on the thermostat.
Navigating The Menu
Start by turning on your thermostat. Press the “Menu” button on the display. Use the arrow keys to navigate. Look for “WiFi Setup” in the options.
Check Best Thermostat Pricing in Amazon
** As an Amazon Associate, I earn from qualifying purchases.
Selecting Wifi Option
Once you find “WiFi Setup,” press the select button. A list of available networks will appear. Choose your home network from the list. Enter your WiFi password when prompted. Wait for the thermostat to connect. You will see a confirmation message.
Connect To Wifi
Connecting your Honeywell Home Thermostat to WiFi can enhance your home comfort. You can control the temperature from your phone. It’s simple and quick. Follow these steps to connect your thermostat to WiFi.
Choosing Network
First, find your thermostat’s screen. Look for a WiFi setup option. Tap it. A list of available networks will appear. Find your home network. Make sure you choose the right one. If you are unsure, check your router’s name. Once you find your network, tap on it.
Entering Password
Now, it’s time to enter your network password. Use the on-screen keyboard. Type in your WiFi password. Be careful with letters and numbers. Double-check for any typos. Once entered, press ‘Done’ or ‘Connect’. The thermostat will now connect to your network.
You will see a confirmation message. Your Honeywell Home Thermostat is now connected to WiFi. You can control it using your smartphone. Enjoy the convenience of adjusting your home’s temperature from anywhere.
Verify Connection
Ensure your Honeywell Home Thermostat connects to WiFi by verifying the connection settings. Check your device’s network and password for accuracy. Follow the on-screen prompts to complete the connection process.
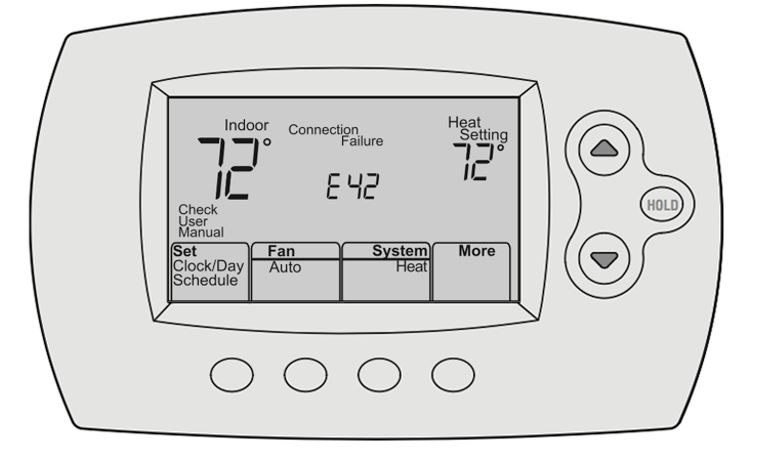
### Verify Connection Once you’ve connected your Honeywell Home Thermostat to your WiFi network, it’s crucial to verify that the connection is strong and stable. This ensures that your thermostat can efficiently communicate with your mobile app and other smart devices. Let’s dive into the steps to verify your connection effectively. ###Checking Signal Strength
First, check the WiFi signal strength. A weak signal can disrupt communication. Navigate to your thermostat’s settings and look for the WiFi signal strength indicator. It might be represented by bars, similar to those on your phone. If you see only one or two bars, consider moving your router closer to the thermostat. Alternatively, you can use a WiFi extender to boost the signal. ###Testing Connectivity
Next, test the connectivity to ensure everything is working smoothly. Open your Honeywell Home app on your phone. Try adjusting the temperature settings from the app. If the thermostat responds immediately, your connection is solid. However, if there’s a delay or no response, there might be an issue with the WiFi connection. In such cases, restart your router and thermostat. This simple step often resolves connectivity problems. Wouldn’t it be frustrating to have your thermostat not follow your commands when you need it the most? Ensuring a strong and stable connection prevents such scenarios. By following these steps, you can enjoy a seamless experience with your Honeywell Home Thermostat.Troubleshooting
Setting up your Honeywell Home Thermostat to Wi-Fi can sometimes be tricky. You might face issues that can make the process frustrating. But don’t worry. We will cover common problems and how to reset your thermostat.
Common Issues
One common issue is the thermostat not connecting to Wi-Fi. This can happen for various reasons. Your Wi-Fi signal might be weak. Or there could be interference from other devices. Sometimes, the thermostat’s software needs an update.
Another issue is incorrect Wi-Fi password entry. Ensure you enter the correct password. Check for any typos or misplaced characters. Also, ensure your Wi-Fi network is set to 2.4 GHz. Some thermostats do not support 5 GHz networks.
Resetting The Thermostat
If you have tried everything and it still doesn’t connect, try resetting the thermostat. This can resolve many issues. To reset, locate the ‘Menu’ button on your thermostat. Navigate to ‘Settings’ and then ‘Reset’.
Once you select ‘Reset’, confirm the action. Your thermostat will restart. After it restarts, try connecting to your Wi-Fi again. This process often fixes connection problems.
If the problem persists, you may need to contact Honeywell support. They can provide further assistance. Following these steps should help you connect your thermostat to Wi-Fi successfully.
Credit: www.honeywellhome.com
Frequently Asked Questions
How Do I Connect My Honeywell Thermostat To Wifi?
Connect your Honeywell thermostat to WiFi by pressing the “Menu” button. Select “WiFi Setup” and follow the on-screen instructions. Enter your WiFi network name and password. Confirm the connection.
How Do I Reconnect My Smart Thermostat To Wifi?
To reconnect your smart thermostat to WiFi, open the thermostat’s settings menu. Select “Network” or “WiFi settings. ” Choose your network, enter the password, and confirm.
How Do I Reset My Honeywell Thermostat Wifi?
To reset your Honeywell thermostat WiFi, press the “Menu” button, select “WiFi Setup,” then follow the on-screen instructions.
How To Connect Wireless Thermostat?
To connect a wireless thermostat, turn off power, remove old thermostat, connect new thermostat wires, and mount it. Follow the manufacturer’s app instructions to connect to Wi-Fi and configure settings. Ensure compatibility with your HVAC system.
Conclusion
Connecting your Honeywell Home Thermostat to WiFi is simple. Follow the steps carefully. Ensure your WiFi network is stable. Check the thermostat’s compatibility. Use the Honeywell app for easy setup. Restart if you face issues. Enjoy the benefits of a connected home.
Control your thermostat from anywhere. Save energy and money. Stay comfortable with accurate temperature control. Now, your home is smarter and more efficient.
Check Best Thermostat Pricing in Amazon
** As an Amazon Associate, I earn from qualifying purchases.