
Check Best Thermostat Pricing in Amazon
** As an Amazon Associate, I earn from qualifying purchases.
Are you ready to take full control of your home’s comfort with your Honeywell WiFi thermostat? Setting it up might seem tricky at first, but once you know the simple steps, you’ll have your heating and cooling working exactly how you want—right from your phone.
Imagine adjusting your thermostat from anywhere, saving money on energy bills, and coming back to the perfect temperature every time. Keep reading, and you’ll learn exactly how to configure your Honeywell WiFi thermostat quickly and easily, so you can enjoy all these benefits without any hassle.
Choosing The Right Thermostat
Choosing the right thermostat is a key step before setting up your Honeywell WiFi thermostat. The right model fits your home’s heating and cooling system. It also matches your lifestyle and budget. Picking a thermostat with the right features makes controlling your home’s temperature easy and efficient.
Models Compatible With Wifi
Honeywell offers several WiFi thermostat models. The Honeywell Home T9 and T10 Pro are popular choices. They support remote control via smartphone apps. The Lyric T5 model also connects to WiFi and works well for basic needs. Check your heating and cooling system type before buying. Some models fit only certain systems like gas, electric, or heat pumps.
Features To Consider
Look for features that suit your daily routine. Scheduling options help save energy by setting temperature changes automatically. Some models have smart sensors to detect room occupancy. This feature keeps rooms comfortable only when needed. Voice control compatibility works with Alexa or Google Assistant. Easy installation and clear display screens improve user experience. Battery life and WiFi range also matter for reliable use.
Preparing For Installation
Preparing for the installation of your Honeywell WiFi thermostat is a crucial first step. Proper preparation ensures a smooth setup and prevents common issues. Taking time to gather tools and secure safety measures can save effort later.
Tools And Materials Needed
Before starting, gather the right tools and materials. You will need a screwdriver, wire stripper, and a drill for mounting. A level helps to position the thermostat straight. Also, have the Honeywell WiFi thermostat and its user manual ready. A small flashlight might be useful if the installation area is dark.
Turning Off Power
Safety is a top priority during installation. Turn off the power to your heating and cooling system at the breaker box. This step prevents electrical shock and protects the thermostat. Double-check that the power is off by testing the system controls. Only start wiring after confirming the power is safely off.
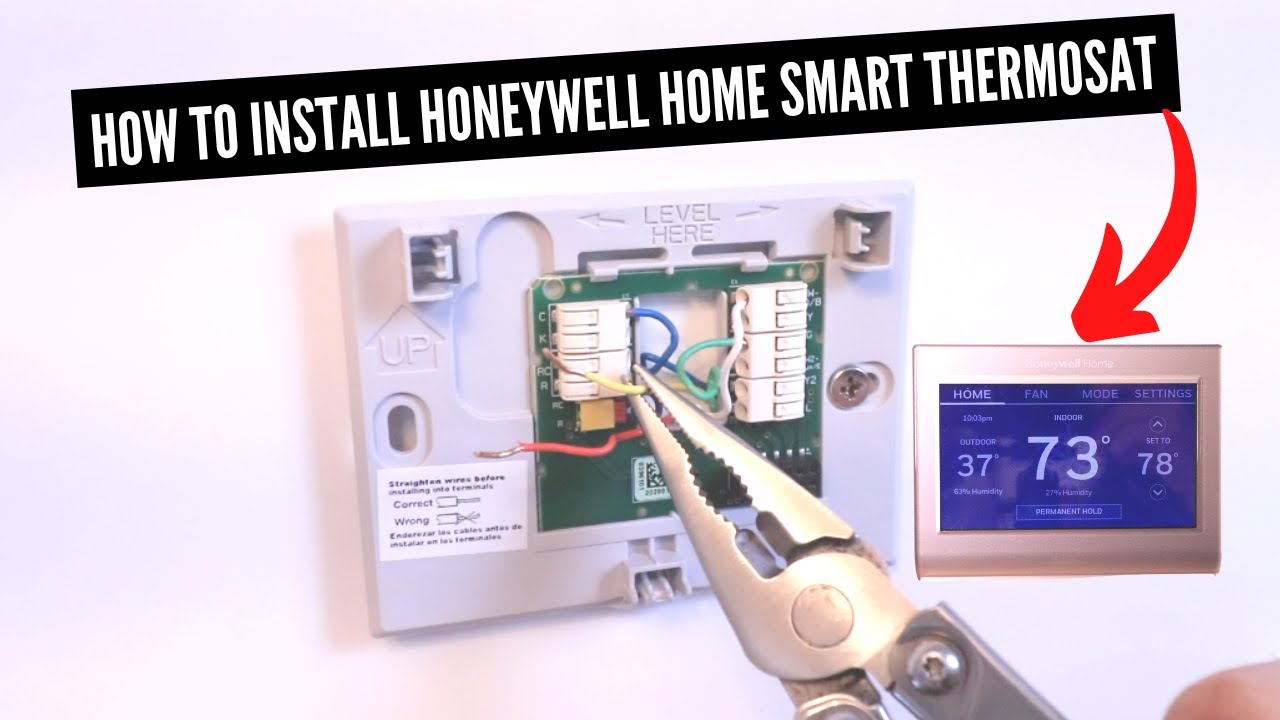
Installing The Thermostat
Installing a Honeywell WiFi thermostat is a straightforward process. Proper installation helps the device work well. Follow the steps carefully to avoid issues. Start by removing the old thermostat safely. Then, wire the new device correctly. Finally, mount the thermostat on the wall.
Removing The Old Thermostat
Turn off power to your heating system at the breaker. This prevents electric shock or damage. Remove the thermostat cover by gently pulling it off. Take a photo of the wiring. This helps during the new wiring process. Unscrew the thermostat base from the wall. Carefully disconnect the wires. Keep the wires separated and labeled if needed.
Wiring The New Device
Match the wires to the new thermostat terminals. Use the photo or wire labels to guide you. Connect each wire firmly to the correct terminal. Avoid loose or crossed wires. Check the Honeywell manual for terminal names. Usually, wires include R, W, Y, G, and C. The C wire powers the WiFi feature. Make sure the C wire is connected if available.
Mounting The Thermostat
Place the thermostat base on the wall. Align it with the screw holes. Use a level to ensure it is straight. Secure the base with screws. Snap the thermostat display onto the base. Turn the power back on at the breaker. The device should power up and start setup.
Credit: www.youtube.com
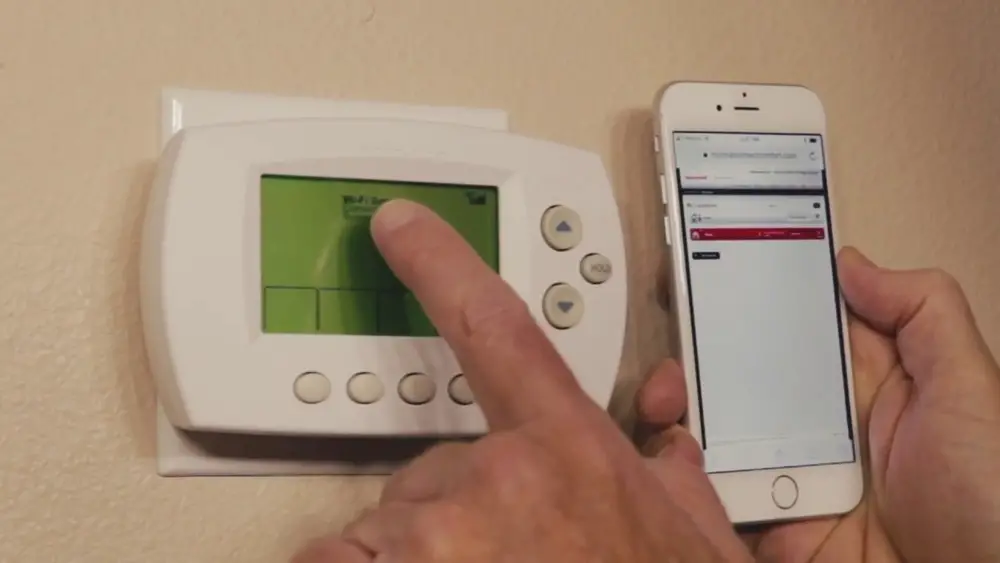
Connecting To Wifi
Connecting your Honeywell WiFi thermostat to your home network is essential for remote control and smart features. This process allows the thermostat to communicate with your smartphone or voice assistant. Follow these clear steps to get your device online quickly.
Accessing Network Settings
Start by turning on your Honeywell thermostat. Find the menu button on the main screen and press it. Look for the “Settings” option, then select “Network” or “WiFi.” This menu shows available WiFi networks nearby. Make sure your router is on and within range.
Entering Wifi Credentials
Choose your WiFi network from the list shown. Next, enter the password carefully using the touchscreen. Take your time to avoid typos. After inputting the password, confirm it by selecting “Connect.” Your thermostat will try to join the network. Wait a few moments for the connection.
Troubleshooting Connection Issues
If the thermostat does not connect, check your password again. Ensure your WiFi signal is strong near the thermostat. Restart the thermostat and router if needed. Sometimes moving the router closer helps. Also, verify your router’s settings allow new devices to connect. Repeat the connection steps if necessary.
Setting Up The Honeywell App
Setting up the Honeywell app is key to controlling your thermostat easily. The app lets you adjust temperature, set schedules, and monitor energy use from your phone. Follow simple steps to connect your thermostat to the app and start managing your home comfort remotely.
Downloading And Installing
Open the app store on your smartphone. Search for “Honeywell Home” or “Honeywell Total Connect Comfort.” Choose the official app and tap “Install” or “Get.” Wait for the download to finish. Once done, open the app to begin setup.
Creating An Account
Tap “Create Account” on the app’s welcome screen. Enter your email address and create a password. Fill in your personal details as required. Confirm your email if asked. This account lets you control your thermostat anytime, anywhere.
Pairing The Thermostat
Make sure your thermostat is powered on and connected to Wi-Fi. In the app, select “Add Device” or “Pair Thermostat.” Follow the prompts to enter your thermostat’s model and Wi-Fi details. Wait for the app to find and link to your thermostat. Once paired, you can control it from your phone.
Check Best Thermostat Pricing in Amazon
** As an Amazon Associate, I earn from qualifying purchases.
Credit: www.honeywellstore.com
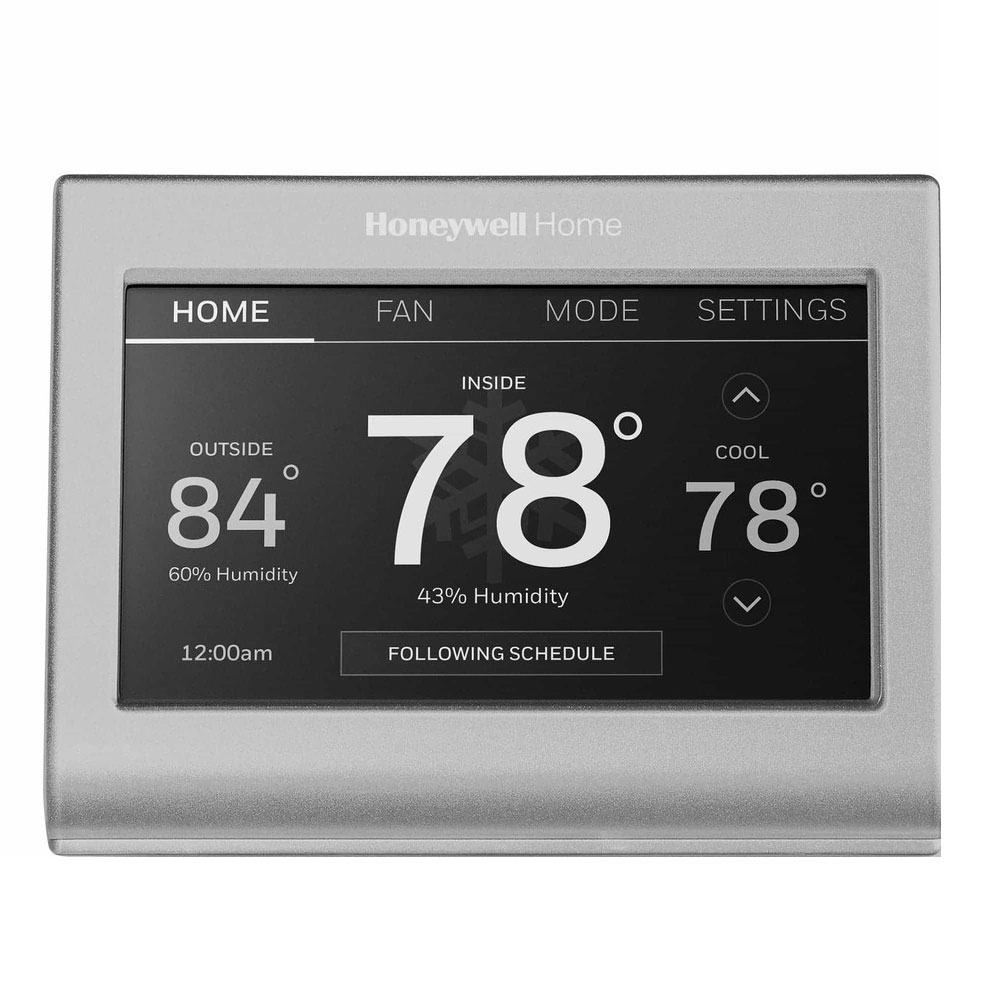
Configuring Temperature Settings
Configuring temperature settings on your Honeywell WiFi thermostat helps maintain comfort in your home. It lets you control heating and cooling easily. Adjusting these settings saves energy and lowers bills. The thermostat offers different ways to set your preferences. You can create schedules, adjust temperatures, and use smart features like geofencing.
Setting Schedules
Schedules let you set temperatures for different times of the day. You can program morning, day, evening, and night settings. This keeps your home comfortable when you need it. For example, lower the temperature while you sleep. Set it warmer just before you wake up. Use the thermostat app or the device screen to create these schedules. This automation saves energy without extra effort.
Adjusting Temperature Preferences
You can change temperature preferences anytime. Use the touchscreen or mobile app to set your desired temperature. Adjust heating or cooling based on your comfort. The thermostat remembers your preferences for future use. You can also set temperature limits to avoid extreme settings. This helps protect your HVAC system and save energy.
Using Geofencing Features
Geofencing uses your phone’s location to control temperature. The thermostat detects when you leave or come home. It adjusts settings automatically based on your presence. This feature saves energy by lowering heating or cooling when no one is home. When you return, the thermostat warms or cools your space quickly. Enable geofencing in the app for hands-free temperature control.
Optimizing Energy Efficiency
Optimizing energy efficiency with your Honeywell WiFi thermostat saves money and reduces waste. Small changes in settings make a big difference in your energy bills. Smart features help you control heating and cooling easily. These tools keep your home comfortable while using less power.
Using Smart Alerts
Smart alerts notify you about temperature changes or system issues. They warn if your HVAC system needs maintenance. Early alerts prevent costly repairs and energy waste. You receive messages on your phone or email. These alerts help keep your system running efficiently.
Integrating With Other Devices
Connect your thermostat with smart home devices for better control. Link with voice assistants like Alexa or Google Home. Use sensors to track room temperature and adjust settings automatically. Integration allows you to create schedules that match your routine. This reduces energy use when rooms are empty.
Maintaining Your Thermostat
Maintaining your Honeywell WiFi thermostat is key for reliable performance. Regular care keeps it working smoothly and extends its life. Small steps can make a big difference in comfort and energy savings.
Firmware Updates
Keep your thermostat’s software up to date. Firmware updates fix bugs and add new features. Check the Honeywell app or website for available updates. Install updates promptly to ensure the best operation.
Regular Cleaning
Dust and dirt can affect your thermostat’s sensors. Clean the device gently with a soft, dry cloth. Avoid using water or harsh cleaners. Regular cleaning helps maintain accurate temperature readings.
Battery Replacement
Check the thermostat’s battery status regularly. Low batteries can cause system errors or loss of WiFi connection. Replace batteries as soon as the device signals low power. Use the recommended battery type for best results.

Credit: www.techsolutions.support.com
Frequently Asked Questions
How Do I Connect Honeywell Thermostat To Wifi?
To connect, access the thermostat menu and select WiFi setup. Choose your network and enter the password. The device will confirm once connected successfully.
Can I Control Honeywell Thermostat Remotely?
Yes, using the Honeywell app, you can control your thermostat remotely. This feature allows temperature adjustments from anywhere via smartphone or tablet.
What If Honeywell Thermostat Wifi Fails To Connect?
Restart your router and thermostat. Ensure correct WiFi password entry. If issues persist, reset the thermostat to factory settings and try again.
How To Update Honeywell Thermostat Firmware?
Navigate to the settings menu and select software update. Connect to WiFi, then download and install the latest firmware for optimal performance.
Conclusion
Configuring your Honeywell WiFi thermostat is simple and quick. Follow the steps carefully to connect it to your network. Once set up, enjoy better control of your home’s temperature. Save energy and stay comfortable all year round. This guide helps you get started without confusion.
Now, your thermostat works smartly with just a few taps. Enjoy the ease of managing your heating and cooling from anywhere.
Check Best Thermostat Pricing in Amazon
** As an Amazon Associate, I earn from qualifying purchases.