
Check Best Thermostat Pricing in Amazon
** As an Amazon Associate, I earn from qualifying purchases.
To check the thermostat on a water heater, first, ensure safety. Turn off the power supply.
A thermostat regulates the temperature of your water heater. If your water isn’t hot enough, the thermostat might be the problem. Checking the thermostat is a straightforward process that can help you diagnose issues. This guide will walk you through the steps to check the thermostat safely.
Understanding how to do this can save you time and money. It can also prevent potential water heater damage. Let’s dive into the details and ensure your water heater works efficiently.

Credit: diy.repairclinic.com
Tools And Materials Needed
Checking the thermostat on your water heater can save you from cold showers. To do this task effectively, you need specific tools and materials. These items help ensure safety and accuracy. Let’s break down what you will need.
Required Tools
First, gather these essential tools:
- Screwdriver: Choose one that fits the screws on your water heater panel.
- Multimeter: This device measures voltage and ensures the thermostat works correctly.
- Non-contact Voltage Tester: Safety first. Verify the power is off before starting.
- Needle-nose Pliers: These help with gripping and adjusting wires.
Necessary Materials
Next, gather these materials:
- Replacement Thermostat: Have a new thermostat ready in case the old one is faulty.
- Insulation Tape: Use this for securing wires and preventing electrical hazards.
- Marker: Mark wires to remember their positions when reconnecting.
Having the right tools and materials makes the job easier. It also ensures you can complete the task safely and efficiently.
Credit: www.home-repair-central.com
Locating The Thermostat
Knowing how to locate the thermostat on your water heater is crucial. Properly checking it ensures your water heater works efficiently. This section will guide you through finding and identifying the thermostat.
Finding The Access Panel
First, you need to find the access panel. The access panel is a metal cover on the side of the water heater. It is usually secured with screws. You may need a screwdriver to remove it. Once the screws are out, gently take off the panel.
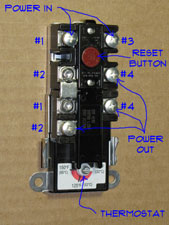
Identifying The Thermostat
After removing the access panel, you will see the thermostat. It is a small device with a temperature dial. The thermostat is usually located near the heating element. You may see some wires connected to it. Ensure the power is off before you touch anything inside.
Turning Off Power Supply
First, ensure the water heater is unplugged. Turning off the power supply prevents electrical accidents. This step is crucial before checking the thermostat.
When it comes to checking the thermostat on your water heater, safety is paramount. The first step to ensure you’re working safely is to turn off the power supply. This will protect you from any accidental electrical shocks or mishaps. Let’s dive into the details of how you can do this effectively.Switching Off Circuit Breaker
The first thing you need to do is find your home’s main electrical panel. Typically, it’s located in a garage, basement, or utility room. Once you locate the panel, look for the circuit breaker labeled “Water Heater” or something similar. Flip the switch to the “OFF” position. This cuts off the electrical supply to your water heater. I remember the first time I did this; I was a bit nervous about touching the breaker. But once I did, I realized how simple and safe it was. Just a quick flip of the switch and you’re good to go.Ensuring Power Is Off
Now, it’s crucial to double-check that the power is genuinely off. You don’t want any surprises while you’re working on your water heater. Use a non-contact voltage tester to ensure there’s no electricity flowing to the unit. Simply place the tester near the wire connections. If it doesn’t light up or make a sound, you’re safe. This step might seem like overkill, but trust me, it’s worth the peace of mind. Imagine the shock—literally—of working on what you think is a powerless unit only to find out otherwise. By following these steps, you can safely move on to checking the thermostat on your water heater. Do you have any tips or experiences to share about turning off the power supply? Feel free to leave a comment!Removing Access Panel
Checking the thermostat on your water heater is essential to ensure it’s functioning correctly. The first step in this process involves removing the access panel. This might sound complicated, but it’s actually quite straightforward and can be done with minimal tools. Let’s dive into the steps of unscrewing the panel and storing screws safely.
Unscrewing The Panel
Begin by locating the access panel on your water heater. This is typically a small, rectangular panel on the side of the unit. Use a screwdriver that fits the screws on the panel. Turn the screws counterclockwise to loosen them.
As you unscrew each screw, keep a firm grip so they don’t fall and get lost. If your water heater is old, the screws might be rusty or difficult to turn. In that case, apply a bit of penetrating oil and give it a few minutes before trying again.
Once all screws are removed, gently pull the panel away. You should now see the internal components of the water heater, including the thermostat.
Storing Screws Safely
Now that you’ve removed the screws, it’s crucial to store them safely. Losing them can turn a simple job into a frustrating search mission. Use a small container or a magnet to keep the screws together.
I find that an old pill bottle or a ziplock bag works well. This way, you won’t accidentally kick them under the water heater or lose them in the surrounding area. Additionally, storing screws safely ensures you can quickly reassemble the panel once your work is complete.
Have you ever been in the middle of a repair and found yourself hunting for a missing screw? It’s a small step, but it saves a lot of time and headache.
Check Best Thermostat Pricing in Amazon
** As an Amazon Associate, I earn from qualifying purchases.
With the access panel removed and screws stored safely, you’re ready to inspect the thermostat. Remember, a bit of preparation goes a long way in making your DIY projects smoother and more efficient. Do you have any other tips for keeping track of small parts during repairs?
Testing The Thermostat
Easily check the thermostat on your water heater by turning off the power. Remove the access panel. Use a multimeter to test the thermostat’s functionality.
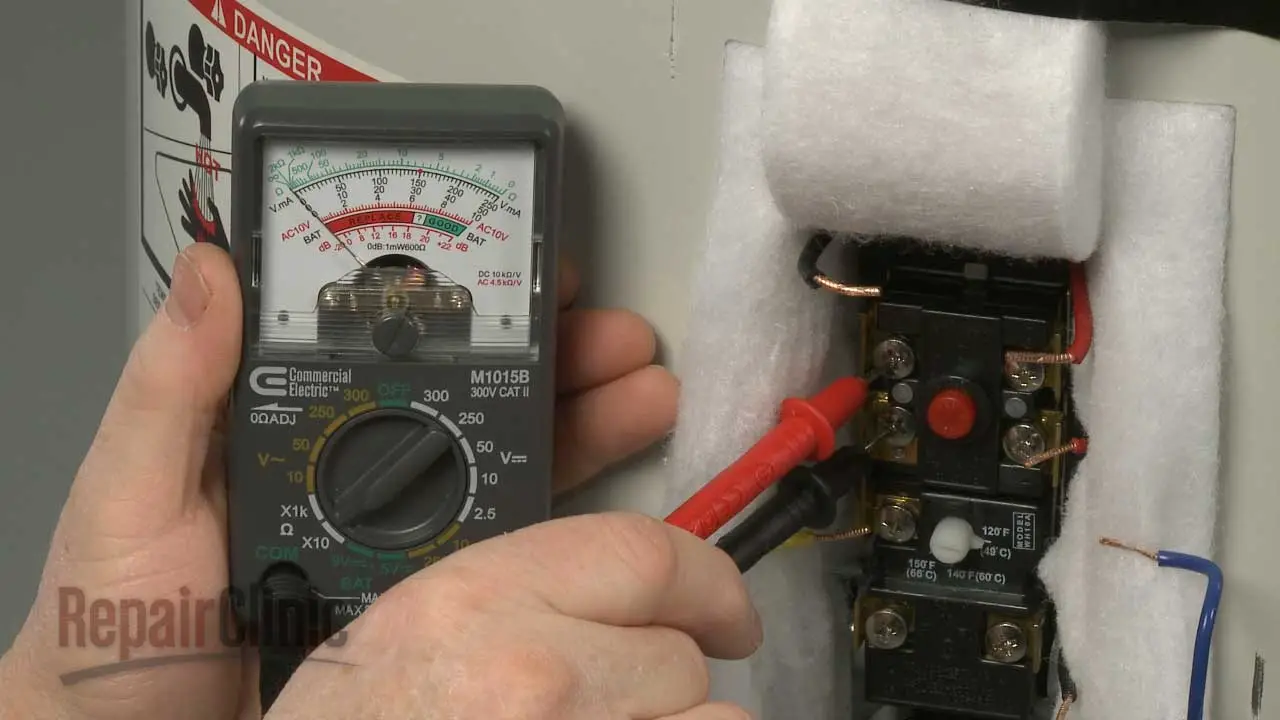
Testing the Thermostat Testing the thermostat on your water heater is essential for ensuring it functions properly. A malfunctioning thermostat can lead to inconsistent water temperatures or even a lack of hot water altogether. By following a few simple steps, you can determine if your thermostat is working correctly.Using A Multimeter
To test the thermostat, you will need a multimeter. This handy tool measures electrical voltage, current, and resistance. First, turn off the power to your water heater at the circuit breaker. Safety first! Remove the access panels on the water heater. Use a screwdriver to carefully take off the panels and expose the thermostat. Set your multimeter to the resistance setting (ohms). Touch the multimeter probes to the thermostat terminals. A good thermostat should show a reading of zero or close to zero ohms. If the reading is significantly higher, the thermostat may be faulty.Interpreting The Readings
Understanding your multimeter readings is crucial. A zero or near-zero reading indicates continuity, meaning the thermostat is likely functioning well. If the reading is very high or infinite, there is no continuity. This suggests the thermostat is not working and may need to be replaced. To be sure, test both the upper and lower thermostats if your water heater has two. Compare the readings to ensure accuracy. Is your thermostat showing a high reading? It might be time to replace it. This is a straightforward fix that can save you from the inconvenience of cold showers. By regularly testing your water heater’s thermostat, you ensure that it operates efficiently. This simple check can prevent bigger problems down the line. Have you ever tested your water heater’s thermostat? Share your experiences and tips in the comments below.Adjusting Or Replacing The Thermostat
Adjusting or replacing the thermostat on your water heater can solve many issues. It helps in maintaining the perfect water temperature. This guide will cover how to adjust the temperature settings and replace a faulty thermostat.
Adjusting Temperature Settings
First, locate the thermostat on your water heater. It is usually behind a panel. Use a screwdriver to remove the panel. You will see a dial or a digital display. Adjust the dial to your desired temperature. For safety, set it between 120°F and 140°F. This prevents scalding and saves energy. After adjusting, replace the panel and secure it with screws.
Replacing Faulty Thermostat
If adjusting the temperature settings does not work, you may need a new thermostat. Start by turning off the power to the water heater. This ensures safety. Remove the panel covering the thermostat. Use a multimeter to check if the thermostat is faulty. If it shows no continuity, it needs replacement. Disconnect the wires from the old thermostat. Take note of their positions. Attach the wires to the new thermostat, matching their original positions. Secure the new thermostat in place. Replace the panel and turn the power back on.
Reassembling And Testing
Reassembling and testing your water heater thermostat ensures your efforts have paid off and your heater is functioning correctly. This step is crucial to avoid potential issues and guarantee your water heater is back in optimal condition. Let’s dive into the final stages: reattaching the access panel and restoring power to test the thermostat.
Reattaching The Access Panel
After successfully checking and adjusting your thermostat, it’s time to put everything back in place. Carefully reattach the access panel to your water heater. Make sure the screws are tightened securely but not overly tight to avoid stripping them.
Double-check that no wires are pinched or exposed before securing the panel. This step is essential for safety and proper functioning. A properly closed panel prevents dust and debris from entering the thermostat area, which could affect performance.
Restoring Power And Testing
Once the access panel is securely in place, you can restore power to the water heater. If you had turned off the circuit breaker, switch it back on. For gas water heaters, ensure the gas valve is back to the “on” position.
Allow some time for the water heater to return to its normal operation. Usually, this takes about 30 minutes. During this period, check for any unusual noises or signs of malfunction.
Finally, test the water temperature at a faucet to ensure the thermostat is set correctly. If the water is too hot or not warm enough, you might need to adjust the thermostat again. Remember, the ideal setting is usually around 120 degrees Fahrenheit.
Have you ever encountered unexpected results when testing your water heater? How did you resolve it? Share your experiences in the comments below!

Credit: www.reddit.com
Frequently Asked Questions
How Do I Know If My Water Heater Thermostat Is Bad?
Check for inconsistent water temperatures. Look for leaks around the thermostat. Listen for unusual noises. Test with a multimeter. Contact a professional if unsure.
How Do I Reset A Water Heater Thermostat?
Turn off the power supply. Locate the thermostat. Press the reset button firmly. Restore power and check the heater.
What Is Normal Thermostat Temp For Water Heater?
The normal thermostat temperature for a water heater is typically set at 120°F (49°C). This setting helps prevent scalding and saves energy.
How To Test Heater Thermostat?
Turn off the heater. Remove the thermostat. Use a multimeter to test for continuity. Replace if the reading shows no continuity.
Conclusion
Checking your water heater thermostat is a simple but essential task. Regular checks ensure efficient heating and prevent issues. Follow the steps mentioned above for a smooth process. Keep your water heater in good shape. Save on energy bills and avoid sudden cold showers.
Take these small steps for a reliable hot water supply. Your home will thank you for it.
Check Best Thermostat Pricing in Amazon
** As an Amazon Associate, I earn from qualifying purchases.