
Check Best Thermostat Pricing in Amazon
** As an Amazon Associate, I earn from qualifying purchases.
To check your thermostat, start with a simple test. Set it to a temperature and observe if your HVAC system responds.
A thermostat is crucial for maintaining a comfortable home environment. It regulates the heating and cooling systems based on your settings. If your home feels too hot or cold, the thermostat might be faulty. Troubleshooting it can save you from discomfort and high energy bills.
In this guide, we will show you how to check your thermostat for issues. You’ll learn simple steps to diagnose and fix common problems. Whether you’re facing an unresponsive thermostat or inconsistent temperatures, this guide will help. Follow along to ensure your home stays cozy and energy-efficient.
Introduction To Thermostats
Thermostats play a vital role in our homes. They control heating and cooling systems, ensuring comfort. These devices help maintain desired temperatures by switching systems on or off. Understanding how they work is essential for every homeowner.
Thermostats come in various types. Some are manual, while others are programmable. Smart thermostats have gained popularity for their advanced features. Despite their differences, all thermostats serve the same primary function.
Importance Of Thermostats
Thermostats regulate indoor temperatures. This ensures a comfortable living environment. A well-functioning thermostat can save energy. It reduces utility bills by optimizing heating and cooling cycles.
Maintaining the right temperature is crucial for health. It prevents issues like mold growth and excessive dryness. Thermostats also contribute to the longevity of HVAC systems. They prevent overuse and unnecessary wear and tear.
Common Thermostat Issues
Several problems can affect thermostat performance. One common issue is an incorrect temperature reading. This can lead to discomfort and increased energy use. Another issue is poor wiring or loose connections. This can cause the thermostat to malfunction.
Dirt and dust can accumulate inside the thermostat. This affects its sensors and overall performance. Battery problems are also common in digital thermostats. Dead batteries can cause the device to stop working altogether.
Sometimes, the thermostat’s settings might be wrong. This can cause the HVAC system to run inefficiently. Regular checks and maintenance can prevent these issues.
Preparing For The Check
Prepare to check your thermostat by ensuring the power is off. Remove the cover and inspect the wiring connections.
Preparing to check your thermostat is a crucial first step. It ensures you have everything you need and keeps you safe during the process. Let’s break down the steps to get you ready.Gather Necessary Tools
Before you start, gather all the tools you’ll need. This typically includes a screwdriver, a multimeter, and your thermostat’s manual. Having these on hand will make the process smoother. You might also want to grab a notepad and pen. Jotting down any observations can be helpful for troubleshooting. Make sure you have a flashlight if your thermostat is in a dimly lit area.Safety Precautions
Safety should be your top priority. Always turn off the power to your HVAC system before you start. This prevents any risk of electric shock. Wear rubber-soled shoes to avoid static discharge. You don’t want to damage any components. If you’re unsure about anything, consult a professional. It’s better to be safe than sorry. — Gathering the right tools and following safety precautions will set you up for success. Have you ever found yourself halfway through a project only to realize you’re missing something essential? It can be frustrating. Preparation helps you avoid that scenario. Are you ready to dive into the actual check? Let’s make sure your thermostat is working perfectly.Inspecting The Thermostat
Inspecting the thermostat is a crucial step to ensure your heating and cooling systems work efficiently. A faulty thermostat can lead to discomfort and higher energy bills. Let’s dive into how you can inspect the thermostat effectively.
Visual Inspection
Start with a visual inspection of your thermostat. Look at the display screen. Is it showing any readings? If the screen is blank, the thermostat might not be getting power.
Check the settings. Ensure it is set to the correct mode—either heating or cooling. Sometimes, a simple switch from “Off” to “Heat” or “Cool” can solve the problem.
Notice the room temperature displayed. Compare it with the set temperature. If they are too far apart, you might need to adjust the settings or inspect further.
Checking For Physical Damage
Physical damage to the thermostat can affect its performance. Check for cracks or chips on the thermostat’s casing. Such damage can indicate internal issues.
Inspect the wiring. Loose or corroded wires can lead to intermittent problems. Ensure all connections are secure. If you are not comfortable with wiring, consider calling a professional.
Finally, look at the mounting of the thermostat. If it is not level, the internal mercury switch may not work correctly. Use a level to check and adjust if necessary.
Have you ever had a thermostat issue that seemed minor but turned out to be a big deal? Share your stories in the comments below. They might help someone else troubleshoot their thermostat problems!
Testing Thermostat Functionality
Testing your thermostat is crucial for maintaining a comfortable home. It ensures your HVAC system runs efficiently. This guide will help you test your thermostat’s functionality.
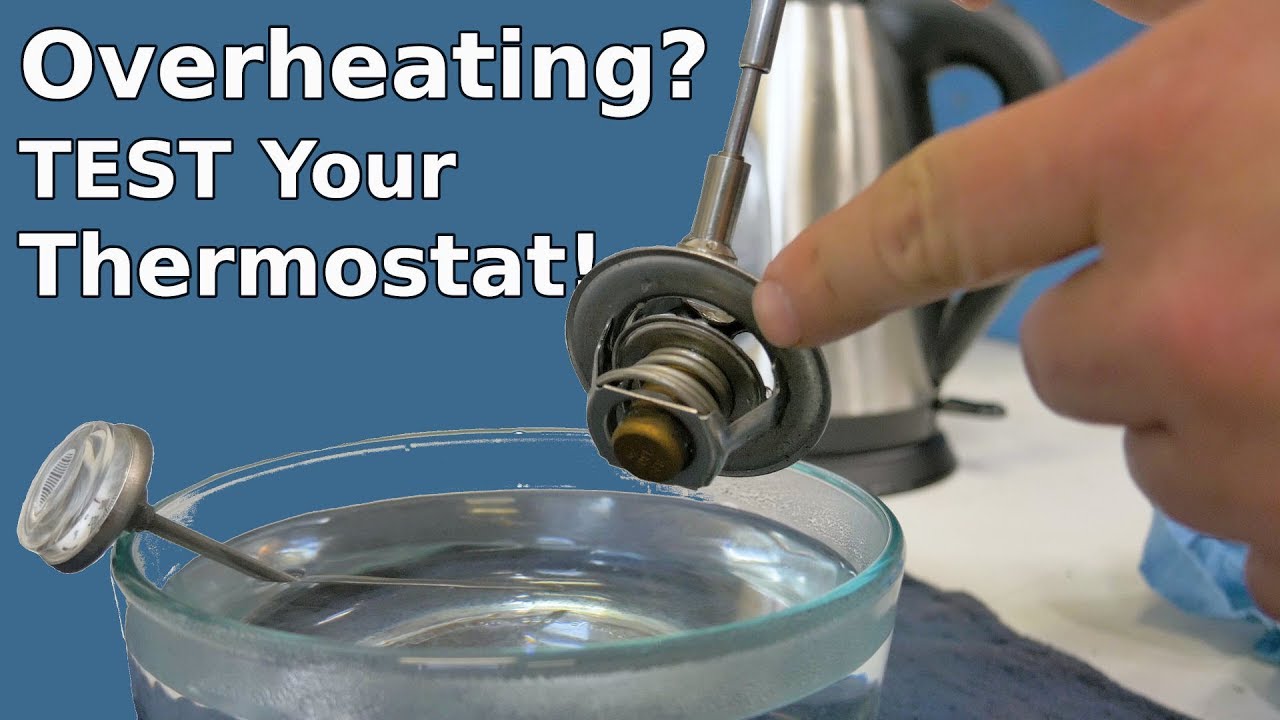
Using A Thermometer
A thermometer is a simple tool to test your thermostat. First, place the thermometer near your thermostat. Make sure it’s at the same height. Leave it for about 15 minutes. Compare the thermometer reading with the thermostat’s display. They should match closely. A difference of more than a degree may signal an issue. Adjust the thermostat setting and see if the thermometer reflects the change. This will confirm the thermostat’s accuracy.
Checking Battery Levels
Some thermostats run on batteries. Low battery levels can affect functionality. Check your thermostat’s battery compartment. Replace old batteries with new ones. Use the correct battery type. After replacing, check if the thermostat works better. Proper battery levels ensure your thermostat functions well. Regular checks prevent sudden malfunctions.
Calibrating The Thermostat
Calibrating the thermostat ensures your home stays at the desired temperature. It helps in maintaining comfort and energy efficiency. Proper calibration means accurate temperature readings and efficient system performance.
Adjusting Temperature Settings
First, locate the temperature settings on your thermostat. These are usually buttons or a dial. Make sure the thermostat is set to the desired temperature. If you set it to 70 degrees, the room should heat up to 70 degrees.
If the room feels too hot or cold, adjust the settings. Move the temperature up or down by a few degrees. Wait for the system to respond. This helps in fine-tuning the comfort level.
Ensuring Accurate Readings
Check if the thermostat is reading the room temperature correctly. Place a separate thermometer near the thermostat. Compare the readings from both devices. They should be close to each other.
Check Best Thermostat Pricing in Amazon
** As an Amazon Associate, I earn from qualifying purchases.
If the readings differ, the thermostat may need recalibration. Consult the user manual for specific instructions. Some models have a calibration feature. This allows you to adjust the displayed temperature for accuracy.

Credit: mechanics.stackexchange.com
Evaluating Thermostat Placement
Evaluating thermostat placement is vital for accurate temperature readings. A poorly placed thermostat can result in incorrect temperature regulation. This could lead to discomfort and higher energy bills. Let’s explore the ideal locations for thermostat placement and what areas to avoid.
Ideal Locations
Place your thermostat on an interior wall. This helps in getting an accurate reading. Choose a spot in the center of your home. Ensure it’s away from direct sunlight. Keep it at eye level. This makes it easy to access and read. Placing it near frequently used rooms is also a good idea. These rooms include the living room or family room. This helps in maintaining a comfortable temperature where you spend most of your time.
Avoiding Poor Placement
Avoid placing the thermostat near doors or windows. These areas can have drafts. This can cause inaccurate readings. Do not place it near heating or cooling vents. The air from these vents can affect the thermostat’s performance. Avoid placing it in the kitchen. The heat from cooking can cause false readings. Bathrooms are also a poor choice. The steam from showers can interfere with the thermostat. Lastly, avoid placing it in direct sunlight. This can cause the thermostat to think it’s warmer than it is.
Maintaining Your Thermostat
Maintaining your thermostat is crucial for a well-functioning heating and cooling system. Regular maintenance helps extend the life of your thermostat. It ensures your home stays comfortable throughout the year. Simple tasks can make a big difference. Here are some tips to keep your thermostat in top shape.
Regular Cleaning
Dust and dirt can affect your thermostat’s performance. Clean your thermostat regularly to avoid this issue. Use a soft brush or a cloth. Gently wipe the exterior and interior parts. This removes any dust that may have collected.
Be careful not to damage the internal components. A clean thermostat reads temperatures more accurately. It also helps your HVAC system work efficiently.
Routine Checks
Check your thermostat’s settings often. Ensure it is set to the correct mode. Verify that the temperature settings match your preferences. Inspect the wiring for any signs of wear or damage. Loose connections can cause your thermostat to malfunction.
Replace the batteries if your thermostat is battery-operated. This simple step prevents unexpected power issues. Routine checks help identify potential problems early. This saves you from costly repairs down the road.
Credit: www.youtube.com
When To Replace Your Thermostat
Knowing when to replace your thermostat can save you a lot of headaches. Not only does a faulty thermostat make your home uncomfortable, but it can also lead to higher energy bills. Let’s dive into the key signs that indicate it’s time for a change and how to choose the right thermostat for your home.
Signs Of Failure
Is your HVAC system running constantly or not turning on at all? This could be a sign of a failing thermostat. Another common issue is fluctuating temperatures. If you set your thermostat to 70 degrees but it feels like 65 or 75, the thermostat may be misreading the temperature.
High energy bills can also be a clue. When the thermostat isn’t working properly, your HVAC system may run more often than necessary, driving up costs. If you notice any of these signs, it might be time to consider a replacement.
Choosing A New Thermostat
Once you’ve decided to replace your thermostat, the next step is choosing a new one. You’ll want to consider several factors. Do you prefer a programmable thermostat that adjusts automatically based on your schedule, or a smart thermostat that you can control from your phone?
Think about compatibility with your HVAC system. Not all thermostats work with every system, so check the specifications. Additionally, consider user-friendly options. Some thermostats have touchscreens and intuitive interfaces, making them easier to use.
Research the features that matter most to you. Do you want energy reports to monitor your usage? Or maybe you need a model with a large, easy-to-read display. Choose a thermostat that fits your lifestyle and preferences to make your home comfortable and energy-efficient.
Have you ever had to replace your thermostat? What features did you find most useful? Share your thoughts in the comments below!
Credit: www.allclaveparts.com
Frequently Asked Questions
How Can I Test If My Thermostat Is Bad?
Check your thermostat by setting it to a higher or lower temperature. Listen for a click sound. No click indicates a bad thermostat.
How Do You Tell If You Need A New Thermostat?
A new thermostat may be needed if your HVAC system cycles frequently, temperature readings are incorrect, or energy bills spike.
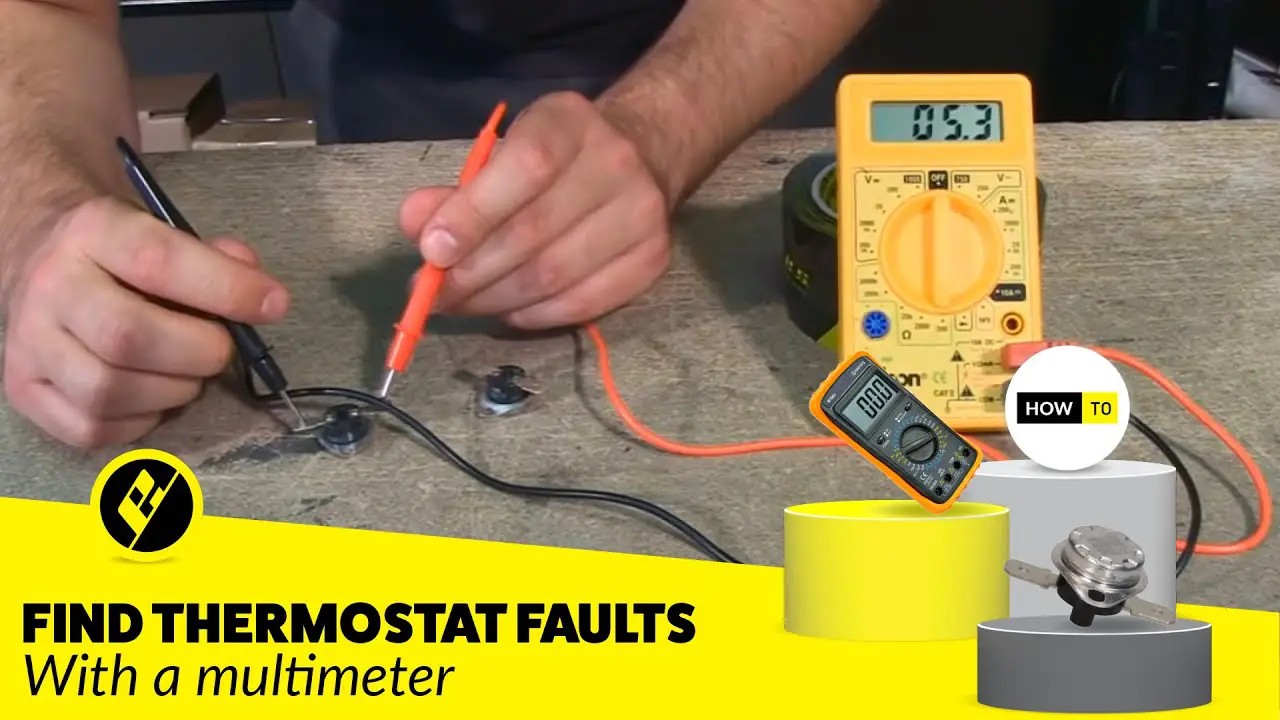
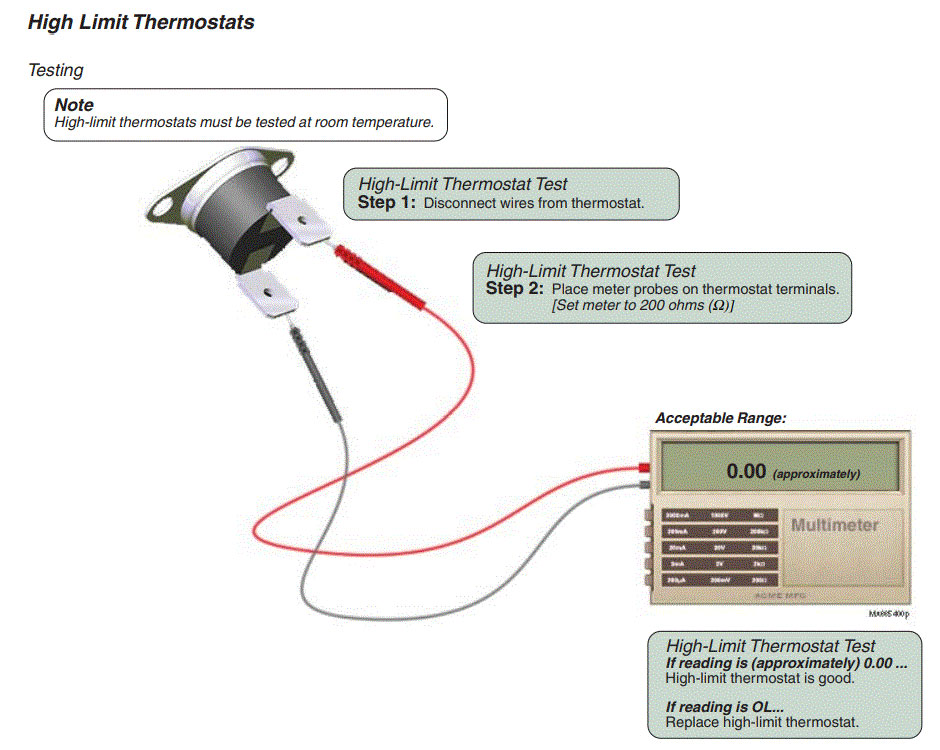
Which Is The Correct Method To Test A Thermostat?
To test a thermostat, turn off power, remove the thermostat, and test with a multimeter for continuity.
How Can I Check If My Thermostat Is Accurate?
Place a reliable thermometer near the thermostat. Compare readings after 15 minutes. Adjust calibration if necessary. Check manufacturer’s guidelines for accuracy.
Conclusion
Checking your thermostat is essential for home comfort. Follow the steps outlined above to ensure it works properly. Regular checks can prevent costly repairs. A well-maintained thermostat leads to efficient energy use. You’ll enjoy a cozy home year-round. Remember, minor issues can often be fixed easily.
Don’t hesitate to consult a professional for complex problems. Keep your thermostat in top shape for a comfortable living space. Happy checking!
Check Best Thermostat Pricing in Amazon
** As an Amazon Associate, I earn from qualifying purchases.