
Check Best Thermostat Pricing in Amazon
** As an Amazon Associate, I earn from qualifying purchases.
Checking your refrigerator thermostat is crucial for maintaining the right temperature. A faulty thermostat can lead to spoiled food or higher energy bills.
Wondering how to check your refrigerator thermostat? You’re in the right place! The thermostat controls the cooling system in your fridge, ensuring your food stays fresh. A malfunctioning thermostat can cause temperature fluctuations, making it important to know how to check it.
In this guide, we will walk you through simple steps to test your refrigerator thermostat. These easy steps will help you ensure your fridge is working efficiently. Let’s dive in and make sure your refrigerator stays at the perfect temperature.

Credit: www.hnkparts.com
Safety Precautions
Ensure the refrigerator is unplugged before checking the thermostat. Use a multimeter to test for continuity. Always handle electrical components with care to avoid injury.
Checking your refrigerator thermostat is a task that can save you money and ensure your food stays fresh. But before you dive into the technicalities, it’s crucial to remember safety precautions. These precautions are your first line of defense against accidents and ensure you can complete the task without injury.Unplugging The Refrigerator
Safety starts with unplugging your refrigerator. This simple step can prevent electric shocks. Always disconnect the power source before you begin any repairs or checks. Think about the last time you tried to fix something without unplugging it. You might have gotten a little zap that served as a shocking reminder. Avoid this mistake by ensuring your fridge is unplugged.Gathering Necessary Tools
Before you start, gather all the necessary tools. You’ll need a screwdriver, a multimeter, and possibly a flashlight. Having these tools ready can save you time and frustration. Imagine starting the check and then having to hunt down a screwdriver. It disrupts your flow and can make the task more complicated than it needs to be. Moreover, a multimeter is essential for checking the thermostat’s functionality. If you don’t have one, consider borrowing or purchasing it. This tool is invaluable for various home repairs. Remember, taking these safety precautions isn’t just about avoiding accidents. It’s about making your task smoother and more efficient. Have you ever had an experience where skipping a small step led to a big problem? Share your thoughts in the comments!
Credit: www.instagram.com
Locating The Thermostat
Find the thermostat inside the refrigerator, usually behind the control panel or near the back wall. Check its settings for proper cooling. Adjust if necessary.
Locating the thermostat in your refrigerator can seem like a daunting task, but with a bit of guidance, it’s a breeze. Knowing where the thermostat is helps you maintain the right temperature and keep your food fresh. Let’s dive into how you can find it.Thermostat Placement
Most refrigerator thermostats are inside the fridge compartment. They are usually near the top or side walls. Open your fridge and check the upper section first. Look for a small dial or a digital display. If you don’t see it there, check the side walls. The thermostat might be hidden behind a panel, so don’t hesitate to move a few items around.Refrigerator Model Differences
Different refrigerator models have thermostats in various locations. For instance, in side-by-side models, the thermostat is often in the fresh food section. In top-freezer models, you might find the thermostat in the rear of the fridge compartment. Bottom-freezer models usually have the thermostat located inside the fridge, near the back. Check your refrigerator’s manual if you’re struggling to find it. It often has a diagram showing the exact location of the thermostat. If you’ve misplaced the manual, a quick search online with your refrigerator’s model number can be a lifesaver. Remember, keeping your thermostat in check ensures your food stays fresh and your fridge runs efficiently. So, have you checked your thermostat lately?Removing The Thermostat Cover
Checking the refrigerator thermostat can seem daunting, but it’s a task you can handle with a few basic tools and a bit of patience. One of the key steps involves removing the thermostat cover. This section will guide you through this process, ensuring you can proceed with confidence.
Tools Needed
Before you start, gather the necessary tools. You’ll need a screwdriver, typically a Phillips head, and a pair of needle-nose pliers. A flashlight might also be useful to see into tight spaces. Having these tools handy will make the process smoother and quicker.
Step-by-step Removal
- Unplug the Refrigerator: Safety first! Always unplug your refrigerator before starting any repairs. This prevents electrical shock and keeps you safe.
- Locate the Thermostat: Open your fridge and find the thermostat. It’s usually located inside the refrigerator compartment, often at the back or side.
- Remove the Knob: Gently pull off the temperature control knob from the thermostat. This might require a slight wiggle but should come off easily.
- Unscrew the Cover: Use your screwdriver to remove the screws holding the thermostat cover in place. Keep these screws in a safe place so they don’t get lost.
- Remove the Cover: Carefully pull off the thermostat cover. If it’s stuck, use your needle-nose pliers to gently pry it loose. Be cautious not to damage any wires or components.
With the cover removed, you now have access to the thermostat for further inspection or replacement. This step-by-step guide should make the process straightforward and manageable.
Have you ever faced trouble finding the thermostat in your refrigerator? What other tips do you find helpful when performing DIY repairs? Share your thoughts and experiences in the comments below!

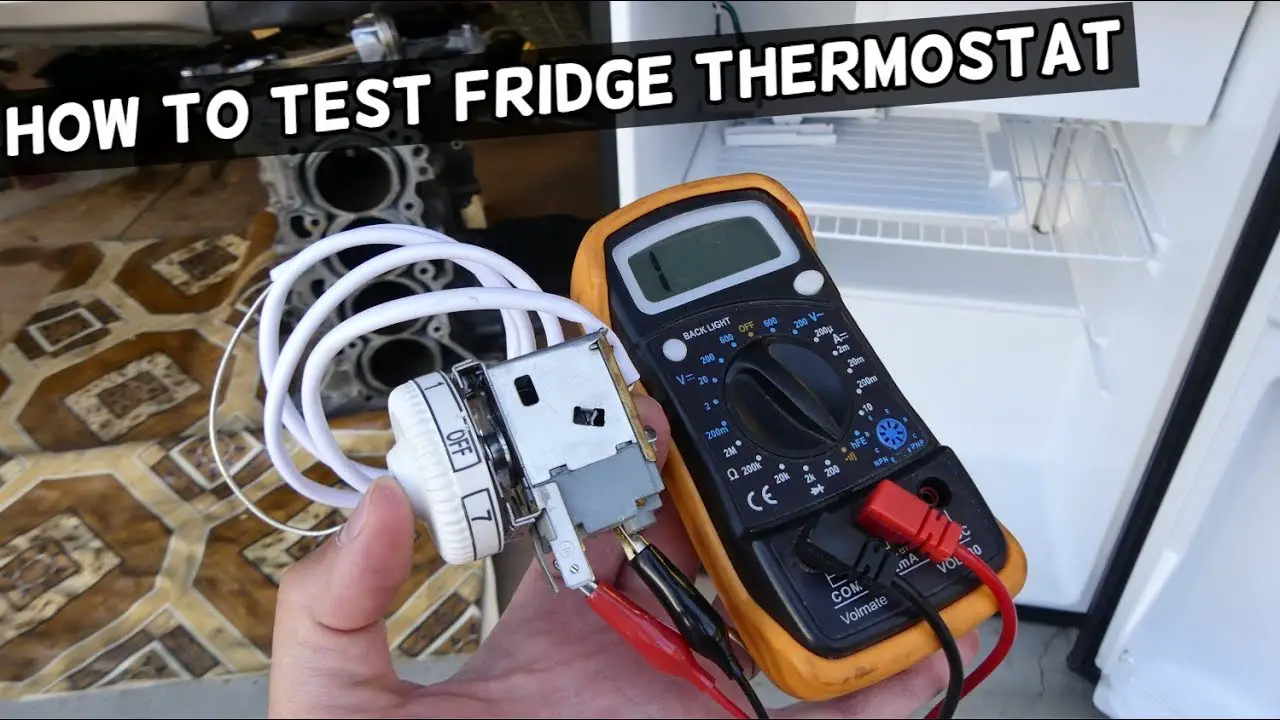
Credit: www.youtube.com
Testing The Thermostat
Testing the thermostat is crucial for ensuring your refrigerator maintains the right temperature. A malfunctioning thermostat can lead to spoiled food or overworking the fridge. Let’s dive into the steps for testing the thermostat.
Using A Multimeter
First, unplug the refrigerator to ensure safety. Locate the thermostat, usually found in the fridge’s control panel. Remove the thermostat from its housing. Set your multimeter to the ohms setting. Place the multimeter probes on the thermostat terminals. You should get a reading. If not, the thermostat may be faulty.
Interpreting The Results
A working thermostat will show a continuity reading on the multimeter. This means the circuit is closed. If the multimeter shows no continuity, the thermostat is likely broken. Replace the thermostat if needed.
Always refer to the refrigerator’s manual for specific instructions. Testing the thermostat can save you from costly repairs. Keep your fridge running efficiently with these simple steps.
Check Best Thermostat Pricing in Amazon
** As an Amazon Associate, I earn from qualifying purchases.
Adjusting The Thermostat
Learn to check your refrigerator thermostat easily. Start by locating the thermostat inside the fridge. Turn the dial to see if the temperature changes. If not, it might need a replacement.
Adjusting the thermostat on your refrigerator can make a big difference in its performance. It might seem like a small detail, but getting the temperature right is crucial for food safety and energy efficiency. If you’ve ever been frustrated by spoiled food or high energy bills, adjusting the thermostat could be the solution.Temperature Settings
The first step is to find the right temperature setting. Most refrigerators have a built-in dial or digital control panel. Generally, the ideal temperature for your fridge is between 35°F and 38°F (1.7°C to 3.3°C). Freezers should be set at 0°F (-18°C). Check the manual for recommendations specific to your model. If you can’t find it, a quick search online can help. Remember to allow some time for the temperature to stabilize after adjustments.Fine-tuning For Efficiency
Fine-tuning your refrigerator’s thermostat can help you save on energy bills. A temperature that’s too cold can use more electricity and freeze your fresh food. Too warm, and you risk spoiling your groceries. Use a separate refrigerator thermometer to get an accurate reading. Place it in the center of the fridge, not near the door or back. This way, you get a true sense of the overall temperature. Make small adjustments and check the temperature again after 24 hours. This waiting period ensures your changes have taken effect. Have you noticed how some spots in your fridge are colder? This is common and can be improved by organizing your food better. Keep airflow paths clear and avoid overstuffing. Isn’t it surprising how something as simple as a small temperature change can impact your wallet and your food’s freshness? Try adjusting your thermostat and see the difference it makes.Reassembling The Thermostat
Reassembling the thermostat in your refrigerator is a crucial step. Proper reassembly ensures your fridge maintains the right temperature. Follow these steps to reassemble the thermostat efficiently.
Securing The Cover
Start by placing the thermostat cover back in its position. Align the cover with the screw holes. Use a screwdriver to secure the cover firmly. Make sure the cover fits snugly without any gaps.
Double-checking Connections
Once the cover is secured, inspect the connections again. Ensure all wires are tightly connected. Look for any loose or disconnected wires. Tighten any loose connections with your screwdriver.
Next, check the temperature dial’s position. Ensure it moves smoothly and is set to the correct temperature. A properly set thermostat ensures your fridge functions efficiently.
Final Steps
The final steps in checking your refrigerator thermostat are crucial. These steps ensure your fridge maintains the right temperature. Let’s go through them.
Plugging In And Testing
First, plug your refrigerator back into the power socket. Listen for the sound of the compressor starting. This indicates the fridge is running. Adjust the thermostat to the desired setting. Allow the fridge to run for a few hours. This helps the temperature stabilize.
Monitoring Temperature
Place a thermometer inside the fridge. Check the temperature after a few hours. Ideally, it should be between 35 to 38 degrees Fahrenheit. If it’s too warm or cold, adjust the thermostat again. Repeat this process until the temperature is correct. Monitoring the temperature ensures your food stays fresh.
Frequently Asked Questions
How Do I Know If My Refrigerator Thermostat Is Bad?
Check for inconsistent temperatures, spoiled food, or a non-responsive thermostat. Use a multimeter to test for continuity.
How Do I Reset My Refrigerator Thermostat?
To reset your refrigerator thermostat, unplug the fridge for 5 minutes. Plug it back in and adjust the thermostat to the desired setting.
How Do You Check A Refrigerator Temperature Sensor?
Use a multimeter to test the sensor’s resistance. Consult the refrigerator’s manual for correct values. Replace if readings are incorrect.
How Do I Know If My Fridge Isn’t Cold?
Check for warm food or drinks inside. Verify if the fridge motor runs constantly. Inspect for frost buildup. Use a thermometer to check temperature, which should be below 40°F. Listen for unusual noises.
Conclusion
Checking your refrigerator thermostat is crucial for proper cooling. Follow these steps to ensure it works right. First, locate the thermostat. Adjust the settings. Observe any changes in temperature. Regular maintenance helps your fridge run efficiently. Troubleshooting issues early can prevent costly repairs.
Keep your food fresh and safe. Remember, a well-functioning thermostat extends your refrigerator’s life. Stay vigilant and proactive.
Check Best Thermostat Pricing in Amazon
** As an Amazon Associate, I earn from qualifying purchases.