
Check Best Thermostat Pricing in Amazon
** As an Amazon Associate, I earn from qualifying purchases.
To check a hot water heater thermostat, first, turn off the power. Then, use a multimeter to test for continuity.
A hot water heater is essential in every home, providing comfort and convenience. When it stops working, it can disrupt daily routines. One common issue is a faulty thermostat. Knowing how to check and diagnose this can save time and money.
This blog will guide you through the simple steps to test your hot water heater thermostat. You’ll learn how to use basic tools, ensuring your water heater functions properly. By the end, you’ll feel confident in handling this common household task. Let’s dive in and get your hot water flowing again.

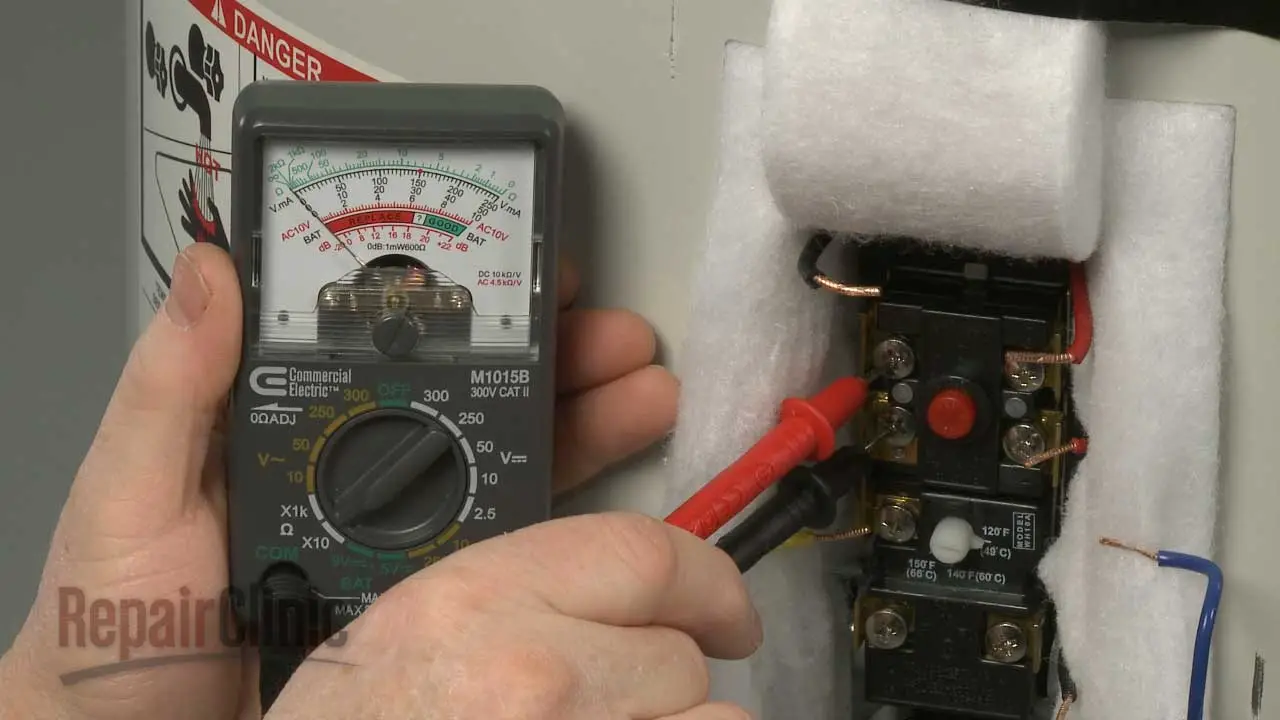
Credit: diy.repairclinic.com
Tools Needed
When you suspect that your hot water heater thermostat is malfunctioning, having the right tools can make all the difference. You don’t want to be halfway through the job and realize you’re missing something crucial. Below, we’ll break down the essential and optional tools you need to check your hot water heater thermostat efficiently.
Essential Tools
First and foremost, safety is your priority. You will need a few basic tools to get started.
- Multimeter: This is crucial for measuring electrical voltage and ensuring your thermostat is functioning correctly.
- Screwdrivers: Both flat-head and Phillips screwdrivers are necessary for removing the access panels on your heater.
- Non-contact voltage tester: This tool helps you ensure the power is off before you start working, adding an extra layer of safety.
- Protective gloves and goggles: Safety gear is essential to protect yourself from any unexpected hazards.
These tools are your basic toolkit for diagnosing and fixing thermostat issues. Without them, you might not be able to complete the task safely and correctly.
Optional Tools
While the essential tools will get the job done, having some optional tools on hand can make the process smoother and quicker.
- Flashlight: A flashlight can help illuminate dark areas inside the water heater, making it easier to see what you are working on.
- Wire stripper: If you need to replace any wiring, a wire stripper will be handy.
- Notebook and pen: Jotting down any readings or observations can help you keep track of your work.
While not strictly necessary, these tools can make your life easier and the task less stressful. Think of them as your backup crew, ready to assist when needed.
Remember, preparation is key. Having the right tools on hand can save you time and frustration. What’s the most surprising tool you’ve found useful for home repairs?
Turn Off Power
Before checking your hot water heater thermostat, ensure you turn off the power. This step is crucial for your safety and prevents any electrical hazards. You’ll need to locate the circuit breaker and shut off the electricity. This way, you can safely proceed with your inspection and repairs.
Locate Circuit Breaker
First, find your home’s circuit breaker panel. It’s usually in a garage, basement, or utility room. Open the panel door to see the breakers. Look for labels indicating the hot water heater.
Shut Off Electricity
Next, flip the switch for the hot water heater to the “off” position. This action cuts power to the heater, ensuring your safety. Double-check the power is off by attempting to turn on the heater. If it doesn’t start, you’re good to go.
Access The Thermostat
Checking your hot water heater thermostat can seem daunting, but it’s simpler than you might think. The first step is accessing the thermostat. This involves a few straightforward actions that anyone can handle with a bit of patience and a screwdriver.
Remove Access Panel
To begin, locate the access panel on your hot water heater. It’s typically on the side of the unit. Use a screwdriver to remove the screws securing the panel. Keep the screws in a safe place—you’ll need them later.
Once the screws are out, gently lift the panel away. You might see some insulation inside. Carefully move this insulation aside to reveal the thermostat. Make sure to handle the insulation with care to avoid damage.
Identify Thermostat
With the access panel off, you can now see the thermostat. It’s a small device with a temperature dial and wires connected to it. If you’re unsure, refer to your heater’s manual for a clear diagram.
Take a moment to familiarize yourself with the layout. Knowing where everything is will make the next steps easier. You’re now ready to test or adjust your thermostat.
Have you ever wondered why your water heater isn’t performing as expected? A faulty thermostat could be the culprit. By accessing and identifying the thermostat, you’re halfway to solving the problem.
What’s your experience with checking or fixing appliances? Share your stories or questions in the comments below. Your insight might help someone else facing the same issue!
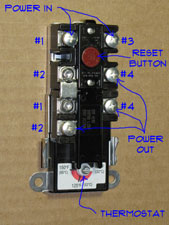
Credit: www.home-repair-central.com
Check Thermostat Settings
Keeping your hot water heater thermostat in check ensures consistent water temperature. Regularly inspecting the thermostat settings can prevent unexpected cold showers. Follow these steps to verify and adjust your thermostat.
Verify Temperature Setting
First, find the thermostat on the water heater. It is usually behind a small panel. Remove the panel carefully. Look at the current temperature setting. The ideal setting is around 120 degrees Fahrenheit. This temperature is safe and energy-efficient.
Adjust If Necessary
If the temperature is not set to 120 degrees, adjust it. Use a flathead screwdriver to turn the dial. Turn it to the desired temperature. Be cautious not to set it too high. High settings can cause scalding and waste energy. Once adjusted, replace the panel securely.
Test The Thermostat
Check if the hot water heater thermostat works by using a multimeter. Turn off the power first. Then, test the thermostat for continuity.
Check Best Thermostat Pricing in Amazon
** As an Amazon Associate, I earn from qualifying purchases.
Use A Multimeter
First, you need a multimeter to test the thermostat. A multimeter measures electrical resistance and ensures the thermostat is working. If you don’t have one, they’re available at most hardware stores. Before you start, ensure the power to your water heater is off. This step is vital for your safety. Remove the access panel on the water heater, and you’ll see the thermostat. Set your multimeter to the lowest ohm setting. Place one of the multimeter’s probes on one of the thermostat’s terminals and the other probe on the terminal opposite. You should get a reading.Interpret Results
Reading the multimeter results can tell you if the thermostat is faulty. A reading of zero or close to zero means the thermostat is working. However, a very high reading or no reading at all indicates a problem. If your thermostat is faulty, it might need replacing. This fix can solve many heating issues and is often a straightforward task. Have you had any surprising results when testing your appliances before? Sometimes the fix is simpler than we expect. By checking the thermostat, you might avoid a costly service call and keep your hot water flowing perfectly.
Credit: www.reddit.com
Replace Faulty Thermostat
If your hot water heater isn’t performing as it should, a faulty thermostat might be the culprit. Replacing a defective thermostat is a straightforward process that can restore your heater’s functionality. Here’s a step-by-step guide to help you get started.
Remove Old Thermostat
First, ensure your safety by turning off the power supply to your water heater. You can do this by switching off the breaker at your home’s electrical panel. Double-check with a voltage tester to confirm there is no power.
Next, locate the thermostat cover on the side of the water heater. Use a screwdriver to remove the screws holding the cover in place. Once the cover is off, you’ll see the thermostat and its wiring.
Take a clear photo of the wiring setup or make a detailed note of where each wire is connected. Carefully disconnect the wires using a screwdriver or pliers. Remove the old thermostat from its mounting bracket.
Install New Thermostat
Unpack your new thermostat and compare it to the old one to ensure compatibility. Attach the new thermostat to the mounting bracket, making sure it fits securely.
Refer to your photo or notes to reconnect the wires to the correct terminals on the new thermostat. Tighten all screws and ensure there are no loose connections.
Replace the thermostat cover and secure it with the screws. Finally, turn the power back on at the breaker panel and test your water heater to ensure it’s working properly.
Replacing a faulty thermostat can save you from cold showers and high energy bills. Have you ever replaced a thermostat? What challenges did you face, and how did you overcome them? Share your experience in the comments below!
Restore Power
After you’ve checked and possibly adjusted the thermostat settings on your hot water heater, it’s time to restore power. This step is crucial to ensure everything is functioning correctly. We’ll guide you through turning on the electricity and testing the hot water to confirm your adjustments were successful.
Turn On Electricity
First, you need to safely restore power to your hot water heater. Head over to your home’s breaker box. Look for the switch labeled “Water Heater” and flip it to the “On” position. You should hear a slight click as the electricity flows back into the unit.
Be cautious during this step. Ensure your hands are dry to avoid any risk of electric shock. If you’re unsure about the labeling, consult your home’s electrical plan or a professional.
Once the power is back on, give the heater some time. Typically, it takes about 30 to 60 minutes for the water to reach the desired temperature.
Test Hot Water
Now it’s time to test your adjustments. Turn on the hot water tap in the bathroom or kitchen. Let the water run for a few minutes to ensure it’s reaching the right temperature.
If the water is too cold or too hot, revisit the thermostat settings. Make small adjustments and test again. Patience is key here to get the perfect temperature.
Remember, safety first. Do not set the thermostat too high to avoid scalding. A common recommendation is to keep it around 120°F (49°C).
Have you ever found yourself frustrated with cold showers? Adjusting and testing your hot water heater’s thermostat can save you from those unexpected chills. Give it a try and enjoy consistent, warm showers every day!
Do you have any tips or personal experiences with hot water heaters? Share in the comments below! Your insights could help others facing the same issues.
Frequently Asked Questions
How Do I Know If My Hot Water Heater Thermostat Is Bad?
Check for inconsistent water temperature, no hot water, or high energy bills. Test with a multimeter for accuracy.
How Do You Test A Thermostat On A Hot Water Heater?
Turn off power. Remove access panel. Use a multimeter to check for continuity. Adjust thermostat settings. Observe temperature changes.
Can A Water Heater Thermostat Get Stuck On?
Yes, a water heater thermostat can get stuck on. This issue may cause overheating and potential damage. Regular maintenance helps prevent this problem.
How Do You Check A Hot Water Heater To See If It’s Working?
Check if the hot water heater is working by setting the thermostat to 120°F. Verify hot water flow at faucets. Inspect the heater for leaks or unusual noises.
Conclusion
Checking your hot water heater thermostat is essential. It ensures consistent water temperature. Regular checks can prevent larger issues. Follow the steps mentioned in this guide. Always prioritize safety first. A working thermostat saves energy. It also extends the heater’s life.
If unsure, consult a professional. Proper maintenance keeps your home comfortable. Keep your heater running efficiently. Don’t overlook this simple yet crucial task.
Check Best Thermostat Pricing in Amazon
** As an Amazon Associate, I earn from qualifying purchases.