
Check Best Thermostat Pricing in Amazon
** As an Amazon Associate, I earn from qualifying purchases.
Changing the battery of a thermostat is simple. It ensures your device runs smoothly.
Thermostats control the temperature in your home. They keep you comfortable in all seasons. But sometimes, they need a new battery to function properly. If the screen is blank or the device isn’t responding, a battery change might be required.
This task is easy and quick, even for beginners. By following a few steps, you can save money and avoid the hassle of a service call. In this guide, you’ll learn how to replace the battery in your thermostat. No special skills are needed. Let’s get started and ensure your home stays at the perfect temperature.
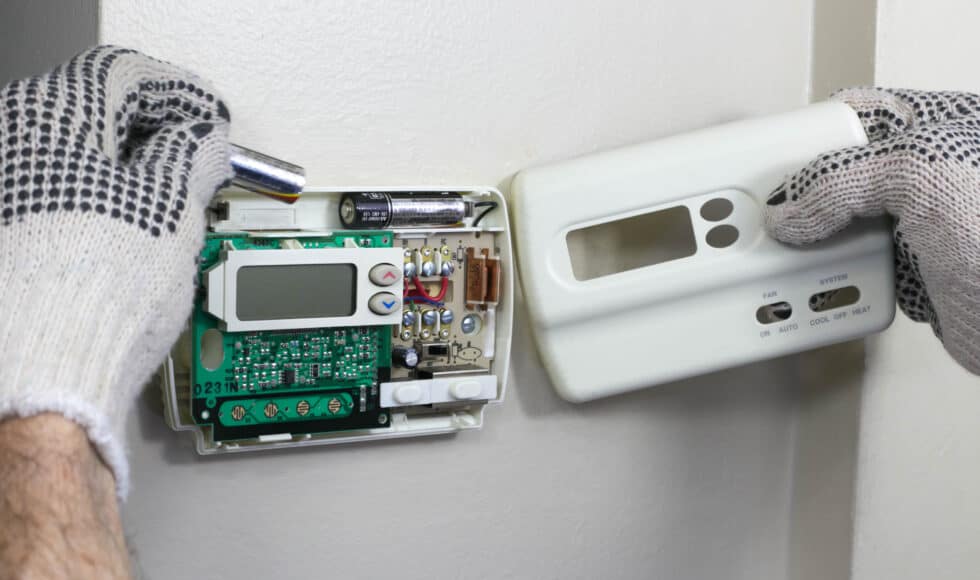
Credit: scottsdaleair.com
Gather Tools
Gathering the right tools is the first step to changing your thermostat battery. This ensures you have everything needed for a smooth process. Missing tools can disrupt your progress and cause frustration. Let’s start with the essentials.
Required Tools
To change your thermostat battery, you need a few basic tools. A small flathead screwdriver helps to open the battery compartment. A pair of gloves protects your hands. Fresh batteries are crucial, so have them ready before you begin.
Safety Precautions
Safety is always a priority. Turn off your thermostat before you start. This prevents any accidental changes to your home’s temperature settings. Wear gloves to avoid any electrical contact. Keep your workspace clean and free of clutter. This helps you stay organized and focused.

Credit: www.reddit.com
Identify Thermostat Type
Changing the battery in your thermostat is a simple process. The first step is to identify the type of thermostat you have. Knowing whether your thermostat is digital or analog, and the specific brand, can help you follow the right instructions. Different thermostats have different methods for battery replacement.
Digital Vs. Analog
Digital thermostats often have a display screen. They may show the current temperature and settings. Analog thermostats usually have a dial or slider. They are more mechanical and do not have a digital display. Identifying whether your thermostat is digital or analog is crucial. It determines the steps you will follow to change the battery.
Brand-specific Instructions
Each brand may have unique instructions for changing the battery. Popular brands like Honeywell, Nest, and Ecobee have their own methods. Check your thermostat’s manual or the brand’s website for precise instructions. Follow these steps carefully to ensure your thermostat works properly after the battery change.
Locate Battery Compartment
Changing the battery of your thermostat is straightforward. The first step is to locate the battery compartment. This might seem tricky. But with a bit of guidance, you’ll find it in no time. Let’s break it down into simple steps.
Common Locations
Thermostat battery compartments are usually easy to access. They are often found in one of three places. First, check the front of the thermostat. Some models have a visible battery cover. Second, look at the sides of the thermostat. You might see a small compartment door. Third, if you don’t see it on the front or sides, it might be on the back. You may need to remove the thermostat from the wall.
Removing The Cover
Once you locate the battery compartment, it’s time to remove the cover. This can be done with a gentle pull or by pressing a release button. Make sure to handle the thermostat with care. Some models require you to slide the cover off. Others might need a small screwdriver to open. Look for any small screws that might be holding the cover in place. Always refer to the user manual if unsure. Now, you are ready to replace the old batteries with new ones.
Remove Old Battery
Changing the battery of a thermostat is not complicated. It is essential to follow the right steps. One crucial step is to remove the old battery properly. This ensures the new battery functions correctly. Let’s explore the proper technique and disposal instructions.
Proper Technique
First, switch off the thermostat. This prevents any electrical issues. Next, locate the battery compartment. Most thermostats have it on the back or bottom. Use a screwdriver to open it if necessary. Carefully remove the old battery. Avoid using sharp objects. They can damage the compartment. Check for any corrosion or dirt. Clean it gently if needed.
Disposal Instructions
Do not throw the old battery in the trash. Batteries contain harmful chemicals. They can damage the environment. Take the old battery to a recycling center. Many stores also accept old batteries. Check your local guidelines for proper disposal. Always recycle batteries responsibly. It helps protect our planet.
Insert New Battery
Changing the battery of your thermostat is a simple task. The most important step is inserting the new battery correctly. This step ensures your thermostat functions properly. Let’s go through the process step-by-step.
Battery Orientation
First, check the battery compartment. Look for the plus (+) and minus (-) symbols. These symbols indicate the correct battery orientation. Align the new battery with these symbols. The positive end of the battery goes to the plus symbol. The negative end goes to the minus symbol. This prevents damage to your thermostat.
Ensuring Proper Fit
Now, ensure the battery fits snugly in the compartment. A loose battery can cause connection issues. Gently press the battery into place. It should not move or wiggle. If it does, recheck the orientation. Make sure the battery is aligned correctly. This step guarantees a stable power supply to your thermostat.
Once the battery is secure, close the compartment. Your thermostat should now be ready to use. Following these steps ensures your thermostat works efficiently.
Reattach Cover
After replacing the thermostat battery, the next step is to reattach the cover. This step ensures that the thermostat functions properly and looks neat. Properly securing the cover also protects the internal components from dust and other particles.
Securing The Cover
First, align the cover with the base. Make sure the tabs on the cover match the slots on the base. Press the cover gently until you hear a click. This sound means the cover is securely attached. Do not force the cover, as this may damage it.
Checking Alignment
After securing the cover, check its alignment. Ensure the cover is flush with the wall. There should be no gaps or uneven edges. If you see any misalignment, gently adjust the cover. This ensures a clean and professional look.
Reattaching the cover is a simple but crucial step. It ensures your thermostat functions properly. Follow these steps for a seamless finish.
Check Best Thermostat Pricing in Amazon
** As an Amazon Associate, I earn from qualifying purchases.
Test Thermostat Functionality
After successfully changing the battery in your thermostat, it’s crucial to test its functionality to ensure everything is working correctly. This process involves powering on the device and confirming that all operations are running smoothly. A few simple steps can save you from future headaches and ensure your home remains comfortable.
Powering On
First, locate the power button on your thermostat. Press it to turn the device back on. You should see the screen light up and display the current settings.
If nothing happens, double-check the battery installation. Ensure the batteries are properly seated and the polarity is correct.
It’s important to use fresh batteries. Old or weak batteries can cause the thermostat to malfunction.
Confirming Operations
Once the thermostat is powered on, you need to confirm that it is operating correctly. Set your desired temperature and wait for the system to respond. You should hear your HVAC system kick in within a few minutes.
Check if the displayed temperature matches your room’s actual temperature. Use a separate thermometer if necessary.
Test both heating and cooling modes. Make sure that both settings trigger the appropriate response from your HVAC system.
Have you ever changed your thermostat battery only to find out it still wasn’t working? Share your experiences in the comments. Your insights could help others facing the same issue.
Maintenance Tips
Keeping your thermostat in good condition ensures your home stays comfortable and energy efficient. Regular maintenance is key, especially when it comes to changing the battery. Here are some practical tips to help you maintain your thermostat, extending its battery life and ensuring it works seamlessly.
Battery Life Extension
To extend the battery life of your thermostat, consider using high-quality batteries. Alkaline or lithium batteries usually last longer compared to standard ones. This small investment can save you from frequent replacements.
Minimize the use of your thermostat’s display light. The display light can drain the battery quickly if left on for long periods. Turn it off when it’s not necessary.
Keep the thermostat at a stable temperature. Drastic temperature changes can affect battery performance. A consistent room temperature helps maintain battery efficiency.
Regular Checks
Make a habit of checking your thermostat battery at least once every three months. This ensures you catch any issues before the battery dies completely.
Look out for any warning signs on the thermostat display. Most modern thermostats will alert you when the battery is running low. Pay attention to these alerts to avoid sudden power loss.
When checking the battery, also inspect the battery compartment for corrosion or dirt. Clean it gently using a dry cloth to ensure good contact between the battery and the thermostat.
How often do you find yourself overlooking these small maintenance tasks? A little attention can go a long way in keeping your thermostat running smoothly and your home comfortable.

Credit: www.youtube.com
Frequently Asked Questions
How To Remove Thermostat Cover?
To remove a thermostat cover, gently pull or unscrew it. Check for screws on the sides or bottom.
What Happens If You Don T Change The Batteries In Your Thermostat?
Thermostat may stop working, causing heating and cooling issues. Energy bills can increase due to system inefficiency.
What Kind Of Battery Does A Home Thermostat Take?
Home thermostats typically use AA or AAA alkaline batteries. Always check the user manual for specific battery requirements.
How Do I Know If My Thermostat Is Out Of Battery?
Check if the thermostat display is blank or unresponsive. This often indicates low or dead batteries.
Conclusion
Changing your thermostat battery is easy and important. Follow the steps carefully. Always check your thermostat manual. Ensure you have the correct battery type. Regular battery checks prevent issues. Replace batteries promptly to maintain efficiency. This small task saves energy and money.
Keep your home comfortable year-round. Remember, a functional thermostat means a cozy home. Happy DIY!
Check Best Thermostat Pricing in Amazon
** As an Amazon Associate, I earn from qualifying purchases.