
Check Best Thermostat Pricing in Amazon
** As an Amazon Associate, I earn from qualifying purchases.
To bypass the thermostat on an RV air conditioner, locate the thermostat wires and connect them directly. Ensure power is off before starting.
Bypassing the thermostat on an RV air conditioner can be a necessary task for troubleshooting or emergency cooling. It allows direct control over the AC unit, ensuring it runs without relying on a possibly faulty thermostat. This method is often used by RV owners experiencing issues with their thermostat malfunctioning or not responding correctly.
Always exercise caution and follow safety protocols when working with electrical components. Knowing how to bypass the thermostat can save you time and help maintain a comfortable environment in your RV, especially during hot weather.
- Introduction To Rv Air Conditioner Thermostat Bypassing
- Tools And Materials Needed
- Identifying Your Rv Air Conditioner Model
- Accessing The Thermostat
- Understanding Thermostat Wiring
- Executing The Bypass
- Alternatives To Bypassing
- Final Checklist And Safety Review
- Frequently Asked Questions
- Conclusion
Introduction To Rv Air Conditioner Thermostat Bypassing
RV air conditioners are vital for comfort during road trips. Sometimes, the thermostat can malfunction. Knowing how to bypass it can save your trip. This guide will explain why you might need to bypass the thermostat and the safety steps to follow before you start.
Why Bypass The Thermostat?
The thermostat controls the temperature. When it fails, the air conditioner won’t work right. Bypassing the thermostat allows the air conditioner to run without interruptions. Here are some common reasons to bypass the thermostat:
- Thermostat Failure: If the thermostat is broken, the air conditioner won’t turn on.
- Temperature Inaccuracy: A faulty thermostat might not read the temperature correctly.
- Testing Purposes: Bypassing can help diagnose if the thermostat is the problem.
Bypassing the thermostat ensures continuous cooling. This can be crucial during hot weather.
Safety Considerations Before Starting
Safety is paramount when bypassing the thermostat. Follow these steps to stay safe:
- Turn Off Power: Always turn off the RV’s power before starting.
- Use Insulated Tools: Use tools with insulated handles to avoid electric shocks.
- Wear Safety Gear: Wear gloves and safety glasses to protect yourself.
- Follow Instructions: Read the RV’s manual for specific instructions.
Ignoring safety can lead to accidents. Always follow these steps to ensure a safe process.

Credit: www.irv2.com
Tools And Materials Needed
Bypassing the thermostat on your RV air conditioner requires specific tools and materials. Using the right equipment ensures a smooth and safe process. This section will cover everything you need.
Essential Tools For The Job
- Screwdrivers: Both Phillips and flat-head screwdrivers are necessary for removing and securing panels.
- Wire Cutters: These are essential for cutting and stripping wires.
- Multimeter: This tool helps to check voltage and ensure your connections are correct.
- Needle Nose Pliers: These are useful for gripping small components and wires.
Additional Materials For A Smooth Process
- Electrical Tape: Use this to safely insulate any exposed wires.
- Wire Nuts: These are essential for making secure wire connections.
- Replacement Wires: Keep extra wires handy in case you need them.
- Zip Ties: These help to keep wires organized and out of the way.
- Instruction Manual: Always refer to your RV’s manual for specific instructions.
| Tool | Purpose |
|---|---|
| Screwdrivers | Removing and securing panels |
| Wire Cutters | Cutting and stripping wires |
| Multimeter | Checking voltage and connections |
| Needle Nose Pliers | Gripping small components |
Having these essential tools and additional materials will make the job easier. Proper preparation ensures safety and efficiency. Make sure you gather everything before you start.
Identifying Your Rv Air Conditioner Model
To bypass the thermostat on your RV air conditioner, you must know the model. Identifying the model helps you understand the specific requirements and features. This knowledge ensures you handle the bypass correctly and safely.
Locating The Model Information
The model information is usually found on the unit itself. Look for a label or sticker on the air conditioner. This label typically includes the model number, serial number, and other essential details.
Here are common places to find the model information:
- Inside the air filter cover
- On the side or back of the unit
- In the user manual
Once you locate the label, write down the model number. This will be crucial for the next steps.
Understanding Your Ac’s Specifications
Understanding the specifications of your RV air conditioner is vital. The specs will tell you about the unit’s capacity, power requirements, and features.
Here is a simple table to help you understand common specifications:
| Specification | Description |
|---|---|
| BTU Rating | The cooling capacity of the unit |
| Power Requirements | Voltage and amperage needed |
| Model Number | Unique identifier for the unit |
| Serial Number | Specific to your unit |
Knowing these details helps you make informed decisions. You can ensure compatibility with any replacement parts or modifications.
Model number is critical for finding the right instructions and parts. BTU rating tells you how powerful your AC is. Power requirements ensure you use the correct electrical setup.
Accurate knowledge of your air conditioner model and specifications will make bypassing the thermostat easier. It ensures safety and efficiency in your DIY project.
Accessing The Thermostat
Accessing the thermostat on your RV air conditioner is the first step to bypassing it. This process involves locating and safely opening the control panel. Below is a detailed guide to help you through the process.
Step-by-step Access Guide
- Turn off the Power: Ensure the RV is disconnected from any power source. This prevents any electrical accidents.
- Locate the Thermostat: Find the thermostat. It’s usually on a wall inside the RV.
- Remove the Cover: Use a screwdriver to carefully remove the thermostat cover. This will expose the internal components.
- Identify Wires: Look for the wires connected to the thermostat. They are usually color-coded for easy identification.
- Disconnect Wires: Gently disconnect the wires from the thermostat. Make sure to remember their positions for future reference.
Troubleshooting Common Access Issues
Sometimes, accessing the thermostat can be tricky. Here are some common issues and their solutions:
- Stuck Cover: If the thermostat cover is stuck, use a flathead screwdriver to gently pry it open.
- Hard-to-Reach Location: If the thermostat is in a hard-to-reach spot, use a step ladder for better access.
- Worn-out Screws: If screws are worn out, use a screw extractor tool to remove them safely.
- Wire Confusion: If wires are confusing, take a photo before disconnecting them. This helps in reconnecting them later.
Following these steps and tips will help you access the thermostat easily. Ensure all steps are followed carefully to avoid any damage.
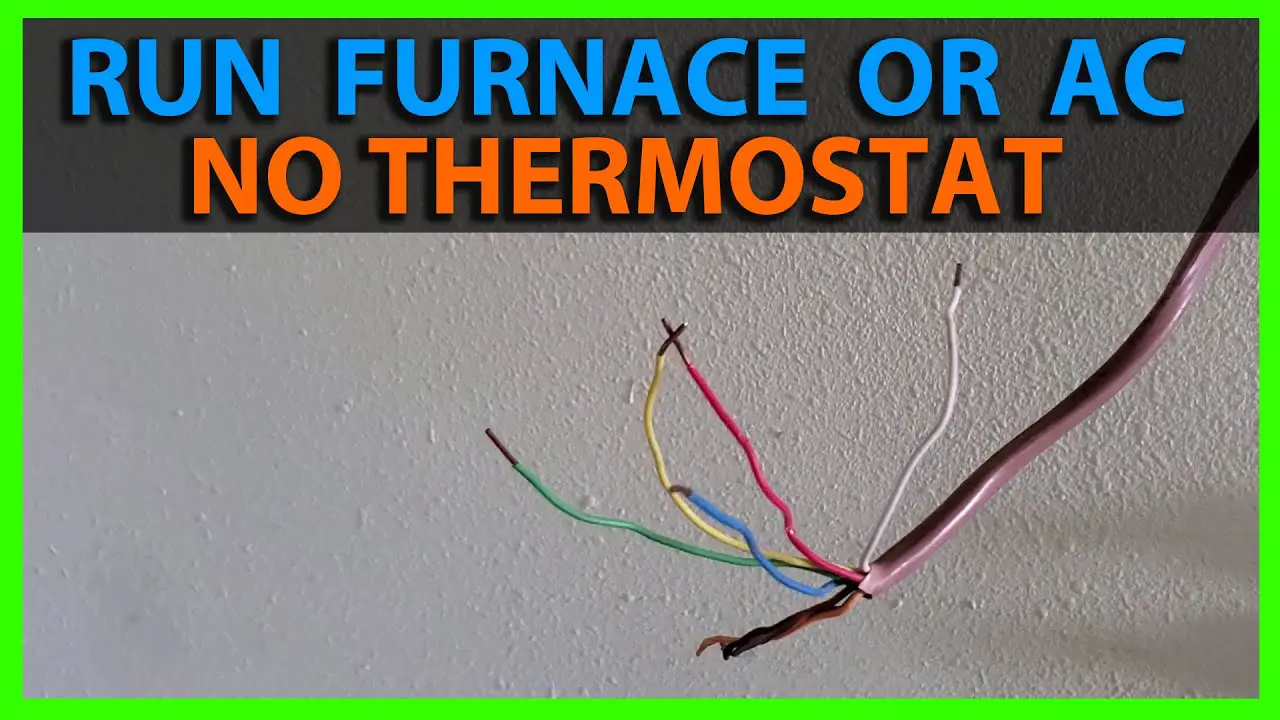
Understanding Thermostat Wiring
Understanding your RV air conditioner’s thermostat wiring is crucial. It can help you bypass the thermostat when needed. Thermostat wiring controls the temperature settings. It ensures your RV stays comfortable during your travels.
Color Coding And Wire Functions
Thermostat wires come in different colors. Each color wire has a specific function. Knowing these colors is the first step in understanding the wiring.
- Red Wire (R): This wire connects to the 24V power supply.
- Green Wire (G): This wire controls the fan.
- Yellow Wire (Y): This wire connects to the compressor.
- White Wire (W): This wire connects to the heating system.
- Blue or Black Wire (C): This wire serves as a common wire for 24V power.
By understanding these wire functions, you can troubleshoot or bypass the thermostat more effectively.
Diagramming Your Thermostat’s Wires
Creating a diagram of your thermostat’s wires can simplify the process. It helps you visualize the connections. Here is a sample table layout for your RV air conditioner thermostat wiring:
Check Best Thermostat Pricing in Amazon
** As an Amazon Associate, I earn from qualifying purchases.
| Wire Color | Function |
|---|---|
| Red (R) | 24V Power Supply |
| Green (G) | Fan Control |
| Yellow (Y) | Compressor Control |
| White (W) | Heating Control |
| Blue/Black (C) | Common Wire for 24V |
This table can act as a reference guide. It can help you understand the wiring better. Use this guide to make accurate connections when bypassing the thermostat.
Credit: www.youtube.com
Executing The Bypass
Executing a bypass on your RV air conditioner thermostat is a crucial step when your thermostat fails. It ensures your comfort on the road. This section will guide you through the process of connecting the wires directly and testing the AC post-bypass.
Connecting The Wires Directly
Before starting, ensure the RV’s power supply is turned off. This prevents any electrical accidents. Follow these steps:
- Remove the thermostat cover to access the wiring.
- Identify the cooling and power wires. These are usually marked.
- Disconnect the wires from the thermostat.
- Use a wire nut to connect the cooling and power wires directly. This bypasses the thermostat.
Ensure the connection is secure. Loose connections can cause malfunctions or electrical hazards.
Testing The Ac Post-bypass
After connecting the wires, it is time to test the AC unit:
- Turn the power supply back on.
- Switch on the air conditioner manually.
- Observe the AC’s performance. It should start cooling immediately.
If the AC does not start, recheck your connections. Ensure the wires are properly connected.
Regularly check the unit during the first few hours of operation. This ensures there are no issues with the bypass.
| Step | Action |
|---|---|
| 1 | Remove thermostat cover |
| 2 | Identify cooling and power wires |
| 3 | Disconnect wires from thermostat |
| 4 | Connect wires directly with wire nut |
| 5 | Turn power back on |
| 6 | Switch on air conditioner |
Executing the bypass involves careful steps and attention to detail. This ensures your RV remains cool and comfortable.
Alternatives To Bypassing
Bypassing your RV air conditioner thermostat can be tricky. Sometimes, it’s better to explore other options. There are several alternatives to bypassing that can save you time and effort.
When To Consider Repair Over Bypass
Before bypassing, think about repairing the thermostat. If your thermostat is not working, a simple repair might fix it.
- Check the wiring: Loose or damaged wires can cause issues.
- Replace the batteries: Sometimes, a dead battery is the culprit.
- Inspect the sensors: Dirty or faulty sensors can affect performance.
A repair can be quicker and easier than bypassing. Plus, it keeps your RV’s system intact.
Upgrading Your Thermostat Instead Of Bypassing
If your thermostat is old, consider an upgrade. Modern thermostats offer better features and efficiency.
| Feature | Old Thermostat | New Thermostat |
|---|---|---|
| Energy Efficiency | Low | High |
| Programmable Settings | Limited | Advanced |
| Ease of Use | Basic | User-Friendly |
New thermostats can save you money on energy bills. They also offer better control over your RV’s climate. This makes upgrading a smart choice.
Upgrading is often easier than bypassing. It ensures your system works efficiently.
Final Checklist And Safety Review
Congratulations! You have successfully bypassed the thermostat on your RV air conditioner. Now, it’s essential to ensure that everything is set up correctly and safely. This final checklist will help you review your work and make sure your RV air conditioner runs smoothly.
Ensuring All Steps Were Followed Correctly
It’s important to double-check each step to avoid any errors. Refer to the list below to ensure that all steps were followed correctly:
- Power Off: Verify that the power to the air conditioner was turned off before you started.
- Wiring Connections: Ensure all wires are securely connected and match the instructions.
- Bypass Installed: Confirm that the bypass setup is correctly installed.
- Tools Removed: Make sure all tools and materials are removed from the working area.
Use this table to cross-check the key components and their statuses:
| Component | Status |
|---|---|
| Power Supply | Turned Off |
| Wiring Connections | Secure |
| Bypass Setup | Correctly Installed |
| Tools and Materials | Removed |
Revisiting Safety And Long-term Implications
Safety is the top priority. Review the following points to ensure safe operation and long-term reliability:
- Check for Exposed Wires: Ensure there are no exposed wires that could cause short circuits.
- Insulate Wires: Use electrical tape to insulate all wire connections properly.
- Test the Air Conditioner: Turn the power back on and test the air conditioner to ensure it functions as expected.
- Monitor Performance: Keep an eye on the air conditioner’s performance for the next few days to ensure it operates smoothly.
By following this final checklist, you can be confident that your RV air conditioner will run efficiently and safely. Ensuring all steps were followed correctly and revisiting safety and long-term implications will help you avoid future issues and enjoy your travels comfortably.
Credit: www.quora.com
Frequently Asked Questions
How Do I Know If My Rv Ac Thermostat Is Bad?
Check if the RV AC thermostat shows erratic readings, fails to maintain set temperature, or displays no power.
Where Does The Thermostat Get Its Power From In An Rv?
The thermostat in an RV typically gets its power from the RV’s 12-volt battery system. This ensures continuous operation.
What Happens If My Ac Thermostat Is Not Working?
If your AC thermostat isn’t working, the unit might not cool properly. Check batteries, settings, and wiring.
How Do I Turn Off The Hold On My Thermostat?
Press the “Hold” button on your thermostat to deactivate the hold setting. Refer to the user manual for specific instructions.
Conclusion
Bypassing your RV air conditioner’s thermostat can be a straightforward process. Ensure safety by following proper guidelines and steps. This knowledge can enhance your RV experience, providing consistent comfort. Always consult the manual and, if necessary, seek professional help. Enjoy your travels with a perfectly cooled RV!
Check Best Thermostat Pricing in Amazon
** As an Amazon Associate, I earn from qualifying purchases.