
Check Best Thermostat Pricing in Amazon
** As an Amazon Associate, I earn from qualifying purchases.
Want to control your Nest Thermostat right from your Apple Home app? You’re in the right place.
Imagine adjusting your home’s temperature with just a tap on your iPhone or asking Siri to do it for you. It’s easier than you think, and this guide will walk you through every step. By the end, you’ll have full control over your Nest Thermostat using your Apple devices, making your home smarter and your life simpler.
Ready to get started? Let’s dive in!
Credit: www.addtohomekit.com
Nest Thermostat Compatibility
Nest Thermostat works with smart home systems to make controlling temperature easy. But not all Nest models connect with Apple Home. Knowing which models work saves time and effort. Also, Apple HomeKit needs certain settings for Nest to work well.
Understanding Nest Thermostat compatibility helps you set up your smart home smoothly. It avoids frustration and ensures your devices communicate properly.
Supported Nest Models
Only some Nest Thermostats support Apple Home. The Nest Thermostat (2020) model works with HomeKit. The Nest Thermostat E and Nest Learning Thermostat do not. Older Nest models lack HomeKit support. Check your model before trying to connect it.
Using the right model means better control from your iPhone or iPad. It allows voice commands through Siri and automation with other HomeKit devices.
Apple Homekit Requirements
Apple HomeKit needs an iPhone or iPad running iOS 14 or later. A home hub like Apple TV, HomePod, or iPad is also necessary. The home hub manages smart devices remotely.
Make sure your Apple ID is signed in on all devices. The Nest Thermostat must connect to your Wi-Fi network. Proper setup ensures smooth communication between Nest and Apple Home.
Preparing Your Nest Thermostat
Preparing your Nest Thermostat is the first step to connect it with Apple Home. It needs to be ready for smooth integration. This means checking its software and settings.
These preparations help avoid connection problems. They ensure the device works well with Apple Home’s system. Follow these simple steps to get your Nest Thermostat ready.
Update Firmware
Updating your Nest Thermostat’s firmware is important. Firmware controls how the device works. An old version may cause issues with Apple Home.
To update, open the Nest app on your phone. Select your thermostat and go to settings. Look for the software update option and tap it.
The device will download and install the latest firmware. Keep your thermostat connected to Wi-Fi during this. This process can take a few minutes.
Reset Settings
Resetting your Nest Thermostat clears old settings. This helps avoid conflicts with Apple Home. The reset returns the device to factory defaults.
Go to the thermostat’s settings menu. Find the option labeled “Reset” or “Restore Factory Settings.” Confirm the reset to start the process.
After resetting, you need to set up your thermostat again. This step ensures a clean start before linking to Apple Home.
Setting Up Apple Home App
Setting up the Apple Home app is the first step to control your Nest Thermostat with your iPhone or iPad. The app helps you manage smart devices in one place. It lets you adjust temperature, set schedules, and check energy usage easily. Follow simple steps to get the app ready for your Nest Thermostat.
The process is quick and requires no technical skills. Once set up, you can enjoy smooth control over your home’s temperature using Apple Home.
Download And Install
Open the App Store on your iPhone or iPad. Search for “Apple Home” or “Home.” Tap the download button to install the app. The app is free and lightweight. Wait for the installation to complete before opening it. Make sure your device runs on the latest iOS version. This ensures the app works without problems.
Create Or Log In To Apple Id
Launch the Apple Home app after installation. If you already have an Apple ID, enter your email and password to log in. New users must create an Apple ID by following the on-screen instructions. Use a valid email address and set a strong password. The Apple ID links your devices and settings. This step is essential to sync your Nest Thermostat with Apple Home.
/cdn.vox-cdn.com/uploads/chorus_asset/file/25039283/IMG_8946.PNG)
Credit: en.eimazh.com
Connecting Nest Thermostat To Apple Home
Connecting your Nest Thermostat to Apple Home lets you control temperature easily. Using Apple Home, you can manage your thermostat alongside other smart devices. The setup process is simple and fast. Follow these steps to link your Nest Thermostat with Apple Home.
Check Best Thermostat Pricing in Amazon
** As an Amazon Associate, I earn from qualifying purchases.
Enable Home Control On Nest
Start by opening the Nest app on your phone. Go to the settings menu and find the option for Home Control. Turn on Home Control to allow Apple Home to access your thermostat. This step is essential for integration. Make sure your Nest Thermostat is connected to Wi-Fi before proceeding.
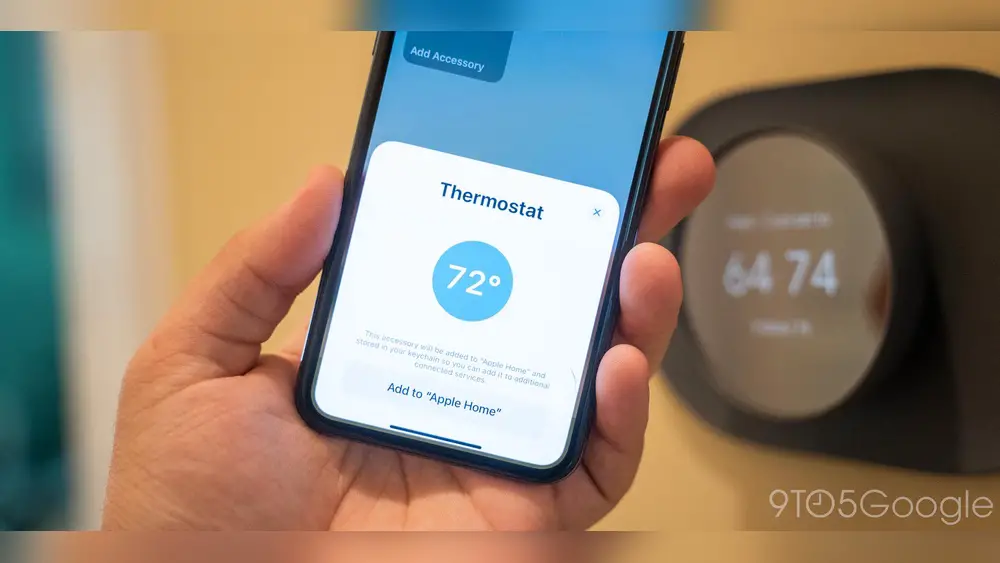
Use Home App To Add Device
Open the Apple Home app on your iPhone or iPad. Tap the “+” button to add a new device. Select “Add Accessory” and scan the HomeKit code on your Nest Thermostat or its packaging. Follow the on-screen prompts to complete the setup. Your Nest Thermostat will now appear in Apple Home for easy control.
Troubleshooting Connection Issues
Connecting your Nest Thermostat to Apple Home can sometimes face issues. Troubleshooting these problems helps get everything working smoothly. Understanding common problems and solutions saves time and effort.
Common Problems
Many users face Wi-Fi connection failures. The Nest Thermostat may not appear in the Apple Home app. Sometimes, the device shows as offline or unresponsive. Incorrect setup steps can cause syncing errors. Firmware or app versions that are outdated also create issues.
Fixing Connectivity Errors
Start by checking the Wi-Fi network. Ensure both devices are on the same network and signal is strong. Restart the Nest Thermostat and the iPhone or iPad. Update the Nest app and Apple Home app to the latest version. Remove the thermostat from Apple Home and add it again. Reset the Nest Thermostat to factory settings if problems persist. Confirm your Apple ID is signed in and iCloud Keychain is enabled.

Credit: www.youtube.com
Using Nest Thermostat With Siri
Using Nest Thermostat with Siri lets you control your home’s temperature with voice commands. It makes adjusting the heat or cooling easy and hands-free. You can ask Siri to change settings without touching the thermostat.
Siri works smoothly with Nest Thermostat through the Apple Home app. This connection allows quick responses to your voice commands. It also helps save energy by managing temperature smartly.
Voice Commands Examples
Try simple commands like “Hey Siri, set the thermostat to 72 degrees.” You can say, “Siri, increase the temperature by 3 degrees.” Or ask, “Hey Siri, what is the current temperature?” These commands control your Nest Thermostat quickly and accurately.
Use commands for different modes too. Say, “Siri, switch to eco mode.” Or, “Hey Siri, turn off the thermostat.” This way, you manage your home’s climate easily.
Customizing Siri Settings
Open the Apple Home app to customize Siri for your thermostat. You can rename your Nest device to something simple. For example, “Living Room Thermostat” makes commands clearer.
Adjust Siri’s voice feedback in settings to get more or less information. You can also create shortcuts for frequent commands. This personalization improves your smart home experience.
Automation And Scenes With Nest
Automation and scenes with Nest make your home smarter and more comfortable. You control your thermostat along with other devices from one app. Set your Nest to work automatically based on time, location, or other triggers. This saves energy and keeps your home cozy without manual changes.
Scenes let you group devices to create the perfect atmosphere. For example, a “Good Morning” scene can adjust your Nest, lights, and blinds all at once. This section explains how to create automations and integrate Nest with other smart devices.
Creating Automations
Start by opening the Apple Home app on your iPhone or iPad. Tap the Automation tab and select “Create New Automation.” Choose a trigger, like a time of day or when you leave home. Set your Nest thermostat to adjust temperature based on this trigger. You can also use your location to change settings automatically. Save the automation and test it to make sure it works well.
Integrating With Other Smart Devices
Integrate Nest with other smart devices to enhance your home system. Connect smart lights, locks, and sensors with your Nest thermostat. For example, when you leave, the thermostat lowers the heat and lights turn off. Create scenes that combine devices for easy control. Use the Apple Home app to link all your devices smoothly. This integration offers convenience and energy savings.
Frequently Asked Questions
How Do I Connect Nest Thermostat To Apple Home?
Nest Thermostat does not natively support Apple HomeKit. Use third-party apps like Homebridge to integrate it. Homebridge acts as a bridge, enabling Nest devices to work with Apple Home. This method requires a computer or Raspberry Pi to run Homebridge software continuously.
Can I Control Nest Thermostat Via Apple Home App?
Direct control through the Apple Home app is not officially supported. However, with Homebridge setup, you can manage Nest Thermostat settings via Apple Home. This allows voice commands through Siri and automation alongside other HomeKit devices.
Is Homebridge Necessary For Nest And Apple Home Integration?
Yes, Homebridge is essential because Nest lacks native HomeKit support. It creates a secure connection between Nest and Apple HomeKit. Without Homebridge, integrating Nest Thermostat into Apple Home is not possible.
Are There Alternatives To Add Nest Thermostat To Apple Home?
Currently, no official alternatives exist. Homebridge remains the most popular and reliable solution. Some smart hubs claim compatibility but often lack seamless Apple Home integration.
Conclusion
Adding your Nest Thermostat to Apple Home is simple and useful. It lets you control your home’s temperature from one app. You save time by managing devices together. The setup takes just a few steps and works well. Enjoy a smarter, more connected home experience today.
Keep your home comfortable with ease and convenience. Try it and see the difference yourself.
Check Best Thermostat Pricing in Amazon
** As an Amazon Associate, I earn from qualifying purchases.