
Check Best Thermostat Pricing in Amazon
** As an Amazon Associate, I earn from qualifying purchases.
Adding a C wire to your thermostat is essential for modern HVAC systems. It provides continuous power, ensuring efficient operation.
Many homeowners face the challenge of installing a C wire. This small but crucial component can make a big difference in how your thermostat functions. With smart thermostats becoming popular, a C wire becomes even more important. Don’t worry if you’re not an expert; this guide will help you understand the process.
We’ll break down each step, making it easy to follow along. Whether you’re upgrading your system or setting up a new thermostat, knowing how to add a C wire can save you time and trouble. Let’s get started on this simple yet vital task.
Tools And Materials
Gather tools like screwdrivers, wire strippers, and a voltage tester. Materials needed include a C wire adapter and extra wire.
Adding a C wire to your thermostat can be a game-changer, especially if you’re upgrading to a smart thermostat. But to make this process smooth, you need the right tools and materials. Without them, you might find yourself stuck halfway, or worse, damage your system.Essential Tools
First, let’s talk about the essential tools you’ll need. A good quality screwdriver set is a must. You’ll often need both flat-head and Phillips-head screwdrivers. Wire strippers are another crucial tool. They help you strip the insulation off the wires without cutting the wire itself. A voltage tester is also important. It ensures you’re working safely by verifying that the power is off before you start. Consider having a drill handy. Sometimes, you might need to create a small hole to run the wire through. It’s better to be prepared than to get stuck mid-task.Necessary Materials
Now, let’s move on to the necessary materials. You’ll need some extra wire, specifically 18/5 thermostat wire. This wire has five strands, including the C wire you need. Wire nuts are also essential. They help you connect new wires to the existing ones securely. Electrical tape is another must-have. It insulates the wire connections and adds an extra layer of safety. Lastly, don’t forget your thermostat’s manual. It usually has a wiring diagram that can be extremely helpful. Keep it close; you’ll refer to it often. Do you have these tools and materials ready? If not, make a checklist. This preparation can save you time and frustration.Safety Precautions
Ensure safety by turning off the power before adding a C wire to your thermostat. Use a voltage tester to confirm. Follow wiring diagrams carefully to avoid mistakes.
When you are adding a C wire to your thermostat, safety should be your top priority. Taking the right precautions can prevent accidents and ensure the task is completed efficiently. Let’s break down some crucial safety steps.Turning Off Power
Before you start any electrical work, make sure to turn off the power. This is crucial to avoid any electrical shocks. Go to your circuit breaker and flip the switch that controls your HVAC system. Don’t just rely on turning off the thermostat; cutting off power at the source is essential. Double-check by trying to turn on the thermostat. If it doesn’t power up, you’re good to go.Using Protective Gear
Protective gear can make a world of difference. Wearing the right gear will help keep you safe from electrical hazards. Use rubber-soled shoes to minimize the risk of electrical shocks. They act as insulators and can protect you from electricity. Wear safety goggles to shield your eyes from any potential sparks or debris. Gloves are also a good idea to protect your hands, especially if you’re working with wires. Have you ever skipped wearing gloves and ended up with a nasty cut? It’s a lesson learned the hard way. Don’t take chances; always gear up. Remember, safety isn’t just about protecting yourself. It’s also about ensuring that your work environment is secure. Taking these precautions might seem like extra steps, but they are absolutely worth it. Your safety is paramount. Have you ever thought about what could go wrong if you skipped these steps? Better safe than sorry, right? So, before you dive into adding that C wire, make sure you’re well-prepared and protected. Ready to get started? Let’s move on to the next step with confidence.Identifying Thermostat Wires
Identifying thermostat wires is crucial before adding a C wire to your thermostat. This task might seem daunting, but with the right guidance, it can be straightforward. This section will help you locate the thermostat and understand the wire colors involved.
Locating Thermostat
First, find your thermostat on the wall. Remove the cover gently. Look for screws that might be holding it in place. Once you remove the cover, you will see the wires connected to the thermostat. Make sure the power is off to avoid any risk of electric shock.
Understanding Wire Colors
Different wires have different colors and functions. Typically, the red wire is the power wire (R). The white wire often controls heating (W). The yellow wire usually controls cooling (Y). The green wire is for the fan (G). The blue or black wire is often the C wire (Common wire). Each wire is important for the proper functioning of the thermostat.
Always refer to your thermostat’s manual. It will have specific information about wire colors and their functions. Understanding these colors is key to successfully adding a C wire.

Credit: www.youtube.com
Accessing The Control Panel
Accessing the control panel of your HVAC system is crucial for adding a C wire to your thermostat. This process involves removing the thermostat cover and locating the control panel. Follow these steps to ensure a smooth process.
Removing Thermostat Cover
First, turn off the power to your HVAC system. This ensures safety. Locate your thermostat on the wall. Carefully remove the cover. Most covers snap off. Some may need a screwdriver. Keep track of any screws or small parts.
Finding Control Panel
Once the cover is off, look inside the thermostat. You will find a set of wires. Trace these wires to the control panel. The control panel is often inside the furnace or air handler. Open the panel door to access the wiring terminals. Look for labels like R, C, G, W, and Y. The C terminal is where the C wire connects.
Connecting The C Wire
Easily add a C wire to your thermostat for consistent power. Follow simple steps to connect it correctly. Ensure your smart thermostat works efficiently with this essential wire.
Adding a C wire to your thermostat can be a bit daunting, but it’s a crucial step if you want to upgrade to a modern smart thermostat. The C wire, or common wire, provides the necessary power for your new device to function properly. This section will walk you through how to connect the C wire, ensuring your thermostat works without a hitch.Attaching Wire To Thermostat
First, make sure you turn off the power to your heating and cooling system. Safety is paramount! Locate the C terminal on your thermostat. It’s typically labeled “C”. Securely attach the C wire to the C terminal. Ensure the connection is tight, as a loose wire can cause your thermostat to malfunction. If your thermostat does not have a C terminal, don’t worry. You can use the G wire (usually green) to act as a C wire. Consult your thermostat’s manual for this step.Connecting Wire To Furnace
Head over to your furnace. Open the panel to access the control board where the wires connect. Find the terminal labeled “C” on the furnace control board. This is where you will attach the other end of the C wire. If your furnace control board does not have a C terminal, you might need to use an adapter or consult a professional for further assistance. Securely connect the C wire to the C terminal. Make sure the wire is snug and there’s no risk of it coming loose. Close the furnace panel and turn the power back on. Have you ever faced a situation where your thermostat just wouldn’t power on? Adding a C wire can solve that frustrating problem. By following these steps, you should have a fully functional smart thermostat. It’s a small upgrade that makes a big difference in your home’s comfort and efficiency. Why wait? Get started on adding your C wire today and enjoy the benefits of a modern, smart home!
Credit: www.reddit.com
Testing The Connection
After adding the C wire to your thermostat, it’s crucial to test the connection. This ensures everything works as expected. Follow these steps to verify the new setup.
Check Best Thermostat Pricing in Amazon
** As an Amazon Associate, I earn from qualifying purchases.
Restoring Power
Begin by turning the power back on. Go to your circuit breaker and flip the switch. This will restore electricity to your HVAC system. Ensure the thermostat powers up. If it doesn’t, double-check your wiring connections.
Checking Thermostat Function
Once power is restored, check if the thermostat functions properly. Set a desired temperature and wait for the system to respond. The heating or cooling should start. If it doesn’t, revisit your wiring.
Examine the display for any error messages. These can help identify issues. Also, test different settings like fan mode or scheduling. This ensures all features work correctly.
Troubleshooting Common Issues
Installing a C wire in your thermostat can sometimes be tricky. Various issues can arise during the process. Understanding how to troubleshoot these common problems is crucial. Here are some tips to help you resolve them.
No Power To Thermostat
One common issue is no power to the thermostat. First, check your circuit breaker. It might have tripped. Reset it if necessary. Next, inspect the power switch near your furnace. Ensure it is turned on.
If these steps don’t work, examine your furnace door. Make sure it is securely closed. A loose door can cut power to the thermostat. Also, check the fuse inside the furnace. Replace it if it’s blown.
Incorrect Wiring
Incorrect wiring can prevent your thermostat from working. Double-check your wiring connections. Refer to the thermostat’s manual. Ensure each wire is connected to the correct terminal. Look for loose or disconnected wires. Re-secure them if needed.
If you are unsure about the wiring, use a multimeter. This tool can help you test for continuity. It will show if the wires are connected properly. Sometimes, the wires can get damaged. Inspect them for any signs of wear or breaks. Replace any damaged wires.

Credit: diy.stackexchange.com
Frequently Asked Questions
How Do I Add C To My Thermostat?
To add a C wire to your thermostat, connect it from the HVAC control board to the thermostat. Ensure power is off before starting.
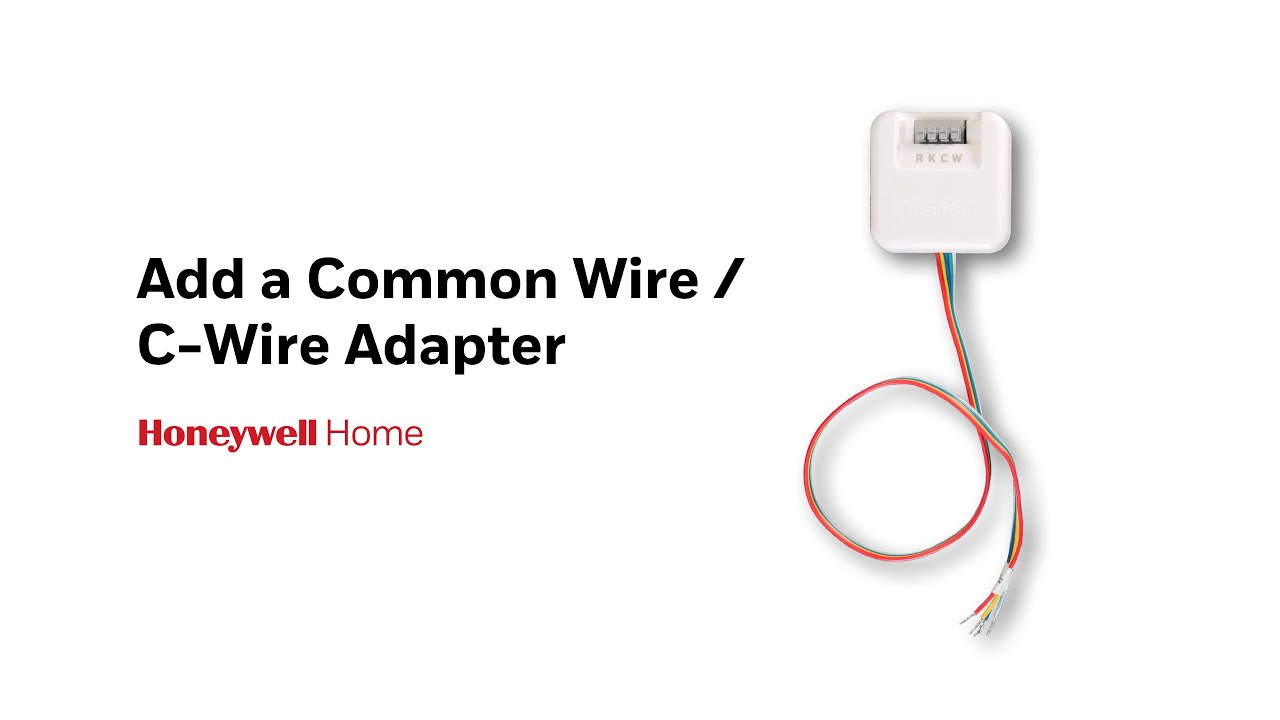
What To Do If There Is No C Wire For A Thermostat?
Use a power extender kit or a C-wire adapter. Install a new C-wire from the HVAC system. Replace the thermostat with a battery-powered model. Consult a professional for assistance.
How Much Does It Cost To Add A C Wire?
Adding a C wire typically costs between $100 and $200. Factors include labor, complexity, and your location.
Is There A Wifi Thermostat That Doesn’t Require C Wire?
Yes, several WiFi thermostats do not require a C wire. Examples include the Ecobee3 Lite and the Nest Thermostat E.
Conclusion
Adding a C wire to your thermostat may seem daunting. But it’s doable with the right tools and steps. Start with understanding your current setup. Then follow the instructions carefully. This small effort can enhance your home’s comfort. Enjoy better control over your heating and cooling.
Always prioritize safety and consult a professional if needed. Your thermostat will work efficiently, saving you energy and money. Now, you are ready to make your home smarter and more comfortable.
Check Best Thermostat Pricing in Amazon
** As an Amazon Associate, I earn from qualifying purchases.