
Check Best Thermostat Pricing in Amazon
** As an Amazon Associate, I earn from qualifying purchases.
Installing a thermostat in a car typically takes 1 to 2 hours. The duration varies based on vehicle make and model.
Car thermostats are crucial for regulating engine temperature. They ensure the engine operates efficiently by managing coolant flow. Over time, thermostats can wear out or fail, leading to overheating or inefficient cooling. Replacing a faulty thermostat promptly prevents engine damage and maintains optimal performance.
The installation process involves draining coolant, removing the old thermostat, and installing a new one. While it’s a relatively straightforward task, some vehicles may have more complex setups. Always refer to your vehicle’s manual or consult a professional mechanic for guidance. Proper maintenance keeps your car running smoothly and extends its lifespan.
Introduction To Car Thermostat Replacement
Replacing a car thermostat is an essential maintenance task. It helps ensure your engine stays at the right temperature. This task might seem daunting, but understanding the process makes it easier.
Significance Of A Car Thermostat
The car thermostat plays a crucial role. It regulates the engine’s temperature. A well-functioning thermostat ensures the engine neither overheats nor stays too cold.
- Prevents engine overheating
- Helps in fuel efficiency
- Maintains optimal engine performance
Symptoms Of A Failing Thermostat
Recognizing the symptoms of a failing thermostat is vital. Common signs include:
- Engine overheating
- Temperature gauge fluctuations
- Coolant leaks
- Unusual noises from the engine
These symptoms indicate the need for a thermostat replacement. Timely replacement prevents further engine damage.
Steps To Replace A Car Thermostat
| Step | Description |
|---|---|
| 1 | Cool down the engine |
| 2 | Locate the thermostat housing |
| 3 | Remove the old thermostat |
| 4 | Install the new thermostat |
| 5 | Refill the coolant |
| 6 | Check for leaks and test |
Each step ensures the thermostat is properly replaced. This process takes about 1-2 hours.
Credit: www.cars.com
Tools And Materials Needed
Installing a thermostat in a car requires specific tools and materials. Being prepared helps to complete the job efficiently and safely. Here, we’ll outline the essential tools and additional supplies you need.
List Of Essential Tools
To install a thermostat, you will need the following tools:
- Socket set – Various sizes for different bolts.
- Wrench set – For tightening and loosening nuts and bolts.
- Screwdrivers – Both flathead and Phillips.
- Torque wrench – To apply precise pressure.
- Pliers – For gripping and bending.
- Drain pan – To catch coolant.
- Funnel – Helps in refilling the coolant.
Additional Supplies And Safety Gear
Besides tools, you will also need various supplies and safety gear:
| Supplies | Safety Gear |
|---|---|
| Replacement thermostat | Safety glasses – Protect your eyes. |
| Gasket sealant | Gloves – Keep your hands clean and safe. |
| Coolant | Work apron – Protect your clothes. |
| Rags or paper towels |
Having these tools and materials ready will make the thermostat installation process smoother and safer. This preparation ensures you avoid any unnecessary delays.
Preparation Steps
Before installing a new thermostat in your car, proper preparation is crucial. Completing these steps ensures a smooth and safe process. This section will guide you through essential safety precautions and engine cooling and draining procedures.
Vehicle Safety Precautions
Safety is the top priority when working on your car. Follow these steps to ensure your safety:
- Park the car on a level surface: Ensure your car is on a flat, stable area.
- Turn off the engine: Allow the engine to cool completely before starting.
- Disconnect the battery: Remove the negative battery cable to avoid electrical shocks.
- Use safety gear: Wear gloves and safety glasses to protect your hands and eyes.
Engine Cooling And Draining
Before removing the old thermostat, the engine coolant must be drained. Follow these steps to do it correctly:
- Locate the radiator drain valve: It’s usually at the bottom of the radiator.
- Place a drain pan under the valve: This will catch the old coolant.
- Open the valve: Let the coolant drain into the pan completely.
- Close the valve: Ensure it’s securely closed after draining.
Completing these preparation steps will make the thermostat replacement process easier and safer. By taking these precautions, you’ll avoid potential hazards and ensure a successful installation.

Credit: www.wikihow.com
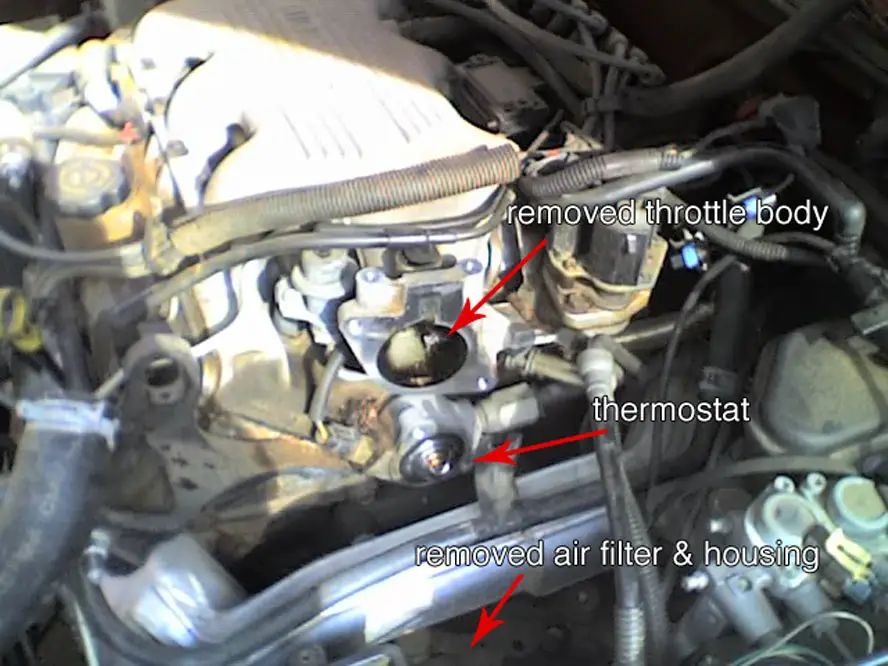
Removing The Old Thermostat
Removing the old thermostat is a key step in replacing it with a new one. This process involves accessing the thermostat housing and following specific steps to ensure a smooth removal. Let’s break down the steps involved in removing the old thermostat.
Accessing The Thermostat Housing
First, you need to locate the thermostat housing. It is usually found near the engine block, connected to the radiator hose. Ensure the engine is cool before starting any work to avoid burns.
- Open the hood and secure it with the hood prop.
- Locate the radiator hose leading to the engine.
- Follow this hose to find the thermostat housing.
Once you find the housing, you may need to remove other components to access it easily. This might include air filters or other hoses. Keep track of all parts and screws for reassembly.
Steps To Remove The Thermostat
With the thermostat housing now accessible, you can proceed to remove the old thermostat. Follow these steps:
- Place a drain pan under the radiator to catch any coolant.
- Loosen the clamp and remove the radiator hose from the housing.
- Use a wrench to remove the bolts securing the housing.
- Carefully lift off the thermostat housing.
- Note the orientation of the old thermostat before removing it.
- Pull out the old thermostat and discard the old gasket.
Clean the mating surfaces on the housing and engine block to ensure a good seal for the new thermostat. Inspect the housing for any signs of damage or corrosion.
By following these steps, you ensure the old thermostat is removed properly. This sets the stage for installing the new thermostat efficiently.
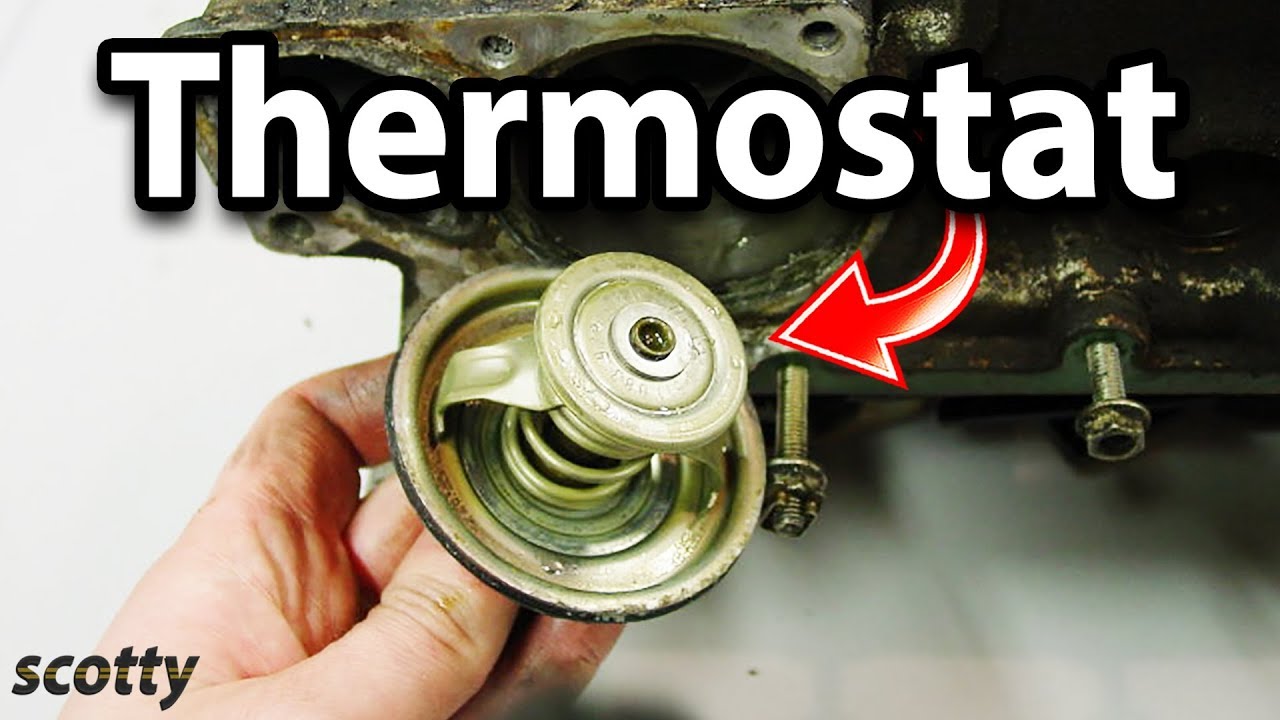
Installing The New Thermostat
Replacing a car thermostat can seem daunting. But it’s a manageable task if you follow the steps correctly. This section will guide you through installing the new thermostat in your car. By carefully following these instructions, you will ensure your car runs smoothly and efficiently.
Positioning The New Thermostat
First, locate the thermostat housing. This is usually found near the engine. Remove the old thermostat and any gasket material. Ensure the surface is clean before installing the new thermostat.
Place the new thermostat into the housing. Make sure the spring side faces the engine. This is crucial for proper functioning. Double-check that the thermostat is seated correctly.
Reassembling The Housing
After positioning the new thermostat, it’s time to reassemble the housing. Place a new gasket on the thermostat. This will help prevent leaks.
Next, carefully align the housing with the engine. Use the bolts you removed earlier to secure it in place. Tighten the bolts evenly to avoid damaging the housing.
Once the housing is secure, reconnect any hoses you disconnected. Make sure they are tight and secure. Finally, refill the coolant and check for leaks. Start the engine and let it run for a few minutes. This will help ensure everything is working correctly.
Follow these steps to install a new thermostat in your car. This will keep your car running efficiently and prevent overheating.
Refilling The Cooling System
Once the new thermostat is installed, the next crucial step is refilling the cooling system. This ensures the engine stays cool and runs efficiently. Proper refilling prevents overheating and extends the engine’s life.
Choosing The Right Coolant
Using the right coolant is essential for your car’s cooling system. Refer to your car’s manual for the recommended type. There are different types like ethylene glycol and propylene glycol. Each type has its own properties. Mixing different types can cause damage. Always use the one specified by the manufacturer.
Check Best Thermostat Pricing in Amazon
** As an Amazon Associate, I earn from qualifying purchases.
| Coolant Type | Properties |
|---|---|
| Ethylene Glycol | High boiling point, toxic |
| Propylene Glycol | Lower toxicity, eco-friendly |
Bleeding Air From The System
Bleeding air from the system is a vital step. Air pockets can cause the engine to overheat. Follow these steps to bleed the air:
- Park the car on a level surface.
- Remove the radiator cap carefully.
- Fill the radiator with the recommended coolant.
- Start the engine and let it run.
- Watch for air bubbles escaping from the radiator.
- Keep adding coolant until no more bubbles appear.
- Replace the radiator cap securely.
These steps ensure that your cooling system is free of air and functioning properly.
Testing The New Thermostat
After installing a new thermostat in your car, testing it is crucial. This ensures it works properly and prevents future issues. Below are the steps to test the new thermostat effectively.
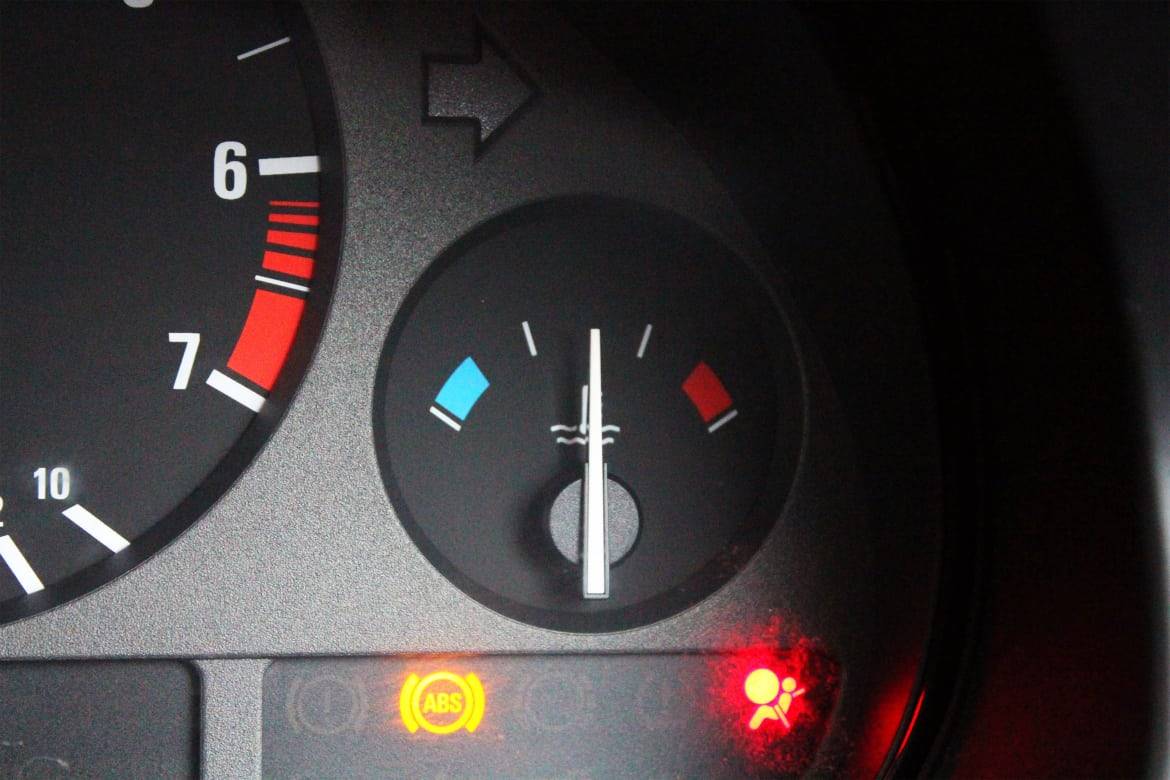
Initial Startup Procedure
Begin by starting the engine. Allow it to idle for a few minutes. This helps the engine reach its normal operating temperature.
Observe the temperature gauge on the dashboard. It should rise gradually and settle at the midpoint. This is the optimal temperature range.
If the gauge rises too fast or too slow, there may be an issue. Stop the engine and let it cool before proceeding.
Monitoring Temperature And Leak Checks
With the engine running, keep an eye on the temperature gauge. It should stay within the normal range.
Check for any leaks around the thermostat housing. Use a flashlight to spot any coolant dripping. Leaks can indicate improper installation or a faulty gasket.
Feel the upper radiator hose. It should be warm, indicating the thermostat is opening and allowing coolant flow.
If you notice any anomalies, turn off the engine immediately. Recheck the installation and ensure all connections are tight.
Here is a summary table of what to check:
| Check | Normal Condition | Potential Issue |
|---|---|---|
| Temperature Gauge | Midpoint | Too High/Low |
| Leaks | No Leaks | Coolant Dripping |
| Radiator Hose | Warm | Cold |
Credit: www.youtube.com
Maintenance Tips
Maintaining your car’s thermostat is crucial for its performance. Regular care can prevent costly repairs and keep your vehicle running smoothly. Below are some essential maintenance tips to ensure your car’s thermostat works efficiently.
Regular Check-ups
Regular check-ups are vital for your car’s health. Inspect your car’s thermostat at least twice a year. Look for signs of wear and tear. Replace any damaged parts immediately.
Check the coolant levels regularly. Low coolant can cause the thermostat to malfunction. Top up the coolant if necessary. Always use the recommended type of coolant for your car.
Keep an eye on your car’s temperature gauge. A fluctuating gauge can indicate a thermostat problem. Address this issue as soon as possible to avoid further damage.
When To Consult A Professional
Some thermostat issues need professional help. If you notice persistent overheating, consult a mechanic. Overheating can damage your engine.
Strange noises can also indicate a thermostat problem. If you hear unusual sounds, seek professional advice. A skilled mechanic can diagnose and fix the issue quickly.
If your car’s heater isn’t working, the thermostat might be the culprit. A professional can confirm this and replace the thermostat if needed.
| Issue | When to Consult a Professional |
|---|---|
| Overheating | Immediately |
| Strange Noises | As soon as possible |
| Heater Not Working | If persistent |
Regular maintenance and timely professional consultation can extend your car’s life. Keep an eye on the thermostat and address any issues promptly.
Time Frame And Additional Considerations
Installing a thermostat in your car can vary in time. It depends on several factors. This section helps you understand the estimated time and other considerations.
Estimated Time For Diy Installation
DIY installation of a car thermostat usually takes 1 to 2 hours. This is if you have some experience with car repairs. Beginners might take a bit longer.
Before starting, make sure to gather all needed tools and parts. Having everything ready can save time.
- Socket wrench set
- Drain pan
- New thermostat
- Gasket or gasket maker
- Coolant
Factors Affecting Installation Time
Several factors can affect the installation time of a car thermostat. Here are some key factors:
| Factor | Impact on Time |
|---|---|
| Experience Level | More experience can reduce time significantly. |
| Vehicle Make and Model | Some models have easier access to the thermostat. |
| Tool Availability | Having the right tools can speed up the process. |
| Condition of Parts | Rusty or stuck parts may take extra time to remove. |
Before starting, check your car’s manual for specific instructions. Each car can have different steps.
Safety first! Always work in a well-ventilated area. Wear safety gloves and goggles.
Frequently Asked Questions
Is It Hard To Replace A Thermostat In A Car?
Replacing a car thermostat can be moderately challenging. Basic mechanical skills and tools are required. Follow the vehicle’s manual for guidance.
How Long Does It Take To Put In A Thermostat?
Installing a thermostat typically takes 1 to 2 hours. The exact time depends on the system and experience level.
How Long Does It Take A Mechanic To Change A Thermostat In A Car?
A mechanic usually takes 1 to 2 hours to change a car thermostat. Time can vary based on the vehicle model.
How Much Should It Cost To Replace A Thermostat In A Car?
Replacing a car thermostat typically costs between $150 and $300. Prices vary based on car model and labor rates.
Conclusion
Replacing a car thermostat can be done in a few hours with basic tools. Always consult your vehicle’s manual for specifics. Regular maintenance ensures better performance and longevity. Don’t hesitate to seek professional help if needed. Proper installation is crucial for optimal engine temperature regulation.
Keep your car running smoothly.
Check Best Thermostat Pricing in Amazon
** As an Amazon Associate, I earn from qualifying purchases.