
Check Best Thermostat Pricing in Amazon
** As an Amazon Associate, I earn from qualifying purchases.
Wiring a thermostat to a furnace can seem challenging. But with the right steps, it’s manageable for many homeowners.
A well-functioning thermostat is crucial for maintaining comfort and energy efficiency in your home. Connecting it properly to your furnace ensures that your heating system works effectively. In this guide, we will break down the process of wiring a thermostat to a furnace in clear, simple steps.
Whether you’re installing a new thermostat or replacing an old one, understanding the basics can save you time and money. Ready to get started? Let’s dive into the essentials to help you wire your thermostat correctly and safely.

Credit: forums.wyze.com
Tools Needed
When wiring a thermostat to a furnace, having the right tools is crucial. It makes the job easier and ensures safety. Let’s discuss the tools you’ll need to get started and some optional ones that can make your task even smoother.
Essential Tools
First, let’s talk about the must-have tools. These are non-negotiable if you want to wire your thermostat correctly.
- Screwdrivers: You’ll need both a flathead and a Phillips screwdriver. These are essential for removing the cover of your furnace and the thermostat.
- Wire Stripper: This tool is crucial for stripping the ends of the wires. It allows for a clean connection.
- Drill: A drill is necessary if you need to make new holes to mount the thermostat.
- Wire Nuts: These are needed to secure the wire connections. They ensure that the wires stay connected and safe.
- Voltage Tester: Safety first! This tool ensures that there is no live current before you start working.
Optional Tools
While the above tools are essential, some additional tools can make your job easier.
- Level: To make sure your thermostat is perfectly straight. A crooked thermostat can affect its functionality and aesthetic.
- Label Maker: Labeling your wires can save you a lot of headache. It makes future repairs and maintenance much easier.
- Fish Tape: This is useful for running wires through walls. It can save you time and effort.
- Needle-Nose Pliers: These are great for bending and shaping wires. They give you better control over the wiring process.
Ever tried using a tool you didn’t think you’d need, only to find out it made the job ten times easier? That’s the benefit of considering optional tools. They might seem unnecessary at first, but they can save you time and hassle. What tools have you found unexpectedly useful in your DIY projects?
Safety Precautions
Ensure safety by turning off the power before wiring a thermostat to a furnace. Wear protective gloves to prevent electrical shocks. Double-check connections to avoid any mistakes.
When wiring a thermostat to a furnace, ensuring safety is paramount. You don’t want to risk injury or damage to your equipment. This section will guide you through essential safety precautions.Power Off
Always turn off the power before starting. Locate the circuit breaker for your furnace and switch it off. This step prevents electrical shocks. After turning off the breaker, double-check the furnace. Ensure there’s no power flowing to it. Use a voltage tester if you have one.Wear Protective Gear
Protective gear is essential. Wear gloves to avoid cuts and scratches. Safety goggles can shield your eyes from dust and debris. Long sleeves and pants can also be helpful. They protect your skin from accidental scrapes. Safety is not just a precaution—it’s a necessity. Have you ever had a close call with electricity? Share your experience in the comments.Identify Wiring Types
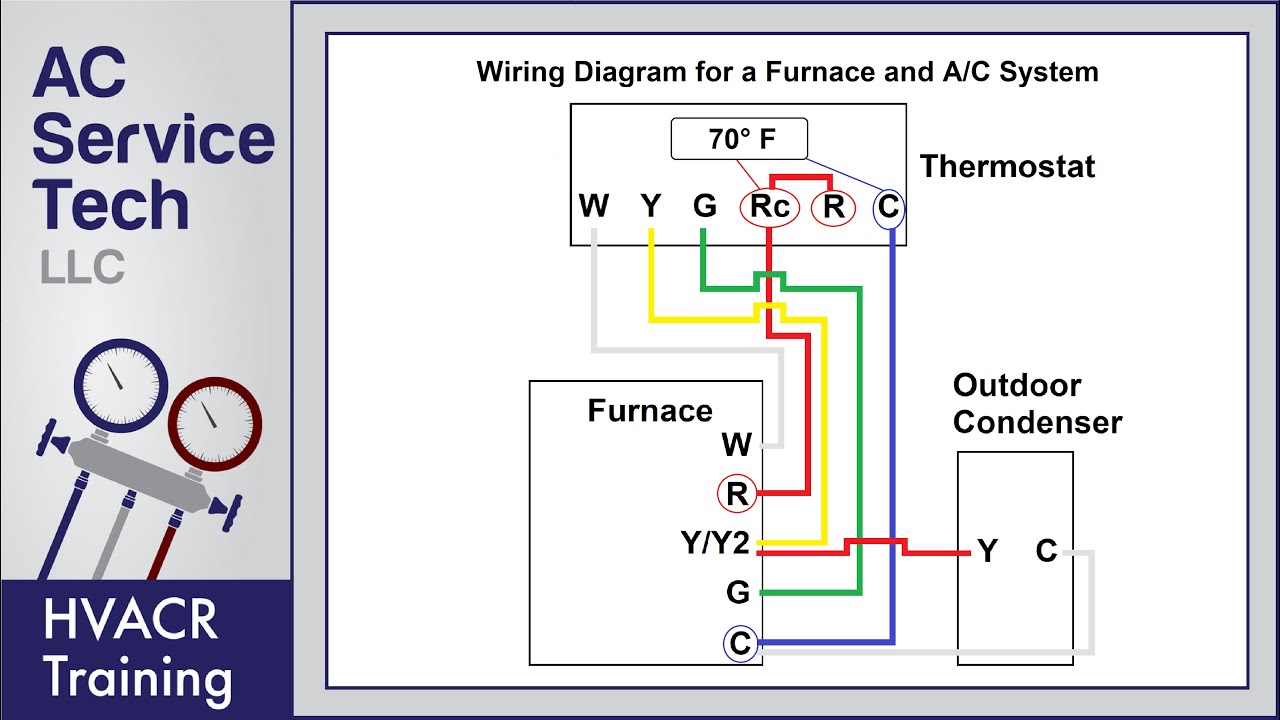
Understanding the wiring types is crucial for connecting a thermostat to a furnace. Each wire has a specific purpose. Knowing these will make the process easier and safer.
In this section, we explore the common wiring types and their color codes.
Common Wiring Types
Thermostats usually have several wires. The most common ones include:
- R or Rh: Power wire for heating
- Rc: Power wire for cooling
- W: Heating control
- Y: Cooling control
- G: Fan control
- C: Common wire
Each wire type serves a specific function. Make sure to connect them correctly.
Color Coding
Wires have different colors for easy identification. Here are the common color codes:
- Red (R or Rh): Power for heating
- Red (Rc): Power for cooling
- White (W): Heating control
- Yellow (Y): Cooling control
- Green (G): Fan control
- Blue or Black (C): Common wire
These color codes help in quick identification. They ensure proper wiring connections.
Remove Old Thermostat
Removing your old thermostat is the first step to upgrade to a new one. It ensures a clean slate for installation. Follow these steps to do it safely and effectively.
Disconnect Power
Before starting, turn off the power to your HVAC system. This prevents any risk of electric shock. Locate the circuit breaker that controls your furnace. Switch it off. Confirm the power is off by attempting to use the thermostat. If the display is blank, you are ready to proceed.
Remove Mounting Plate
Next, remove the cover of the old thermostat. Usually, it snaps off or requires a gentle pull. Once the cover is off, you will see the mounting plate secured by screws. Use a screwdriver to remove these screws. Carefully take off the mounting plate. This exposes the wiring connecting the thermostat to the furnace.
Prepare Furnace Wiring
Before connecting a thermostat to your furnace, prepare the wiring. This step ensures a smooth installation process. It also helps avoid potential issues later. Follow these steps for a successful setup.
Locate Furnace Wires
First, locate the furnace wires. These wires are usually inside the furnace control panel. Open the panel carefully. Identify the terminal block where the wires connect.
Check the furnace manual if needed. It often has diagrams. These diagrams show wire locations. This helps in finding the right wires quickly.
Label Wires
Next, label the wires. This step is crucial. It ensures you connect the wires correctly to the thermostat. Use masking tape and a pen. Label each wire based on its terminal connection. For example, ‘R’ for the red wire, ‘W’ for the white wire.
Take your time with this step. Clear labels prevent confusion. They make the installation process easier. Accurate labeling is essential for a functional system.

Credit: cyncsupport.gelighting.com
Check Best Thermostat Pricing in Amazon
** As an Amazon Associate, I earn from qualifying purchases.
Connect Thermostat Wires
Connecting thermostat wires to a furnace can seem daunting, but it’s manageable with clear steps. This process involves matching wire colors and securing connections properly. By following these simple guidelines, you can ensure a smooth connection. Let’s dive into the details.
Match Wire Colors
To start, identify the wire colors from the thermostat and furnace. Typically, each color represents a different function. For example, red wires often indicate power, while white wires connect to heat controls. Green wires usually link to the fan, and yellow wires are for cooling systems. Match these wires correctly to avoid any issues.
Use the wiring diagram in the thermostat manual. This will help confirm the correct connections. Double-check each wire’s color and corresponding terminal.
Secure Connections
Once you’ve matched the colors, it’s time to secure the connections. Strip about half an inch of insulation from each wire. Insert the exposed wire into the corresponding terminal on the thermostat base. Tighten the screw to secure the wire in place.
Ensure each wire is firmly connected. Loose connections can cause the system to malfunction. Gently tug on each wire to test its security. If any wire feels loose, retighten the screw.
After securing all wires, attach the thermostat cover. Ensure it snaps into place properly.
Mount New Thermostat
Mounting a new thermostat can seem challenging. But with the right steps, it’s easy. First, ensure you have the correct tools. These include a screwdriver, a level, and a drill. Now, let’s dive into the steps to mount your new thermostat.
Attach Mounting Plate
Start by attaching the mounting plate. This is where your thermostat will sit. Hold the plate against the wall. Use a level to ensure it is straight. Mark the screw holes with a pencil. Then, drill pilot holes where you marked.
Next, secure the mounting plate with screws. Make sure it is firmly in place. You don’t want it to move or tilt. This step ensures your thermostat sits correctly.
Install Thermostat
Now, it’s time to install the thermostat. Begin by connecting the wires. Refer to the labels on the terminals. Match each wire to its corresponding terminal. Tighten the terminal screws to secure the wires.
Once the wires are connected, attach the thermostat to the mounting plate. Align it properly and snap it into place. Ensure it sits flush against the plate. Finally, turn on the power to your furnace. Test the thermostat to confirm it works. And that’s it! Your new thermostat is now installed.
Credit: www.youtube.com
Test The System
Testing your thermostat and furnace connection is essential. It ensures everything works correctly. After wiring, you must check the system. This step avoids future issues and confirms a proper installation.
Restore Power
First, restore power to the furnace and thermostat. Go to the circuit breaker panel and flip the switch to the “ON” position. This action supplies electricity to the system. Ensure no other appliances are affected.
Check Thermostat Function
Next, test the thermostat function. Set the thermostat to heat mode and adjust the temperature. Listen for the furnace turning on. Check if warm air comes from the vents. Then, set it to cool mode. Ensure cold air flows when the air conditioner activates.
Observe the thermostat display. It should show the correct room temperature. Verify it matches your desired settings. Confirm all buttons and controls work as expected. This step ensures the thermostat communicates with the furnace properly.
Frequently Asked Questions
Where Does The Thermostat Wire Connect To The Furnace?
The thermostat wire connects to the furnace’s control board. Typically, it connects to the terminals labeled R (red) and W (white).
What Color Wires Go Where On A Furnace?
On a furnace, the red wire connects to the R terminal, white to W, green to G, and yellow to Y.
How Many Wires Are Needed For A Furnace Thermostat?
A furnace thermostat typically needs at least two wires. Modern systems may require four or more wires for advanced functions.
Does The R Wire Go To The Rc Or Rh Thermostat?
The R wire connects to either the RC or RH terminal on the thermostat. Use the manufacturer’s instructions for guidance.
Conclusion
Wiring a thermostat to a furnace can seem complex. But, with the right steps, it’s doable. Ensure your safety first by turning off the power. Follow the color-coded wires carefully. Match each wire to the correct terminal. Double-check connections before turning the power back on.
Test the thermostat to confirm it works. If unsure, seek help from a professional. Completing this task can improve your home’s comfort and efficiency. Remember, patience and accuracy are key. With these tips, you’ll wire your thermostat confidently. Happy wiring!
Check Best Thermostat Pricing in Amazon
** As an Amazon Associate, I earn from qualifying purchases.