
Check Best Thermostat Pricing in Amazon
** As an Amazon Associate, I earn from qualifying purchases.
Replacing a water heater thermostat is straightforward. It requires basic tools and safety measures.
In this guide, we’ll walk you through the process step by step. A faulty thermostat can cause your water heater to malfunction. This can lead to inconsistent water temperatures or no hot water at all. Luckily, replacing the thermostat is a task you can manage yourself.
Understanding how your water heater works is essential before starting the replacement. We will cover safety tips, necessary tools, and detailed instructions. This will ensure you complete the job safely and efficiently. Let’s get started on fixing your water heater to restore consistent hot water in your home.

Credit: www.plumbersingapore.org
Tools Required
Replacing a water heater thermostat requires a few essential tools. These include a screwdriver, a multimeter, and a non-contact voltage tester. Additionally, pliers and wire nuts will be helpful.
To successfully replace a water heater thermostat, you need the right tools at hand. Having the correct tools will ensure that the process is smooth, efficient, and safe. Let’s delve into the essential tools and safety gear you’ll need.Essential Tools
First and foremost, a screwdriver set is crucial. Both flathead and Phillips screwdrivers are often necessary, as water heaters use different types of screws. A voltage tester is essential for checking if the electricity is off. This is a safety must to avoid any accidental shocks. Wire strippers will help you handle the wires with precision. You’ll need them to cut and strip the wires connected to the thermostat. A wrench set can be handy for loosening and tightening nuts. Adjustable wrenches are particularly useful for dealing with varying sizes of nuts and bolts. Lastly, a multimeter is useful to test the new thermostat and ensure it’s working correctly. It’s a handy tool to have for various electrical tasks around the house.Safety Gear
Safety is paramount when dealing with electrical appliances. Always use insulated gloves to protect yourself from electric shocks. Even if you have turned off the power, it’s better to be safe than sorry. Safety goggles are another must-have. They will protect your eyes from any sparks or debris that may fly around while working. Wearing a long-sleeve shirt can add an extra layer of protection. You never know when a small spark could lead to a minor burn. A flashlight is also useful. Water heater areas can be dimly lit, and having a reliable light source will make the job easier and safer. Do you have all these tools and gear ready? If not, gather them before you start. Safety and preparation are key to a successful water heater thermostat replacement.
Credit: www.1tomplumber.com
Preparation Steps
Replacing a water heater thermostat might seem like a daunting task, but with the right preparation, it can be straightforward. Before you dive into the process, it’s crucial to make sure you’re fully prepared. Proper preparation ensures your safety and helps prevent potential damage to your water heater. Let’s walk through the essential preparation steps for replacing a water heater thermostat.
Shutting Off Power
Your first and most crucial step is to shut off the power supply to the water heater. Safety should always be your top priority. If you have an electric water heater, locate your home’s main electrical panel. Flip the breaker that supplies power to the water heater to the “off” position.
Double-check that the power is indeed off. Use a non-contact voltage tester to ensure there’s no electric current flowing to the water heater. This step is vital to avoid any electrical shocks or accidents while working on the thermostat.
Draining The Water Heater
Next, you’ll need to drain the water heater. This step prevents any water from leaking out when you remove the thermostat. Start by turning off the cold water supply to the water heater. This is typically a valve located on the top of the unit.
Attach a garden hose to the drain valve, which is usually found at the bottom of the water heater. Run the hose to a nearby floor drain or outside. Open the drain valve and let the water flow out. Be cautious as the water might be hot. Allow the tank to empty completely before proceeding.
Have you ever thought about why draining the water heater is so important? It’s not just about preventing spills. Draining removes sediment buildup at the bottom of the tank, which can improve the efficiency and lifespan of your water heater. So, it’s a good practice to drain it periodically, even if you’re not replacing the thermostat.
Are you ready to take on the challenge of replacing your water heater thermostat? With these preparation steps, you’re well on your way to ensuring a smooth and safe process. Next, you’ll move on to the actual replacement, but for now, pat yourself on the back for taking these essential precautions.
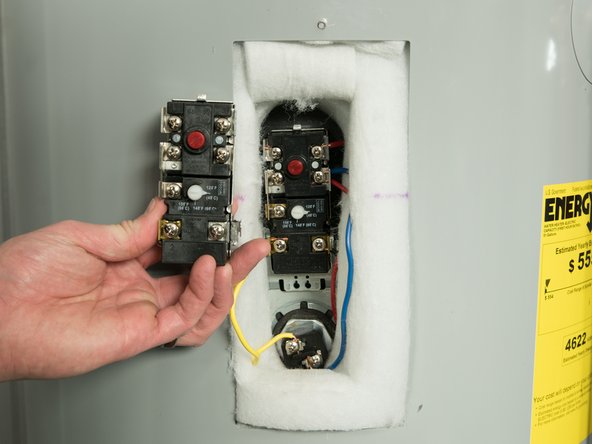
Accessing The Thermostat
Accessing the thermostat on your water heater may sound daunting, but with a few simple steps, you can do it yourself. This process involves removing the cover and locating the thermostat. Let’s get started!
Removing The Cover
First, ensure your water heater is turned off to avoid any electrical hazards. Safety first! Locate the access panel on the side of your water heater. This panel is usually secured with screws.
Use a screwdriver to remove the screws and gently take off the cover. Keep the screws in a safe place, as you’ll need them to reattach the cover later. Once the cover is off, you’ll see a layer of insulation. Remove this as well to expose the thermostat.
Locating The Thermostat
Once the insulation is out of the way, you should see the thermostat along with some wires. The thermostat is usually rectangular and has a dial or a set of buttons for temperature adjustment. If you have trouble finding it, consult your water heater’s manual for specific instructions.
Take a moment to familiarize yourself with the layout. Note the position of the wires and how they are connected. This will be important when you install the new thermostat. Now that you’ve accessed the thermostat, you’re ready to replace it!
Have you ever replaced a thermostat before? What challenges did you face? Share your tips in the comments below!
Removing The Old Thermostat
Replacing a water heater thermostat might sound daunting, but it’s a task you can handle with some patience and the right tools. The first major step is removing the old thermostat. This involves a couple of key actions: disconnecting the wires and extracting the unit. Let’s walk through each step in detail.
Disconnecting Wires
Before you start, ensure the power to your water heater is switched off at the circuit breaker. Safety first! I remember the first time I did this, I had a moment of doubt—was it really off? A quick test with a voltage tester confirmed it was safe to proceed.
Next, remove the access panel on the water heater. Inside, you’ll find the thermostat with wires connected to it. Use a screwdriver to loosen the screws holding the wires in place. Gently pull the wires free. You might want to label them or take a photo to remember their positions for later.
Have you ever wondered why it’s crucial to disconnect wires carefully? If wires are damaged, it could lead to improper functioning or even hazards. Taking this step slowly ensures you avoid any mistakes.
Extracting The Unit
With the wires disconnected, it’s time to extract the thermostat. Depending on your water heater model, the thermostat might be clipped or screwed into place. Use the appropriate tool to remove it. Sometimes, the unit can be a bit stuck due to sediment buildup.
Carefully pull out the old thermostat. If it feels resistant, gently wiggle it to free it from its position. It’s similar to how you might carefully extract a stubborn screw from wood—patience and gentle force are key.
Check Best Thermostat Pricing in Amazon
** As an Amazon Associate, I earn from qualifying purchases.
As you remove the unit, observe its condition. Was there any corrosion or noticeable wear? This can give you insights into how well your water heater has been performing. Removing the old thermostat is a chance to reset and ensure everything is in top shape.
Are you ready to continue with the installation of the new thermostat? Understanding these initial steps will make the entire process smoother and more efficient.
Stay tuned for the next section where we’ll go over installing the new thermostat and restoring your water heater to perfect working condition.
Installing The New Thermostat
Installing the new thermostat in your water heater can seem daunting. But with a bit of patience and some basic tools, you can do it yourself. Follow these steps to ensure a smooth installation.
Connecting Wires
First, ensure the power is off at the circuit breaker. Locate the wires from the old thermostat. Take a picture for reference. This helps in connecting the new thermostat. Disconnect the old wires carefully. Now, connect the new thermostat wires. Match the colors and screw them tightly. Ensure no wires are loose.
Securing The Unit
Place the new thermostat in the same position as the old one. Screw it in place securely. Make sure it is firmly attached. Check for any loose connections. Tighten any screws that are loose. Your new thermostat should now be secure and ready.
Testing The Installation
After replacing your water heater thermostat, testing the installation is crucial. This ensures your new thermostat works correctly. Follow these steps to confirm the installation.
Restoring Power
First, restore power to your water heater. Flip the breaker switch back on. Wait a few minutes for the thermostat to activate. Do not touch any wires or components while the power is on.
Checking Temperature Settings
Next, check the temperature settings on your new thermostat. Turn the dial to your desired temperature. Wait for the water to heat up to the set temperature. Use a thermometer to verify the water temperature. Adjust the thermostat if needed.
Common Issues
Replacing a water heater thermostat can sometimes be a challenging task. Many homeowners face common issues during the process. Understanding these issues can save time and effort. Let’s explore some common problems you might encounter.
Troubleshooting Tips
First, ensure the power is off before starting any repairs. This is crucial for safety. Next, check for a blown fuse or tripped circuit breaker. These can often be the source of the problem. If the heater is still not working, test the thermostat with a multimeter. Ensure it shows continuity. If not, the thermostat might be faulty. Another tip is to inspect the heating element. Sometimes the issue lies with a burnt-out element rather than the thermostat.
When To Call A Professional
It’s important to recognize your limits. If you feel unsure or unsafe, call a professional. Also, if troubleshooting tips do not resolve the issue, seek professional help. Water heater problems can sometimes be complex. Professionals have the expertise to diagnose and fix these issues. Additionally, if there are signs of a more serious problem, like leaks or strange noises, contact a professional immediately. Your safety is paramount.

Credit: www.whirlpoolwaterheaters.com
Maintenance Tips
Maintaining your water heater thermostat is essential for its longevity and efficiency. Regular care can prevent unexpected breakdowns and ensure optimal performance. Here are some key maintenance tips to keep your water heater thermostat in top shape.
Regular Inspections
Check the thermostat every few months. Look for any signs of wear or damage. Ensure all connections are tight and secure. If you notice any issues, address them promptly. This can prevent larger problems down the line.
Preventive Measures
Keep the area around your water heater clean and free of debris. Ensure proper ventilation to avoid overheating. Insulate the water heater to maintain a consistent temperature. This helps the thermostat function efficiently.
Frequently Asked Questions
Can I Replace Water Heater Thermostat Myself?
Yes, you can replace a water heater thermostat yourself. Ensure you follow safety guidelines and turn off power first.
How Do I Tell If My Water Heater Thermostat Is Bad?
Check for inconsistent water temperature. Listen for unusual noises. Inspect for tripped circuit breakers. Test with a multimeter for continuity. Observe for higher energy bills.
Do You Have To Drain A Water Heater To Replace The Thermostat?
No, you don’t need to drain the water heater to replace the thermostat. Just turn off the power and water supply.
How Much Does It Cost To Replace A Thermostat In A Hot Water Heater?
Replacing a thermostat in a hot water heater typically costs between $100 and $300. This includes parts and labor. Prices may vary based on location and heater type.
Conclusion
Replacing a water heater thermostat is simpler than you might think. First, gather the necessary tools and safety gear. Next, follow the step-by-step instructions carefully. Double-check all connections before powering the heater. Proper maintenance ensures your water heater functions efficiently.
Regular checks can prevent future issues. Don’t hesitate to seek help from a professional if needed. Now, you can confidently tackle this DIY project. Save time and money with these easy steps. Your water heater will thank you for the care.
Happy repairing!
Check Best Thermostat Pricing in Amazon
** As an Amazon Associate, I earn from qualifying purchases.