
Check Best Thermostat Pricing in Amazon
** As an Amazon Associate, I earn from qualifying purchases.
Are you looking to upgrade your Honeywell thermostat, or maybe you need to give your walls a fresh coat of paint? Whatever your reason, removing a Honeywell thermostat from the wall might seem like a daunting task.
But don’t worry! With the right guidance, you can tackle this project without any fuss. In this guide, you’ll learn step-by-step how to safely and efficiently remove your thermostat, ensuring you don’t damage your walls or the device itself. By the time you finish reading, you’ll feel confident in handling this task and ready to move on to your next home improvement project.
So, let’s dive in and make this process as smooth as possible!
Credit: www.reddit.com
Gather Necessary Tools
Preparing to remove a Honeywell thermostat requires the right tools. Ensuring you have everything on hand makes the process smoother. This section helps you identify what you need.
Phillips Screwdriver
The Phillips screwdriver is essential for removing screws. Most thermostats are secured with Phillips screws. Check the size to avoid damaging the screws.
Flathead Screwdriver
A flathead screwdriver helps with prying off the thermostat cover. It can also assist with loosening tight screws. Choose a size that fits the screws well.
Digital Camera Or Smartphone
Use a digital camera or smartphone to take pictures. Capture the wiring configuration before removal. This ensures easy reinstallation or troubleshooting.
Marker Or Tape
A marker or tape labels the wires. This prevents confusion during reinstallation. Mark each wire according to its terminal.
Safety Gloves
Wearing safety gloves protects your hands. They provide a better grip when handling wires. Choose gloves that fit comfortably.
Multimeter
A multimeter checks for voltage in the wires. This confirms the thermostat is safe to handle. Ensure the multimeter is functional.
Turn Off Power
Before you begin the process of removing a Honeywell thermostat from the wall, safety must be your top priority. The first step is turning off the power to prevent any electrical mishaps. This might sound daunting, but with a few simple steps, you can ensure a safe and smooth removal process.
Locate Circuit Breaker
Start by identifying the location of your circuit breaker panel. Typically, these panels are tucked away in basements, garages, or utility rooms. Once you find it, open the panel and look for labels indicating the circuit controlling your HVAC system.
It’s important to know that circuit breaker labels might not always be clear. If you’re unsure, test the switches one by one to identify which controls your thermostat. Remember, it’s better to take your time than to risk an electrical shock.
Switch Off Hvac System
After locating the correct circuit breaker, switch it off. This action will cut the power supply to your HVAC system, ensuring your safety. It’s crucial to double-check that the system is indeed off by attempting to turn on the thermostat.
If the thermostat remains unresponsive, you’re on the right track. If it powers on, revisit the circuit breaker to confirm the correct switch is off. Have you ever thought about how many accidents could be prevented with just a bit of patience and caution?
Turning off the power might seem like a minor step, but it’s an essential one. By ensuring no power runs to your thermostat, you protect yourself and your home from potential electrical hazards. So next time you’re about to tackle a home project, ask yourself—have you taken the necessary precautions?
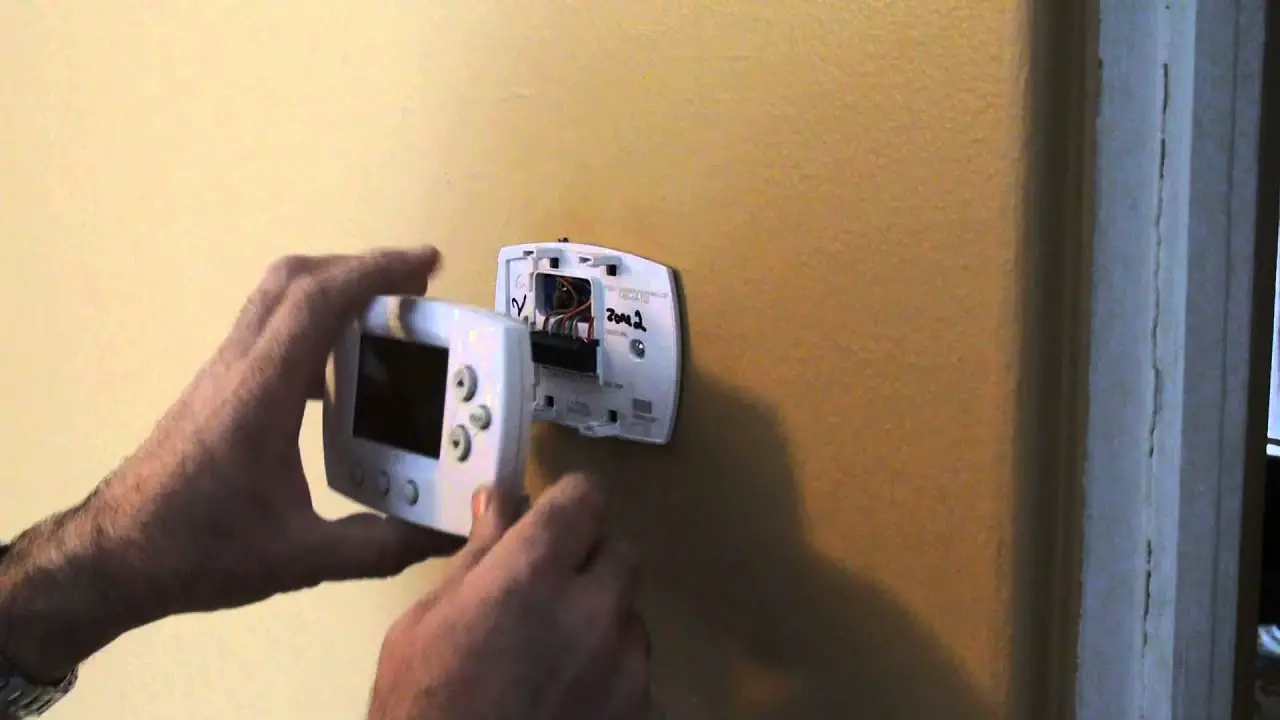
Remove Thermostat Cover
Removing the cover of your Honeywell thermostat is a simple task. It is the first step in accessing its internal components. This guide will help you do it safely and efficiently.
Identify The Cover Type
First, look at your Honeywell thermostat. Determine the type of cover it has. Some models have a snap-on cover. Others might have a hinge or screws. Knowing this helps you remove it correctly.
Gently Pry Off The Cover
Use a flat tool like a screwdriver. Place it in the small gap between the cover and the base. Apply light pressure to pry the cover off. Be gentle to avoid damage. If your model has screws, unscrew them first. Then, lift the cover away carefully.
Disconnect Wiring
To remove a Honeywell thermostat, start by disconnecting the wiring carefully. Ensure power is off to avoid shocks. Unscrew the device gently from the wall, keeping wires intact for easy reinstallation.
Check Best Thermostat Pricing in Amazon
** As an Amazon Associate, I earn from qualifying purchases.
Label Wires For Reinstallation
Before you remove any wires, labeling them is crucial for an easy reinstallation. Imagine trying to solve a puzzle without a picture for reference. Sounds challenging, right? Use small pieces of masking tape and a pen to tag each wire. Write down the terminal letter or number that each wire corresponds to. This simple step can save you a lot of frustration later.Loosen Terminal Screws
Once your wires are labeled, it’s time to loosen the terminal screws. Keep a small screwdriver handy for this step. You don’t want to strip the screws by using the wrong tool. Gently turn the screws counterclockwise. Be careful not to remove them completely; just loosen them enough to free the wires. Have you ever tried to fix something only to realize you lost a tiny part? Avoid that by keeping the screws in place. When you take your time and follow these steps, disconnecting the wiring becomes a manageable task. With everything labeled and loosened, you’re well on your way to safely removing your Honeywell thermostat from the wall. Can you feel the sense of accomplishment already?Detach Mounting Plate
Detaching the mounting plate of your Honeywell thermostat might sound like a daunting task, but it’s actually quite simple when you break it down into manageable steps. Whether you’re upgrading to a new model or troubleshooting an issue, removing the mounting plate is a crucial part of the process. Let’s dive into the practical steps to get this done efficiently.
Unscrew Mounting Plate
First, gather the necessary tools, usually a Phillips-head screwdriver will do the trick. Look closely at your Honeywell thermostat; you’ll notice screws securing the mounting plate to the wall. Carefully unscrew these, making sure to keep them safe for later use. Losing these screws can be a headache, especially if you plan to reinstall the thermostat or use them for another project.
As you unscrew, you might find some resistance. Don’t force it, as this could damage the wall or the thermostat itself. If the screws are stubborn, gently wiggle them to loosen. This approach can save you from potential mishaps.
Remove From Wall
With the screws out of the way, it’s time to remove the mounting plate. Firmly grip the plate and gently pull it away from the wall. Be cautious, as there may be wires connected to the back of the thermostat. You don’t want to accidentally tug on these and cause a wiring issue.
As you remove the plate, take a moment to inspect the wall for any damage. Sometimes, paint or wallpaper can peel off during this process. Have you ever experienced that sinking feeling when you see unexpected wall damage? A little preparation can prevent this. Consider using a cloth or a gentle touch to avoid pulling too hard.
Removing a Honeywell thermostat’s mounting plate doesn’t have to be a hassle. By following these steps, you can confidently manage this task. Have you ever wondered how a simple action like this could impact your home? Share your thoughts or experiences in the comments below!

Credit: willplumb.com
Inspect Wall And Clean Up
Removing a Honeywell thermostat involves more than just unscrewing it. Inspecting the wall and cleaning up is crucial. This ensures the area looks neat after the removal. Let’s explore how to check for any damage and clean the wall area effectively.
Check For Damage
Look closely at the wall after removing the thermostat. There might be small holes or scratches. These can occur during the removal process. Use a flashlight to spot any hidden issues. Identifying damage early helps in fixing it quickly.
Clean Wall Area
Dust and dirt can gather behind the thermostat over time. Start by wiping the area with a damp cloth. This removes surface dust and grime. For stubborn stains, use mild soap and water. Avoid using harsh chemicals that may damage the wall paint.
Once cleaned, let the area dry completely. A dry wall prevents mold and mildew growth. This step is vital to keep the wall healthy.

Credit: www.youtube.com
Frequently Asked Questions
How Do I Take My Honeywell Thermostat Off The Wall?
Turn off your Honeywell thermostat. Remove the cover by gently pulling it off the wall. Unscrew the mounting screws, then carefully detach the thermostat from the wall plate. Ensure no wires are damaged during removal.
How To Remove A Wall Mounted Thermostat?
Turn off the power supply to the thermostat. Unscrew the thermostat cover. Disconnect the wires carefully. Remove the mounting screws. Gently pull the thermostat off the wall. Ensure you label wires for future reference.
How To Remove Old Honeywell Thermostat Faceplate?
Turn off the power to the thermostat. Gently pull the faceplate away from the wall. Use slight pressure if necessary. Ensure the wires remain undisturbed. Follow manufacturer instructions for additional guidance.
How To Take Honeywell Thermostat Off Wall To Change Battery?
Remove the Honeywell thermostat from the wall by gently pulling it towards you. Disconnect the faceplate from the base. Locate the battery compartment at the back. Replace the old batteries with new ones. Reattach the faceplate to the base until it clicks securely.
Conclusion
Removing a Honeywell thermostat is simpler than it seems. Follow the steps carefully. Safety first. Always switch off the power before beginning. Gather your tools: screwdriver and instructions. Be gentle when detaching wires. Mark them for easy reinstallation. Take your time.
There’s no rush. Each step ensures a smooth process. Double-check connections before setting the new one. Save your old device instructions. They might come in handy. With these tips, you can do it. Feel confident in your ability to handle the task.
Stay safe and happy fixing!
Check Best Thermostat Pricing in Amazon
** As an Amazon Associate, I earn from qualifying purchases.