
Check Best Thermostat Pricing in Amazon
** As an Amazon Associate, I earn from qualifying purchases.
Removing a Honeywell thermostat is a straightforward task. It involves a few simple steps that anyone can follow.
Thermostats control the heating and cooling in our homes. Sometimes, we need to replace or upgrade them. Whether you’re changing to a new model or fixing an issue, removing your current Honeywell thermostat is the first step. Understanding how to do this safely and effectively can save you time and money.
This guide will walk you through the process, ensuring you handle the task with confidence. Let’s begin the journey to safely removing your Honeywell thermostat.
Preparation
Before removing a Honeywell thermostat, proper preparation is essential. This ensures safety and prevents damage. Follow these steps carefully to make the process smooth and hassle-free.
Safety Precautions
Safety is the top priority. Wear protective gloves to avoid electrical shocks. Ensure you have all necessary tools ready. A screwdriver and a voltage tester are a must.
Turn Off Power
First, turn off the power to the thermostat. Locate the circuit breaker box in your home. Find the switch that controls the thermostat’s power. Flip the switch to the off position. Confirm the power is off using a voltage tester.
Removing The Thermostat Cover
Removing the thermostat cover is a key step in replacing or servicing your Honeywell thermostat. This process is simple and requires no special tools. Follow these steps to ensure you do it right.
Locate The Cover
First, find the thermostat on your wall. Look for a plastic cover protecting the internal components. This cover is usually rectangular or square. Examine the edges of the cover to find where it attaches to the base.
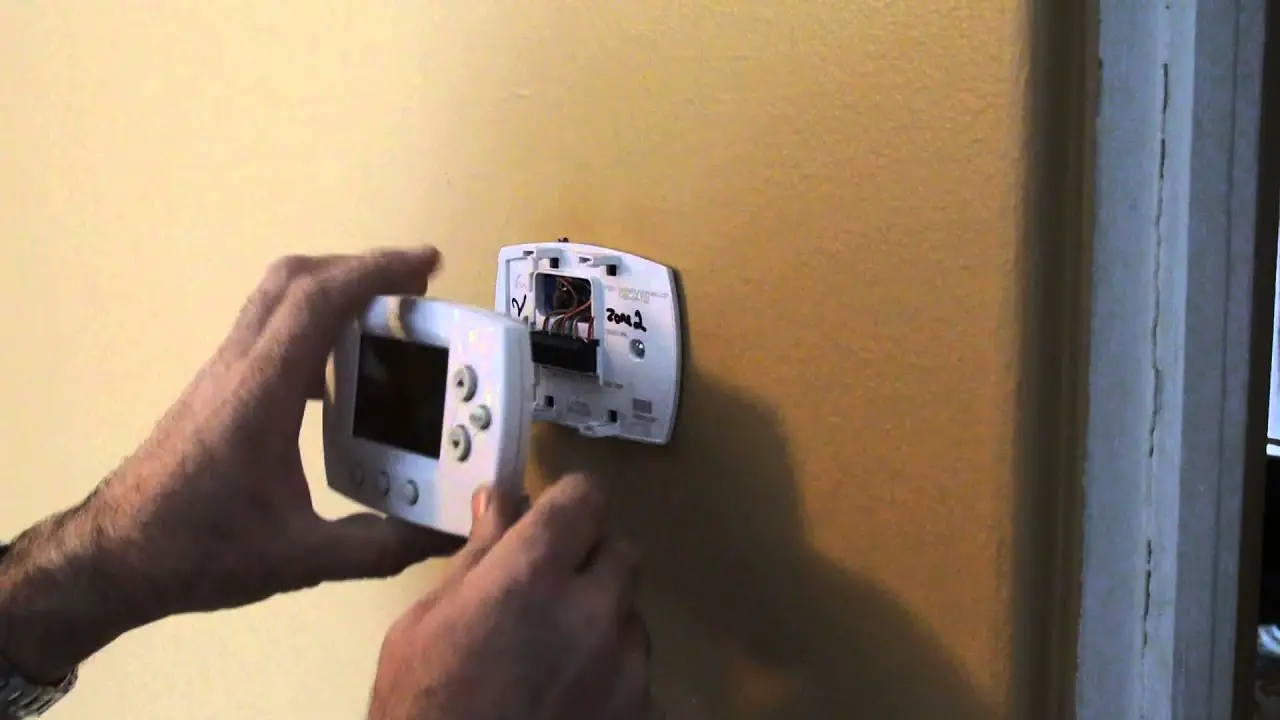
Gently Pry Off The Cover
Next, use your fingers to gently lift the cover. Start at the bottom edge and apply a bit of pressure. The cover should begin to loosen. Continue to lift gently until the cover comes off completely. Be careful not to force it. Forcing may damage the cover or internal parts.
Disconnecting The Wires
Disconnecting the wires is a crucial step when removing a Honeywell thermostat. This ensures the device is no longer connected to your home’s HVAC system. Follow these steps to disconnect the wires safely.
Label The Wires
First, turn off the power to your thermostat. Use the circuit breaker to cut the power supply. This prevents any electrical accidents. Next, remove the thermostat cover. You should see several wires connected to terminals.
Label each wire with its corresponding terminal letter. Use small pieces of masking tape and a pen. This will help you reconnect the wires later. Common terminal labels include R, W, Y, and G. Take a photo for extra reference.
Remove The Wires
Once the wires are labeled, use a small screwdriver to loosen the terminal screws. Carefully pull each wire out from the terminal. Avoid pulling too hard to prevent damage.
After removing all the wires, secure them with a twist tie. This keeps them from falling back into the wall. Now, your wires are safely disconnected, and you can proceed with removing the thermostat unit.
Removing The Wall Plate
Removing a Honeywell thermostat wall plate might seem tricky. But with the right steps, it becomes simple. First, ensure the power is off. Safety first! Now, let’s move to the specifics of removing the wall plate.
Unscrew The Wall Plate
Most Honeywell thermostats have screws securing the wall plate. Look for these screws, usually at the top and bottom. Use a screwdriver to remove them. Keep the screws in a safe place. You will need them later.
Detach The Wall Plate
After unscrewing, the wall plate should come off easily. Gently pull the wall plate from the wall. If it feels stuck, wiggle it slightly. This should help it come loose. Be careful not to damage any wires behind the plate. Now, you have successfully removed the wall plate. Great job!
Handling Old Thermostats
Handling old thermostats is an important step in the removal process. Many people overlook the proper disposal and recycling of these devices. Old thermostats can contain hazardous materials that need special care. It’s not just about removing the thermostat from the wall. It’s about what you do with it afterward.
Proper Disposal
Old thermostats often contain mercury. Mercury is harmful to the environment and human health. You should never throw an old thermostat in the trash. Instead, contact your local waste management facility. They can provide guidance on how to dispose of it safely. Proper disposal prevents harmful materials from entering landfills.
Check Best Thermostat Pricing in Amazon
** As an Amazon Associate, I earn from qualifying purchases.
Recycling Options
Recycling old thermostats is another great option. Many hardware stores offer recycling programs for old thermostats. Check with the store where you bought your new thermostat. They may have a recycling program for old devices. You can also search for electronic waste recycling centers in your area. These centers ensure that hazardous materials are handled correctly.

Credit: willplumb.com
Installing A New Thermostat
Installing a new thermostat can seem like a daunting task. With the right steps, it can be a simple process. This section will guide you through the necessary steps to ensure a smooth installation.
Compatibility Check
Before installing a new thermostat, check its compatibility with your system. Not all thermostats work with every heating or cooling setup. Most thermostat packages include a compatibility guide. Read this guide carefully. It will save you time and frustration later.
Follow Manufacturer Instructions
Every thermostat model comes with a specific set of instructions. These instructions are tailored to the device and ensure proper installation. Follow the steps outlined in the manual. Do not skip any steps. This guarantees the thermostat works correctly.
Start by turning off the power to your HVAC system. Safety first! Next, remove the old thermostat. Label the wires as you disconnect them. This makes it easier to connect them to the new thermostat.
Mount the new thermostat base on the wall. Make sure it is level. Attach the wires to the corresponding terminals. Refer to your labels and the manual. Finally, attach the thermostat faceplate.
Turn the power back on. Test the new thermostat to ensure it is working. If the system does not respond, double-check the wiring. Refer back to the manual if needed.
Testing The New Installation
Testing a new installation? Carefully detach the Honeywell thermostat. Turn off power, remove the cover, and disconnect wires.
After removing the old Honeywell thermostat and installing a new one, it’s essential to test the new installation. This step ensures everything works correctly. Follow these simple steps to confirm that your new thermostat is functioning as expected.Restore Power
First, restore power to your HVAC system. Go to your circuit breaker panel and turn the HVAC breaker back on. This will supply power to your new thermostat. Be careful when handling the circuit breaker to avoid any electrical hazards.Verify Functionality
Once the power is restored, check the thermostat’s display. It should light up and show the current room temperature. Set the thermostat to a desired temperature. Listen for a click, which indicates the thermostat is sending a signal to the HVAC system. Check if the heating or cooling system responds accordingly. Wait a few minutes to ensure that the system starts running smoothly. If the system does not respond, recheck your wiring connections. Make sure all wires are securely connected. Refer to the installation manual for troubleshooting tips. Testing your new thermostat installation is crucial. It ensures your home’s climate control works efficiently. Enjoy your comfortable and well-regulated home environment! “`
Credit: www.youtube.com

Credit: willplumb.com
Frequently Asked Questions
How Do I Take My Honeywell Thermostat Off The Wall?
To remove your Honeywell thermostat, turn off the power. Gently pull the thermostat away from the wall plate. Avoid using excessive force.
Can I Replace My Old Honeywell Thermostat With A New One?
Yes, you can replace your old Honeywell thermostat with a new one. Ensure compatibility with your HVAC system. Follow installation instructions carefully.
How To Remove A Thermostat From The Wall?
To remove a thermostat from the wall, turn off the power. Unscrew the thermostat cover. Disconnect the wires, noting their positions. Remove the mounting screws. Carefully pull the thermostat away from the wall.
How To Remove Cover On Honeywell Pro Series Thermostat?
To remove the cover on a Honeywell Pro series thermostat, gently pull the front cover straight off.
Conclusion
Removing a Honeywell thermostat is a straightforward process. Start by turning off the power. Then, remove the cover gently. Unscrew the mounting plate and disconnect the wires. Label the wires to avoid confusion later. Finally, detach the thermostat from the wall.
Remember to handle everything carefully. Following these steps ensures a smooth removal. Now you can replace or upgrade your thermostat with ease. Happy DIY!
Check Best Thermostat Pricing in Amazon
** As an Amazon Associate, I earn from qualifying purchases.