
Check Best Thermostat Pricing in Amazon
** As an Amazon Associate, I earn from qualifying purchases.
Programming an Emerson thermostat is straightforward. You just need to follow a few simple steps.
Emerson thermostats are popular for their ease of use and energy-saving features. Whether you’re installing a new thermostat or adjusting the settings on an existing one, knowing how to program it can make your life more comfortable and efficient. In this guide, we’ll walk you through the process, step-by-step.
You’ll learn how to set the time, adjust the temperature, and create schedules that fit your lifestyle. By the end of this blog post, you’ll be able to program your Emerson thermostat with confidence and enjoy a well-regulated home climate.
Introduction To Emerson Thermostats
Emerson Thermostats are known for their reliability and user-friendly design. They offer a range of features that make managing your home’s temperature easy and efficient. Whether you’re upgrading your current system or installing a new one, Emerson Thermostats provide a great solution for maintaining comfort.
Let’s dive into some of the benefits and explore the common models available.
Benefits Of Using Emerson Thermostats
One of the key benefits of Emerson Thermostats is their ease of use. The interface is intuitive, allowing you to set your preferred temperature with minimal effort. You won’t need to be a tech expert to navigate the settings.
Another advantage is energy efficiency. These thermostats help you save on your energy bills by optimizing your heating and cooling schedules. You can program them to lower the temperature when you’re not home, reducing unnecessary energy use.
Emerson Thermostats also offer remote access via smartphone apps. Imagine adjusting your home’s temperature while on vacation, ensuring you return to a perfectly comfortable house. This feature enhances convenience and peace of mind.
Common Models Available
Emerson offers several models to suit different needs and preferences. The Sensi Smart Thermostat is a popular choice for its smart home integration capabilities. It works seamlessly with Alexa, Google Assistant, and Apple HomeKit, making it perfect for tech-savvy users.
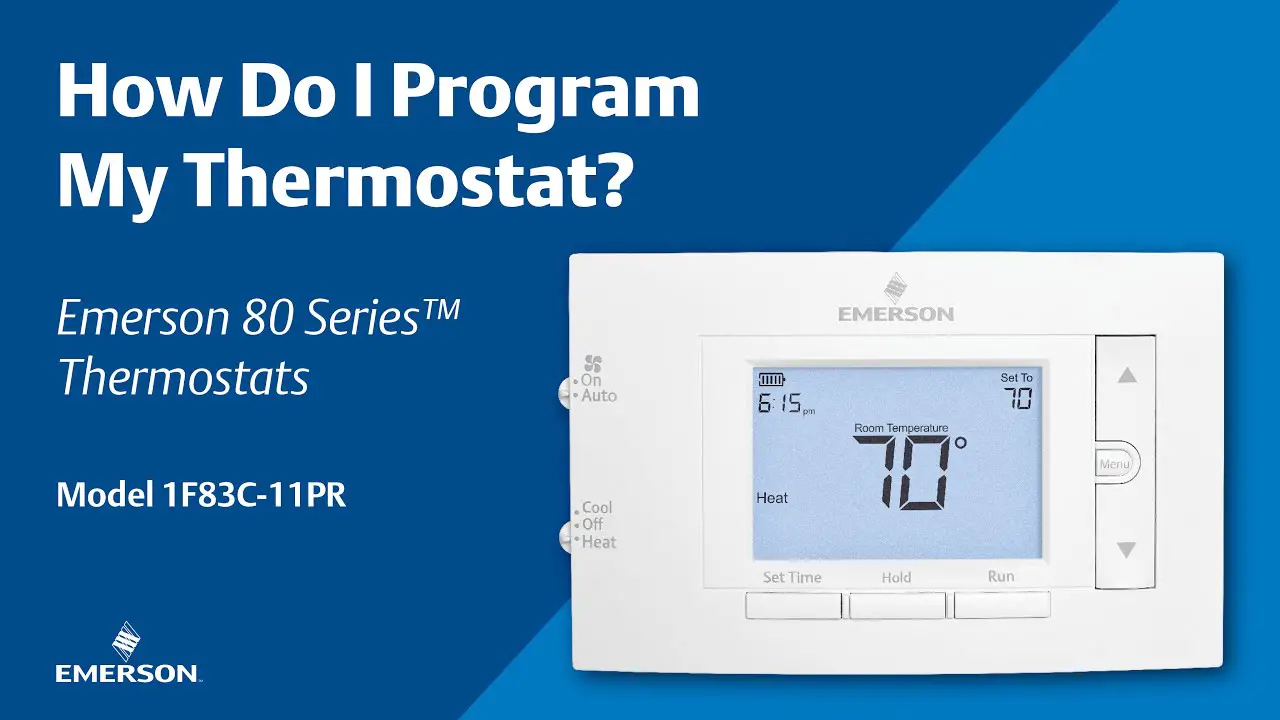
The Emerson 1F83C-11PR is another reliable model, ideal for those who prefer straightforward, manual controls. It provides precise temperature control without the need for Wi-Fi connectivity. This model is perfect if you’re looking for simplicity and reliability.
For those who want a balance between advanced features and ease of use, the Emerson Blue Series 2″ is a great option. It offers programmable settings and a large, easy-to-read display. This makes it simple to adjust and monitor your home’s temperature.
Choosing the right Emerson Thermostat depends on your specific needs. Consider what features matter most to you. Do you value smart home integration, or are you looking for a more basic, user-friendly model?
Emerson Thermostats provide a range of options to enhance your home’s comfort and efficiency. Which model will you choose to upgrade your home’s temperature control?
Tools And Materials Needed
Gather a screwdriver, batteries, and the thermostat manual. Ensure you have a stable internet connection for online instructions.
Programming an Emerson thermostat can seem like a daunting task, but with the right tools and materials, it becomes a breeze. It’s important to have everything you need at your fingertips before you start. This ensures a smooth process and helps you avoid unnecessary interruptions.Essential Tools
To start, gather a few essential tools. A small flathead screwdriver is crucial for removing the thermostat cover. A Phillips screwdriver will also be handy for securing screws. A multimeter is useful to check for live wires and ensure your safety. You don’t want any surprises while working with electrical components. You’ll also need some electrical tape. This helps to secure wire connections and prevent accidental shorts.Optional Accessories
While not necessary, certain optional accessories can make the job easier. A wire stripper can help you prepare wires properly. Clean wire ends make better connections. A level is useful if you want to ensure your thermostat is perfectly straight on the wall. This can be important for both aesthetics and proper function. Lastly, having extra batteries on hand is a good idea. Some Emerson thermostats use batteries for their display or backup power. You don’t want to complete the installation only to find out you need to make a trip to the store for batteries. Have you ever started a DIY project only to realize you were missing a crucial tool halfway through? It’s frustrating, right? By preparing these tools and materials ahead of time, you can avoid that pitfall. Getting these tools ready in advance can save you time and effort. Are you ready to get started? With your tools in hand, you’re well on your way to successfully programming your Emerson thermostat.Initial Setup
Programming an Emerson thermostat starts with the initial setup. This process ensures your device functions correctly and efficiently. Follow these steps to get your thermostat ready for use.
Unpacking The Thermostat
First, take the thermostat out of the box. Make sure all parts are included. You should find the thermostat unit, mounting hardware, and user manual. Check for any damage during shipping.
Installing The Batteries
Open the battery compartment on the back of the thermostat. Insert the batteries, making sure to match the positive and negative ends. Proper battery installation is crucial for the thermostat to work. Close the battery compartment securely.
Wiring The Thermostat
Wiring your Emerson thermostat might seem daunting at first, but it’s actually a straightforward process when you break it down step by step. The key is to be thorough and careful. One wrong connection can lead to issues. Let’s start by identifying and connecting the wires correctly.
Identifying Wires
Before you start, switch off the power to your HVAC system. This is crucial for your safety.
Next, remove the cover of your old thermostat. You will see several wires, each with different colors and labels.
Take a photo of the setup. This will help you remember where each wire goes.
Common wire colors include:
- Red (R): Power
- White (W): Heat
- Yellow (Y): Cooling
- Green (G): Fan
- Blue or Black (C): Common wire
If you notice any unusual wire colors, refer to your HVAC system’s manual.
Connecting The Wires
Now that you’ve identified the wires, it’s time to connect them to your new Emerson thermostat. Start by threading the wires through the backplate of the thermostat. Secure the backplate to the wall.
Using your earlier photo as a reference, connect each wire to the corresponding terminal on the thermostat. For instance, the red wire goes to the terminal marked “R”.
Ensure each connection is snug. Loose wires can cause your system to malfunction.
If your thermostat supports a C wire but your system doesn’t have one, you might need a C wire adapter. This is especially common in older homes.
After connecting all wires, attach the thermostat to the backplate. Restore power to your HVAC system. Test your thermostat to make sure it’s working correctly.
Programming your thermostat properly can save you time and energy. Have you ever encountered any wiring issues while setting up a thermostat? Share your experience!
Mounting The Thermostat
Mounting the Emerson thermostat correctly is crucial for optimal performance. Ensure it is level on the wall and securely fastened before programming.
Mounting the thermostat is a crucial step in programming your Emerson thermostat. It’s not just about finding a spot on the wall and screwing it in place. The location and method you choose can significantly impact the efficiency and accuracy of your thermostat. Let’s dive into the specifics to make sure you get it right.Choosing A Location
Picking the right location for your Emerson thermostat is essential. You want to place it in a central area of your home where it can accurately measure the temperature. Avoid placing it near windows, doors, or direct sunlight, as these can cause inaccurate readings. Think about areas with good air circulation. Hallways are often a good choice, but avoid spots where the thermostat might be affected by drafts or appliances. It’s also important to keep it at eye level for easy access and readability. Does your home have multiple floors? If so, remember that heat rises. Placing the thermostat on the ground floor can provide a more balanced temperature control throughout your home.Securing The Thermostat
Securing your Emerson thermostat properly ensures it stays in place and functions correctly. Start by turning off the power to your heating and cooling system to avoid any mishaps. Safety first! Next, use the provided mounting plate and align it with the pre-drilled holes in your wall. If there are no pre-drilled holes, use a level to mark where you need to drill. Secure the plate with screws, making sure it’s firmly attached and level. Once the plate is secure, connect the wires to the corresponding terminals on the thermostat. Each wire is color-coded, making it a straightforward task. After connecting the wires, attach the thermostat to the mounting plate. You should hear a click, indicating it’s securely in place. Finally, turn the power back on and test your thermostat. Make sure it’s working correctly and responding to your settings. If everything looks good, you’ve successfully mounted your Emerson thermostat. Mounting your thermostat might seem like a small task, but it’s a step that can affect the overall performance of your heating and cooling system. Take the time to do it right, and you’ll enjoy a comfortable home environment with accurate temperature control.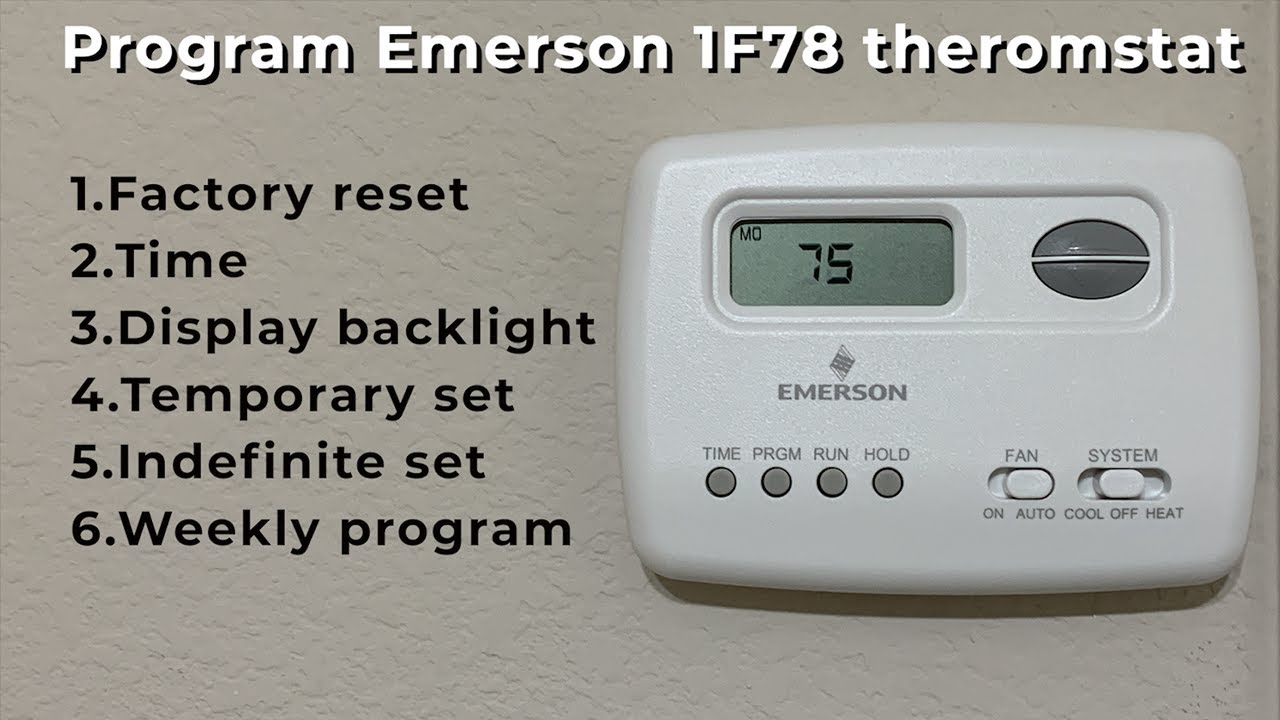
Credit: www.youtube.com
Configuring Settings
Configuring settings on your Emerson thermostat is essential for optimal performance. This section will guide you through the process. You’ll learn how to set the date and time, and adjust temperature settings. These steps are easy to follow and ensure your thermostat works efficiently.
Setting The Date And Time
First, access the main menu on your Emerson thermostat. Use the arrow buttons to navigate. Select “Settings” and press the “Enter” button. Find the “Date and Time” option. Press “Enter” again to open the settings. Use the arrow buttons to set the correct date. Confirm by pressing “Enter.” Repeat the process for the time. Make sure it matches your current time zone. This ensures accurate scheduling.
Adjusting Temperature Settings
Go back to the main menu. Select “Temperature Settings” from the list. Press “Enter” to open the options. Use the arrow buttons to choose your desired temperature. Confirm by pressing “Enter.” You can set different temperatures for day and night. This helps save energy and maintains comfort. Make sure to review the settings regularly. Adjust as needed for seasonal changes.
Programming Heating And Cooling Schedules
Programming your Emerson thermostat helps maintain a comfortable home environment. It saves energy, too. By setting specific heating and cooling schedules, you can optimize your thermostat’s performance. This guide will walk you through the process of programming your Emerson thermostat for both weekdays and weekends.
Setting Weekday Schedules
To set the weekday schedule, start by pressing the ‘Menu’ button. Then, navigate to the ‘Set Schedule’ option using the arrow buttons. Select it by pressing the ‘Enter’ button.
Check Best Thermostat Pricing in Amazon
** As an Amazon Associate, I earn from qualifying purchases.
Next, choose the ‘Weekday’ option. You will see options for setting specific times and temperatures. Start with the morning settings. Set the time you wake up and the desired temperature. Press ‘Enter’ to confirm.
Repeat this process for the ‘Day’, ‘Evening’, and ‘Night’ settings. For each time period, set the start time and temperature. Ensure the settings align with your daily routine.
Setting Weekend Schedules
Setting the weekend schedule follows a similar process. Begin by pressing the ‘Menu’ button. Navigate to the ‘Set Schedule’ option and select ‘Weekend’.
Again, you will set specific times and temperatures. Start with the morning settings. Set the time you wake up and the desired temperature. Confirm each setting by pressing ‘Enter’.
Continue with ‘Day’, ‘Evening’, and ‘Night’ settings. Adjust the times and temperatures to fit your weekend routine. Once completed, review your settings to ensure accuracy.
By programming your Emerson thermostat, you create a comfortable and energy-efficient home environment. Follow these steps for a seamless process.
Troubleshooting Common Issues
Programming your Emerson thermostat can be straightforward, but you might encounter some common issues along the way. Let’s address some of these problems and how you can troubleshoot them. This will help ensure your thermostat is always functioning optimally.
Error Codes And Solutions
Sometimes, your Emerson thermostat might display error codes that indicate specific problems. These codes can be frustrating, but they are designed to help you pinpoint the issue quickly.
E1 Error: This usually means there is a problem with the indoor sensor. Check if the sensor is properly connected and clean. If it’s still not working, you might need a replacement.
E2 Error: This indicates an outdoor sensor issue. Ensure the sensor is not damaged and is properly installed. Extreme weather conditions can sometimes cause this error.
E3 Error: This code suggests a communication error between the thermostat and the HVAC system. Reset your thermostat and HVAC system. If the problem persists, it might be a wiring issue.
These error codes are a helpful tool. They can save you time and effort in troubleshooting. Always refer to your Emerson thermostat manual for a detailed guide on error codes and solutions.
When To Contact Support
There are times when troubleshooting on your own may not resolve the issue. Knowing when to contact support is crucial to avoid prolonged discomfort.
If you’ve tried all the troubleshooting steps and the problem persists, it’s time to reach out. Persistent error codes that won’t clear up even after resetting the thermostat are a sign that you need professional help.
Another reason to contact support is if you’re experiencing issues beyond error codes, such as inconsistent temperature regulation. If your home remains too hot or too cold despite adjustments, it’s best to get expert advice.
Don’t hesitate to contact Emerson customer support. They have trained professionals who can guide you through more complex issues. It’s better to get help early than to let a small issue become a bigger problem.
What has been your experience with programming your Emerson thermostat? Have you encountered any of these issues? Sharing your experiences can help others facing the same problems. Plus, it’s always good to know you’re not alone in your troubleshooting journey.
Maintenance Tips
Programming an Emerson thermostat can greatly improve your home’s comfort and energy efficiency. However, to keep it running smoothly, regular maintenance is crucial. Here are some practical tips to ensure your thermostat remains in top shape.
Cleaning The Thermostat
Over time, dust and dirt can accumulate on your thermostat, affecting its performance. Cleaning it regularly is essential.
Use a soft cloth to gently wipe the surface. Avoid using harsh chemicals or water. A simple, dry cloth should do the trick.
If the thermostat has removable parts, such as a cover, carefully take them off and clean the inside. This helps in maintaining accurate temperature readings.
Have you ever noticed your thermostat acting up during a dust storm or after heavy cleaning? This is why regular cleaning is important. It keeps the device functioning correctly.
Updating Firmware
Just like your smartphone, your Emerson thermostat might need firmware updates. These updates can fix bugs and improve functionality.
Check the manufacturer’s website for any available updates. Downloading and installing them is usually straightforward.
Connect your thermostat to Wi-Fi if it supports it. This often makes updating the firmware easier and more convenient.
Keeping the firmware up-to-date ensures your thermostat runs efficiently. Have you ever missed an update and faced issues? Avoid that by setting a reminder to check for updates monthly.
By following these simple maintenance tips, you can ensure your Emerson thermostat continues to provide optimal comfort and energy savings. So, when was the last time you cleaned or updated your thermostat?

Credit: thermostat.guide

Credit: www.lowes.com
Frequently Asked Questions
How Do I Set The Program On My Emerson Thermostat?
To set the program on your Emerson thermostat, press “Menu,” select “Set Schedule,” and follow the on-screen instructions.
Why Is My Thermostat Showing The Wrong Room Temperature?
Your thermostat may show the wrong temperature due to sensor malfunction, incorrect placement, or dust accumulation. Check and clean sensors, and ensure proper positioning.
Should The Fan Be On Auto Or On The Emerson Thermostat?
Set the fan to auto on the Emerson thermostat for energy efficiency. It runs only when heating or cooling.
Which Emerson Thermostat Do I Have?
To identify your Emerson thermostat, check the model number on the device or its manual. Alternatively, visit the Emerson website for a product comparison.
Conclusion
Programming an Emerson thermostat can be simple with the right steps. Follow the manual carefully. Make sure to set the correct date and time. Adjust the temperature to your comfort. Regularly check and update settings for efficiency. A well-programmed thermostat saves energy and money.
Keep these tips in mind for a cozy home. Happy programming!
Check Best Thermostat Pricing in Amazon
** As an Amazon Associate, I earn from qualifying purchases.