
Check Best Thermostat Pricing in Amazon
** As an Amazon Associate, I earn from qualifying purchases.
Wiring a Honeywell thermostat may seem complicated. It is actually quite simple.
Honeywell thermostats are popular for their reliability and ease of use. To wire one correctly, follow a few straightforward steps. Understanding the wiring process ensures your thermostat works efficiently, keeping your home comfortable. This guide will walk you through the necessary steps, making the process clear and easy.
Whether you’re replacing an old thermostat or installing a new one, we’ll help you get it right. Let’s dive into how to wire your Honeywell thermostat successfully.

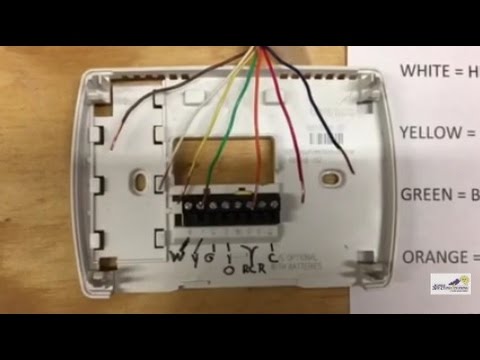
Credit: www.reddit.com
Introduction To Honeywell Thermostats
Wiring a Honeywell thermostat might seem like a daunting task, but with the right guidance, it can be straightforward. Honeywell thermostats are known for their reliability and ease of use. Whether you are upgrading your home system or replacing an old unit, understanding the basics of Honeywell thermostats will help you get started.
Benefits Of Honeywell Thermostats
Honeywell thermostats offer a range of benefits that make them a popular choice for homeowners. They are designed to be energy efficient, which can help reduce your utility bills. With programmable settings, you can set your thermostat to adjust the temperature based on your schedule.
Another significant benefit is their user-friendly interface. Even if you’re not tech-savvy, you’ll find it easy to navigate through the settings. Many models also come with Wi-Fi capabilities, allowing you to control your home’s temperature remotely via your smartphone.
Types Of Honeywell Thermostats
There are several types of Honeywell thermostats available, each suited for different needs. The basic models offer manual adjustments, which are great if you prefer simple, hands-on control. Programmable thermostats, on the other hand, allow you to set a schedule for your heating and cooling needs, making them ideal for those with a regular routine.
For those who love technology, there are smart thermostats. These models learn your preferences over time and can be controlled through voice assistants like Amazon Alexa or Google Assistant. They can also provide energy reports, helping you monitor and optimize your energy usage.
So, which type of Honeywell thermostat do you think will best suit your needs? If you’re looking for convenience and advanced features, a smart thermostat might be the way to go. For simplicity and ease of use, a basic or programmable model could be just what you need.
Credit: www.youtube.com
Tools And Materials Needed
You’ll need a Phillips screwdriver, wire stripper, and wall anchors. Also, make sure you have the thermostat’s wiring diagram.
Wiring a Honeywell thermostat can seem like a daunting task, but with the right tools and materials, you can make the process simple and straightforward. Before you start, it’s important to gather everything you’ll need. This will not only save you time but also ensure a smoother installation process.Essential Tools
Having the right tools on hand is crucial. You’ll need a Phillips screwdriver to remove the thermostat cover and secure it to the wall. A flathead screwdriver might also come in handy for prying open the old thermostat. A drill is useful if you need to make new holes for mounting. A wire stripper will help you prepare the wires for connection. Make sure your wire stripper can handle small-gauge wires, as thermostat wires are typically thin. Keep a small level nearby. This tool ensures that your new thermostat is perfectly aligned on the wall, which is more important than you might think.Required Materials
In addition to tools, certain materials are essential. Ensure you have the appropriate thermostat wire. This is often 18-gauge wire, and you’ll need multiple colors to match the terminal designations. You’ll also need wire nuts or terminal screws. These are used to secure the wire connections. If your new thermostat doesn’t come with them, you can find them at any hardware store. Lastly, have some electrical tape on hand. This tape can insulate and secure wire connections, preventing any accidental shorts. Taking the time to gather these tools and materials upfront can make your installation process much smoother. Have you ever started a project only to realize you’re missing something crucial? It can be frustrating. Preparing ahead of time ensures you won’t face unnecessary delays. So, are you ready to get started? What tools and materials do you already have, and what will you need to buy? Preparing now will save you from headaches later.Safety Precautions
When wiring a Honeywell thermostat, safety is paramount. Understanding and following safety precautions will help prevent accidents and ensure a smooth installation process. Let’s break down some essential safety steps you should follow.
Turning Off Power
Before you even touch the thermostat, turn off the power to your HVAC system. This step is crucial to avoid electrical shock. Locate the circuit breaker panel and switch off the breaker for your heating and cooling system.
After turning off the breaker, double-check that the power is off. Try turning on your heating or cooling system from the existing thermostat. If nothing happens, you are good to go.
Handling Electrical Components
Wiring a thermostat involves handling electrical components, which can be risky. Always use insulated tools to prevent electrical shock. Ensure your hands are dry and you’re working in a dry environment.
Label the wires before removing them from the old thermostat. This will make it easier to connect them to the new Honeywell thermostat correctly. It’s a simple step that can save you a lot of trouble.
Finally, never rush through the process. Take your time to understand each wire and its function. If you’re unsure about any step, consult the Honeywell thermostat manual or seek professional help.
Have you ever encountered an unexpected challenge while wiring a thermostat? Share your experience in the comments below!
Removing The Old Thermostat
Switching out an old thermostat for a new Honeywell model can seem daunting, but breaking it down step-by-step makes it manageable. The first crucial step is removing the old thermostat. This part of the process ensures that you have a clean slate to work with and can prevent potential wiring mishaps.
Labeling Wires
Before you detach any wires, it’s vital to label them. This prevents confusion when you connect them to the new thermostat. I remember the first time I did this, I thought, “I’ll remember where everything goes.” Spoiler: I didn’t.
Use small pieces of masking tape to label each wire with the corresponding terminal it was connected to. Most thermostats will have labels like R, W, Y, G, and C. Write these labels clearly. This ensures that you know exactly where each wire belongs when you’re ready to install your new Honeywell thermostat.
Detaching The Thermostat
Once your wires are labeled, it’s time to detach the thermostat. Start by removing the cover. This usually involves gently pulling or prying it off. Once the cover is off, you should see the base and the wires connected to it.
Unscrew the mounting screws that hold the base to the wall. Carefully pull the base away from the wall, making sure the labeled wires don’t slip back into the hole. This step may seem simple, but it’s easy to overlook something. Have you ever tried to fish wires out of a wall? It’s not fun.
By labeling wires and carefully detaching the old thermostat, you set yourself up for a smooth installation of your new Honeywell thermostat. It’s all about preparation and attention to detail. What’s your biggest worry about installing a thermostat? Let’s tackle it together.
Mounting The New Thermostat
Mounting the new thermostat involves connecting wires correctly. First, turn off the power. Identify and match each wire to the thermostat’s terminal. Follow the Honeywell guide for precise steps.
Mounting the New Thermostat Once you’ve removed the old thermostat, it’s time to mount your new Honeywell thermostat. Getting this step right ensures accurate temperature readings and efficient operation. Let’s dive into the specifics of positioning and securing the backplate.Positioning The Backplate
First, you need to position the backplate of your Honeywell thermostat. This is the part that attaches directly to the wall and holds the wires. Make sure it’s level. Use a small level tool for precision. A crooked backplate can make your thermostat look unprofessional and impact its functionality. Consider the height. Place it around 5 feet off the ground for the best temperature reading. Too high or too low can skew the thermostat’s accuracy. Avoid direct sunlight or drafts. These can affect the thermostat’s reading. Keep it away from windows, doors, and vents.Securing The Backplate
Now that you’ve positioned the backplate, it’s time to secure it. This step is crucial for a stable and reliable installation. Mark your drill points. Use a pencil to mark where the screws will go. This ensures you drill in the right spot without damaging any wires. Drill pilot holes. These small holes make it easier to screw in the backplate. They also prevent the wall from cracking. Attach the backplate with screws. Use the screws provided with your Honeywell thermostat. Tighten them just enough to hold the backplate firmly. Check for stability. Wiggle the backplate slightly to ensure it’s secure. If it moves, tighten the screws a bit more. Mounting your new thermostat correctly sets the foundation for a smooth installation. Have you ever had a thermostat that wasn’t level or was in the wrong spot? Share your experiences and let’s troubleshoot together!Connecting The Wires
Connecting the wires of a Honeywell thermostat can seem daunting, but it is manageable. Following clear steps will ensure you connect the wires correctly and safely. Let’s break down the process into two main parts: identifying wire terminals and attaching wires.
Check Best Thermostat Pricing in Amazon
** As an Amazon Associate, I earn from qualifying purchases.
Identifying Wire Terminals
Start by turning off the power to your HVAC system. This step is crucial for safety. Next, remove the cover of your old thermostat. You will see several wires, each a different color. These colors correspond to specific terminals on the Honeywell thermostat. Typical wire colors include red for power, yellow for cooling, white for heating, and green for the fan.
Look at the Honeywell thermostat manual. It will have a wiring diagram that matches the wire colors to the correct terminals. Common terminals are labeled R, Y, W, and G. Match each wire from your wall to the appropriate terminal on the thermostat.
Attaching Wires
Once you have identified the wire terminals, it’s time to attach the wires. Gently strip about half an inch of insulation from the ends of each wire. Twist the exposed wire to ensure it is neat and ready for insertion. Insert each wire into the corresponding terminal on the thermostat. For example, insert the red wire into the R terminal.
Make sure each wire is securely attached. Loose connections can cause the thermostat to malfunction. Tighten the terminal screws to hold the wires in place. Double-check that all wires are in the correct terminals and secured. After connecting the wires, carefully place the thermostat cover back on.
Finally, turn the power back on and test your Honeywell thermostat. Ensure it is working correctly and that all your settings are functioning as expected.
Configuring The Thermostat
So, you’ve got your Honeywell thermostat wired up. But how do you configure it to make the most of its features? Configuring the thermostat involves setting up the display and programming your desired temperature settings. Let’s dive into these steps to make your home as comfortable as possible.
Setting Up The Display
The first thing you see on your thermostat is the display. It’s crucial to set it up correctly. Start by pressing the “Menu” button on your thermostat. Navigate through the options until you find “Display Settings.”
Here, you can adjust the brightness and contrast. Make sure the display is easy to read from your usual vantage points. If you prefer a dark mode, many Honeywell models offer that option too.
Don’t forget to set the time and date. Accurate time settings ensure your thermostat operates precisely when you need it. A friend once missed his morning heating schedule just because the time was off by an hour. Don’t let that happen to you!
Programming Temperature Settings
Once your display is set up, it’s time to program your temperature settings. This is where your thermostat really starts to shine. Enter the programming mode by pressing the “Program” button.
You can set different temperatures for various times of the day. For instance, you might want a cooler setting at night and a warmer one in the morning. Simply use the “Up” and “Down” arrows to adjust the temperature and press “Set” to confirm.
Want to save on energy bills? Program your thermostat to lower the temperature when you’re not home. It’s a small step that can make a big difference. Have you ever noticed how much your energy usage spikes during peak hours? Programming can help smooth those spikes.
Feeling a bit overwhelmed? Don’t worry. Honeywell thermostats often come with preset programs that you can use as a starting point. You can always tweak these settings later.
Did you find setting up your Honeywell thermostat straightforward? What challenges did you face, and how did you overcome them? Share your experiences and insights in the comments!
Testing And Troubleshooting
Testing and troubleshooting a Honeywell thermostat ensures it works correctly. After installing, it’s crucial to verify its functions. This process helps identify any issues and confirm the system operates efficiently. Below, we’ll discuss the steps for testing and troubleshooting your thermostat.
Powering On The Thermostat
First, turn on your thermostat. Ensure it receives power. Check the display. If the screen is blank, verify the power source. Inspect the circuit breaker. Ensure it’s in the ‘on’ position. Confirm all wires are connected properly. Sometimes loose wires cause power issues. Once powered, the display should light up.
Checking System Functions
Next, test the system functions. Set the thermostat to ‘heat’ mode. Adjust the temperature higher than the room’s current temperature. The heating system should start. Listen for the furnace or boiler. Feel for warm air from vents.
Then, switch to ‘cool’ mode. Set the temperature lower than the room’s temperature. The cooling system should activate. Listen for the air conditioner. Feel for cool air from vents.
Finally, test the fan. Set the fan to ‘on’ mode. The fan should run continuously. Ensure air flows through the vents. If any function doesn’t work, recheck the wiring. Ensure all connections are secure.

Credit: diy.stackexchange.com
Frequently Asked Questions
What Color Wires Go Where On A Honeywell Thermostat?
For Honeywell thermostats, connect the red wire to R, white to W, yellow to Y, green to G, and blue to C.
What Wire Color Goes To What Terminal In A Thermostat?
Red wire connects to the R terminal. White wire goes to the W terminal. Green wire connects to the G terminal. Yellow wire goes to the Y terminal. Blue wire connects to the C terminal.
How Many Wires Does A Honeywell Thermostat Need?
A Honeywell thermostat typically needs 2 to 5 wires. The exact number depends on the model and system type.
Does The R Wire Go To The Rc Or Rh Thermostat?
The R wire goes to the RH terminal for heating systems. For combined heating and cooling systems, it connects to RC.
Conclusion
Wiring a Honeywell thermostat doesn’t have to be complicated. Follow the steps carefully. Ensure you connect the correct wires. Double-check your work for safety. This guide helps simplify the process. You can have a functional thermostat quickly. Remember, patience is key.
A well-wired thermostat improves comfort. Enjoy precise temperature control at home. Happy wiring!
Check Best Thermostat Pricing in Amazon
** As an Amazon Associate, I earn from qualifying purchases.