
Check Best Thermostat Pricing in Amazon
** As an Amazon Associate, I earn from qualifying purchases.
No, you usually don’t need jumper wires for Nest Thermostat installation. Nest Thermostats are designed to work with most heating and cooling systems without extra wiring.
Setting up a smart thermostat can be confusing, especially if it’s your first time. The Nest Thermostat simplifies this process, making it user-friendly and efficient. Knowing whether jumper wires are necessary can save you time and prevent installation errors. In this post, we’ll explore the wiring needs for Nest Thermostat, ensuring you understand what is required for a smooth setup.
Whether you’re upgrading your home system or installing a thermostat for the first time, this guide will help you figure out your wiring needs, making the process straightforward and stress-free.
Introduction To Jumper Wires
Are you trying to make sense of the wiring in your Nest Thermostat? You may have heard about “jumper wires” and wondered what they are and whether you need them. Let’s dive into the basics of jumper wires and their role in your thermostat setup.
What Are Jumper Wires?
Jumper wires are small, simple wires used to connect two points in an electrical circuit. Think of them as bridges that help electricity flow smoothly. They come in various colors and lengths, making it easy to identify and use the right one for your needs.
In the world of thermostats, jumper wires are often short and designed to fit snugly within the tight confines of the device. They help ensure that your thermostat communicates effectively with your heating and cooling system.
Importance In Thermostats
You might be asking, why do I even need jumper wires in my thermostat? Good question! Jumper wires can be crucial for older heating and cooling systems that require specific connections. Without them, your thermostat might not function correctly, leaving you in the cold—literally.
For example, if your system doesn’t have a common wire (C-wire), a jumper wire can sometimes act as a makeshift solution. This ensures that your thermostat remains powered and operational. However, it’s always best to check your system’s requirements or consult a professional.
Have you ever tried to set up your thermostat only to find it doesn’t turn on? It happened to me once, and a simple jumper wire was the missing piece. A quick fix that saved me a lot of hassle.
So, next time you’re setting up or troubleshooting your thermostat, remember to consider the role of jumper wires. They might just be the key to a cozy home.

Credit: www.googlenestcommunity.com
Nest Thermostat Basics
Understanding the basics of the Nest Thermostat can help you use it more effectively. This smart device helps you save energy and provides a comfortable home environment. Learning how to set it up and use its features is essential.
Features Of Nest Thermostat
The Nest Thermostat offers several smart features. It learns your schedule and adjusts the temperature. It can be controlled from your phone, even when you’re not at home. The thermostat also provides energy reports. These reports show how much energy you use and give tips to save more.
Another feature is the “Home/Away Assist.” This feature uses sensors to know if you’re home or away. It adjusts the temperature accordingly. The Nest Thermostat also works with voice assistants. You can control it using voice commands.
Compatibility With Wiring
Before installing, check if your wiring is compatible. The Nest Thermostat works with many heating and cooling systems. Most systems with low voltage (24V) work well. You can check compatibility on the Nest website. They provide a tool to help you.
If you have a jumper wire, you might wonder if you need it. The Nest Thermostat usually does not need a jumper wire. It has built-in sensors that manage power efficiently. Always refer to the installation guide for detailed instructions.
In some cases, you might need a “C” wire for constant power. If your system does not have one, you can use the Nest Power Connector. This helps provide the necessary power without a “C” wire.
Identifying Your Wiring Needs
Understanding your wiring needs is crucial for installing a Nest thermostat. It ensures a smooth setup and optimal performance. Let’s break down the steps you need to follow.
Checking Your Current Setup
First, check your existing thermostat setup. Remove the cover plate to expose the wires. Take note of the wire labels and their corresponding terminals. You’ll need this information for the Nest thermostat installation.
Identify the type of system you have. Common types include heating-only, cooling-only, and combination systems. Knowing your system type helps in determining the wiring configuration needed for the Nest thermostat.
Tools Required
Gather the necessary tools before starting the installation. You will need a screwdriver, wire stripper, and pliers. These tools will help you handle the wires and secure the Nest thermostat in place.
Have a voltage tester handy. It ensures the wires are not live during the installation. Safety first!
Check Best Thermostat Pricing in Amazon
** As an Amazon Associate, I earn from qualifying purchases.
Keep the Nest thermostat installation guide nearby. It provides specific instructions and diagrams tailored to your system.
With the right tools and information, you can confidently identify your wiring needs. This makes the installation process smoother and more efficient.
Credit: www.reddit.com
Step-by-step Installation
Installing your Nest Thermostat can seem daunting. But it doesn’t have to be. With clear steps, you can set it up easily. This guide will walk you through the process. Let’s get started on the step-by-step installation.
Preparing Your Thermostat
First, turn off the power to your HVAC system. This ensures safety. Next, remove the old thermostat. Take a picture of the wiring. This helps in case you need to reference it later. Label the wires. Use the labels provided in your Nest Thermostat box. This makes the next steps easier.
Connecting The Jumper Wire
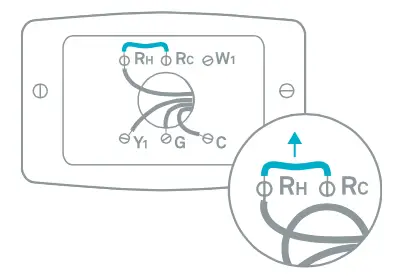
Check if you need a jumper wire. Nest Thermostats often do. The jumper wire connects two terminals. This ensures the system works correctly. Locate the Rh and Rc terminals. If your system has separate Rh and Rc wires, you don’t need a jumper. If there is only one wire, you need the jumper.
Insert the jumper wire into both terminals. Ensure it’s secure. Now, connect the labeled wires to their corresponding terminals. Double-check your connections. Incorrect wiring can cause issues. Once everything is in place, attach the Nest Thermostat base. Screw it into the wall. Finally, snap the display onto the base.
Turn the power back on. Follow the on-screen setup instructions. Your Nest Thermostat should now be ready to use. Enjoy the comfort and savings it brings.
Common Installation Issues
Incorrect jumper wire placement on a Nest thermostat can lead to common installation issues. This might cause the device to malfunction or not power up. Ensure proper wiring to avoid these problems.
Installing a Nest Thermostat can sometimes present challenges. Many people face issues during setup. These problems can be frustrating. Understanding common issues helps avoid them.Troubleshooting Connection Problems
Connection problems are common. Check if the jumper wire is correctly placed. Ensure all wires are firmly connected. Loose wires can cause issues. Verify the power source. Sometimes, power issues cause connection problems. Check for compatibility. Not all systems work with Nest Thermostat. Read the manual. Follow the instructions carefully. This can prevent many problems.Tips For A Successful Setup
Preparation is key. Gather all needed tools. Read the manual first. Follow each step closely. Double-check wire connections. This ensures everything is secure. Label wires before removal. This avoids confusion. Take a picture of the original setup. It serves as a reference. Use the Nest app. It offers guidance and tips. Seek help if needed. Sometimes professional help is best. They can ensure everything is correct. This avoids future issues. “`Benefits Of Using Jumper Wires
Connecting a jumper wire to your Nest thermostat can help maintain a stable connection. It ensures your device functions properly, avoiding unnecessary power issues. This simple step can improve overall performance.
When setting up a Nest Thermostat, you might wonder whether using jumper wires is necessary. Jumper wires can significantly enhance your thermostat’s performance and increase your home’s energy efficiency. Here are some key benefits to consider.Enhanced Thermostat Performance
Jumper wires ensure that your Nest Thermostat receives the right signals from your HVAC system. This leads to more accurate temperature readings and better control over your heating and cooling. Imagine your thermostat consistently maintaining your preferred temperature without constant adjustments. This is the kind of performance jumper wires can help achieve. Additionally, jumper wires can prevent common issues like short cycling, which can wear out your HVAC system faster. They help create a stable connection, reducing the chances of your system turning on and off frequently.Increased Energy Efficiency
Using jumper wires can also make your home more energy-efficient. By providing a more reliable connection, your thermostat can better regulate your HVAC system, ensuring it runs only when necessary. This means you can save on energy bills. A more efficient system uses less energy, which is good for both your wallet and the environment. You might also notice a more comfortable home climate. With precise temperature control, you avoid the discomfort of sudden temperature changes, making your living space more pleasant year-round. Have you ever noticed your energy bills spiking unexpectedly? Jumper wires can help prevent this by maintaining optimal performance and efficiency of your thermostat and HVAC system.Safety Precautions
When installing a jumper wire in your Nest Thermostat, safety should be your priority. Handling electrical components can be dangerous if not done correctly. Here, we outline some key safety precautions to ensure your installation process goes smoothly and safely.
Handling Electrical Components
Before starting, turn off the power at the breaker box. This prevents electrical shock. Use a voltage tester to confirm the power is off. Wear insulated gloves for added protection. Work in a well-lit area to see clearly and avoid mistakes.
Keep your work area dry. Water and electricity do not mix well. Use tools with rubber handles to reduce the risk of electric shock. Read the Nest Thermostat manual carefully. Follow each step as instructed.
Avoiding Common Mistakes
Incorrectly wiring your Nest Thermostat can cause damage. Double-check your wiring diagram before connecting wires. Label each wire before disconnecting them from your old thermostat. This helps you remember where each wire goes.
Do not force wires into the wrong terminals. This can cause short circuits or device failure. Make sure wires are securely connected and not loose. Loose wires can cause intermittent issues. Lastly, use the appropriate tools for the job. Improper tools can damage wires and terminals.

Credit: diy.stackexchange.com
Frequently Asked Questions
What Wires Should Be Connected To Nest?
Connect the R, Y, G, W, and C wires to Nest. Verify compatibility with your HVAC system.
What Is The Purpose Of A Jumper Wire?
A jumper wire connects components in a circuit, allowing electricity to flow. It helps in prototyping and troubleshooting.
Do I Connect Red Wire To Rc Or Rh?
Connect the red wire to the RC terminal for cooling systems. Connect it to the RH terminal for heating systems.
Where Does The Rc Wire Go On A Nest Thermostat?
Connect the RC wire to the RC terminal on the Nest Thermostat. Ensure the wire is securely attached.
Conclusion
Installing a Nest Thermostat can seem tricky but is manageable. Jumper wires are often unnecessary. Confirm your system’s compatibility for a smooth setup. Following the instructions helps avoid mistakes. Seek help if unsure. Enjoy the comfort and efficiency of your Nest Thermostat.
Check Best Thermostat Pricing in Amazon
** As an Amazon Associate, I earn from qualifying purchases.