
Check Best Thermostat Pricing in Amazon
** As an Amazon Associate, I earn from qualifying purchases.
Yes, you can use a Nest Learning Thermostat with 4 wires. It’s a common setup in many homes.
But, let’s dive into more details to understand how it works. The Nest Learning Thermostat is a smart device designed to save energy and make your home more comfortable. Many homes have a 4-wire system for their heating and cooling.
This thermostat can work with these setups, but there are a few things you need to know. Understanding how it connects and functions can help you make the most of its features. We will explain how to set up and use your Nest Learning Thermostat with a 4-wire system. Keep reading to learn more about making your home smart and efficient.
Introduction To Nest Learning Thermostat
The Nest Learning Thermostat is a smart device that controls your home’s temperature. It learns your schedule, preferences, and adjusts itself accordingly. This helps save energy and keeps your home comfortable.
Brief History
Google introduced the Nest Learning Thermostat in 2011. It was one of the first smart thermostats. Over the years, it has become a popular choice for smart home enthusiasts. The device has evolved with new features and improved technology.
Key Features
The Nest Learning Thermostat is known for its smart capabilities. It learns your daily routine and adjusts the temperature automatically. This helps save energy and lowers your bills. The device connects to Wi-Fi, allowing you to control it from your smartphone. You can change the temperature from anywhere.
Another feature is the energy history report. It shows how much energy you have used. This helps you understand your usage patterns. The thermostat also provides energy-saving tips. It integrates with other smart home devices. This enhances your smart home experience.
Understanding Thermostat Wiring
Setting up your Nest Learning Thermostat can feel like a daunting task, especially when it comes to wiring. Understanding thermostat wiring is crucial to ensure your device works efficiently and safely. Let’s break down the key concepts to make this process easier for you.
Basic Wiring Concepts
Thermostat wiring might seem complicated, but it’s essentially about connecting the right wires to the right terminals. Most thermostats, including the Nest Learning Thermostat, use low voltage wiring. This means you’re usually dealing with a 24-volt system, which is safer to handle than high-voltage wiring.
When I first installed my Nest thermostat, I was overwhelmed by the number of wires and their colors. But, I quickly learned that each wire has a specific function and color code, making it easier to identify and connect them correctly.
Common Thermostat Wires
Understanding the common thermostat wires is half the battle. Here are the most common ones you’ll encounter:
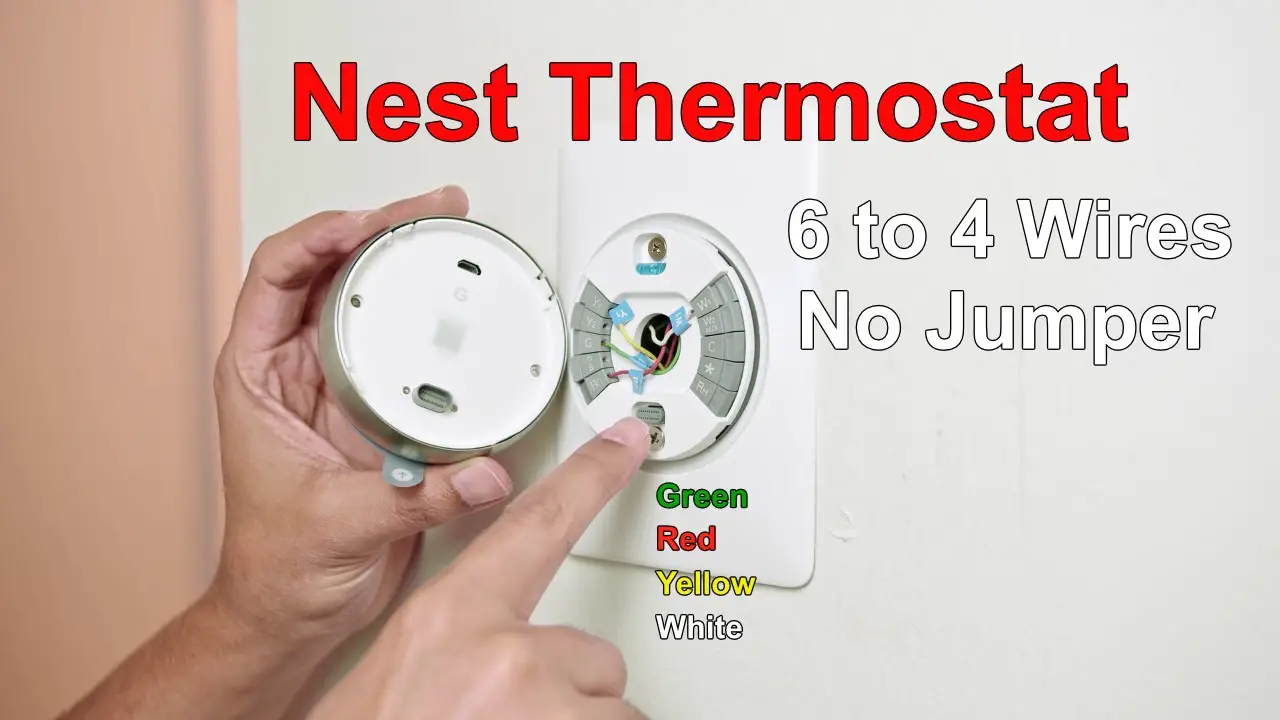
- Red (R or Rc/Rh): This is the power wire. It provides the 24V necessary for the thermostat to operate.
- White (W): This wire controls the heating system. When the thermostat signals for heat, this wire activates the furnace.
- Yellow (Y): This wire is for the cooling system. It signals the air conditioner to turn on.
- Green (G): This wire controls the fan. It turns the fan on and off independently of the heating and cooling systems.
So, can you use a Nest Learning Thermostat with four wires? Absolutely. In most cases, these four wires (R, W, Y, G) are all you need. However, if you encounter other wires, like a common wire (C), it’s worth checking the Nest compatibility guide to ensure proper setup.
Have you encountered any unique wiring setups in your home? It’s always a good idea to double-check the wiring diagram provided with your thermostat and refer to online resources or professional help if you’re unsure.
Nest Thermostat Compatibility
The Nest Learning Thermostat has changed the way we manage home temperatures. It learns your schedule and adjusts accordingly, saving energy and money. But, before you install it, ensure your system is compatible.
Checking Compatibility
Before buying a Nest thermostat, check your current wiring setup. Not all systems work with Nest. It’s crucial to know if your system uses high voltage or low voltage. Most homes have low voltage systems, which are compatible with Nest.
To check, remove your current thermostat cover. Look for labels like R, W, Y, and G. These indicate low voltage. If you see labels like 120V or 240V, it’s high voltage. High voltage systems are not compatible.
4-wire Systems
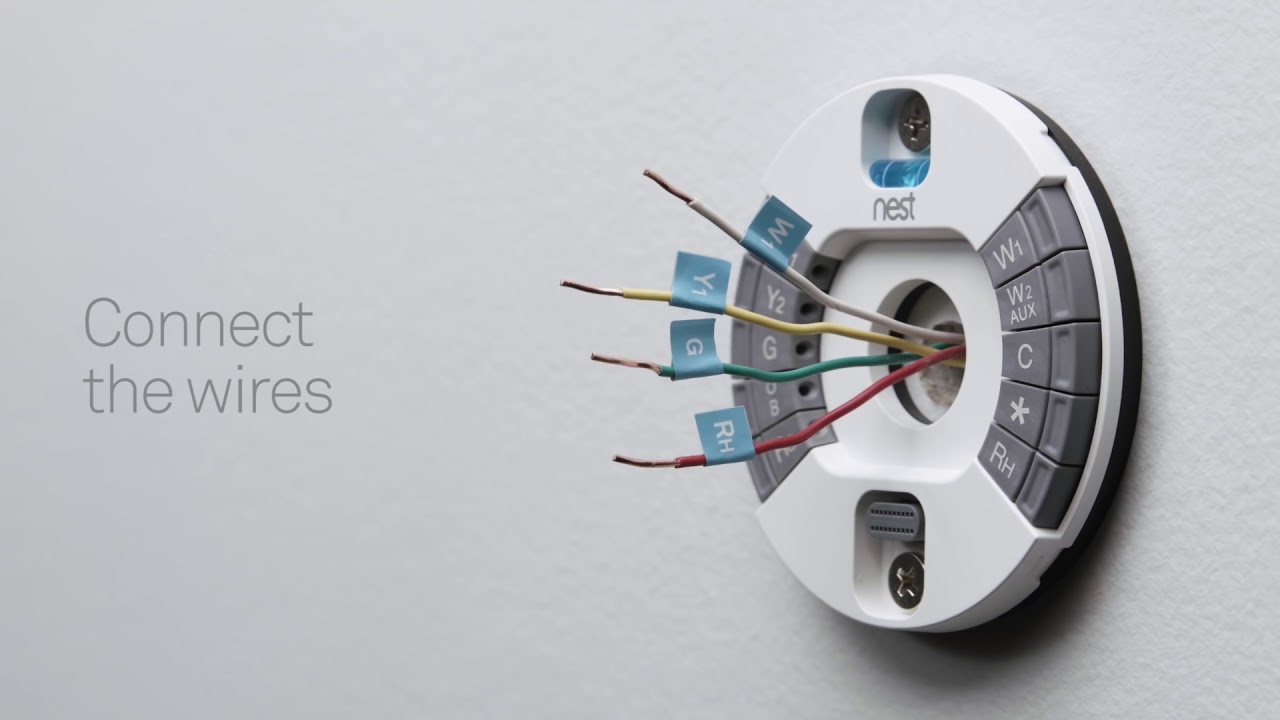
Many homes have a 4-wire setup. This setup usually includes wires labeled R, Y, G, and W. The Nest Learning Thermostat works well with these systems.
Connect the R wire to the R terminal on the Nest base. The Y wire goes to the Y terminal. The G wire connects to the G terminal. Lastly, the W wire goes to the W terminal. This setup ensures proper operation.
A common wire, or C wire, can be useful but is not always needed. The Nest thermostat can work without it. If you face power issues, consider adding a C wire.
Credit: www.youtube.com
Installing Nest Thermostat With 4 Wires
Installing a Nest Learning Thermostat with 4 wires is a straightforward process that can enhance the efficiency of your home heating and cooling system. With the right preparation and a clear installation guide, you can easily set up your thermostat in no time. Let’s dive into the steps you need to take.
Preparation Steps
Before you start the installation, ensure you have all the necessary tools. A Phillips screwdriver, a flathead screwdriver, and a voltage tester are essential. You should also have your Wi-Fi credentials handy.
Turn off the power to your HVAC system at the circuit breaker. This is crucial for your safety. Double-check with the voltage tester to make sure the power is off.
Label the wires connected to your old thermostat. This will help you connect them correctly to the Nest thermostat. Use the labels provided in the Nest packaging.
Installation Guide
First, remove your old thermostat. Unscrew it from the wall and carefully disconnect the wires. Keep the screws; you might need them later.
Next, attach the Nest base to the wall. Use the built-in level to make sure it’s straight. Screw it into place using the screws provided or the ones from your old thermostat.
Now, connect the wires to the Nest base. Insert each wire into the corresponding connector and make sure it’s secure. The Nest app can guide you through this process if you need extra help.
Attach the Nest display to the base. It should click into place easily. Turn the power back on at the circuit breaker and follow the on-screen instructions to complete the setup.
Finally, connect your Nest thermostat to your Wi-Fi network. This will allow you to control it remotely through the Nest app. You’ll also get software updates and new features automatically.
Check Best Thermostat Pricing in Amazon
** As an Amazon Associate, I earn from qualifying purchases.
Installing a Nest Learning Thermostat with 4 wires is a manageable task that can make a big difference in your home’s comfort and efficiency. Have you had a seamless experience with your Nest thermostat installation? What tips would you add?
Troubleshooting Common Issues
Having trouble with your Nest Learning Thermostat? You’re not alone. Many people experience issues, especially when using it with a 4-wire system. Let’s dive into some common problems and how to fix them.
Connection Problems
One common issue is poor connection. You might notice your thermostat displays a “no power” error. Double-check your wiring. Make sure each wire is securely connected to the right terminal.
If you’re still having problems, try resetting your thermostat. Disconnect it from the base and reconnect after a minute. This simple reset can often solve minor connection issues.
Sensor Issues
Another problem could be with the sensors. Your Nest might not be reading the temperature correctly. This can lead to your home feeling too hot or too cold.
Check if the sensors are clean and unobstructed. Dust or objects blocking the sensors can affect performance. Clean the sensors gently with a soft cloth.
Still having trouble? Try recalibrating the sensor settings. Go to the settings menu on your Nest and follow the prompts to recalibrate.
Have you experienced any other issues with your Nest Learning Thermostat? Troubleshooting can be frustrating, but tackling these common problems can often get your system back on track. Share your thoughts and solutions in the comments!
Credit: www.reddit.com
Benefits Of Using Nest Thermostat
Switching to a Nest Learning Thermostat can bring numerous benefits to your home. The Nest Thermostat is not just a gadget; it’s a smart device designed to make your life easier and more efficient. Let’s explore some key advantages of using this smart thermostat.
Energy Efficiency
One of the standout features of the Nest Learning Thermostat is its ability to save energy. It learns your schedule and temperature preferences, adjusting itself automatically to ensure your home is always at an optimal temperature.
Imagine coming home from work to a perfectly heated house without having to touch a button. That’s the power of energy efficiency. According to Nest, users can save up to 15% on their cooling bills and 10-12% on heating bills.
Have you ever thought about how much you could save annually by just making this switch? Those savings add up, making a noticeable difference in your monthly bills.
Smart Home Integration
Nest Thermostat seamlessly integrates with other smart home devices. If you already have a smart home setup, adding a Nest Thermostat can enhance your system’s functionality.
Picture this: You wake up, and your smart lights gradually brighten, your coffee maker starts brewing, and your home is already at your preferred morning temperature. This level of automation makes your daily routine smoother and more enjoyable.
You can control the thermostat using your smartphone, voice commands through devices like Google Home, or even through automation routines. How convenient would it be to adjust your home’s temperature without leaving your couch?
Incorporating a Nest Learning Thermostat into your home isn’t just about convenience; it’s about creating a more efficient and cohesive living environment. So, why not make the switch and start reaping these benefits?
Advanced Features Of Nest Thermostat
The Nest Learning Thermostat offers advanced features that make it a popular choice. One of its standout features is its ability to connect with four wires. This feature makes it compatible with many existing HVAC systems. But the advanced functionalities extend beyond just compatibility. Let’s explore some of the key features that set the Nest Thermostat apart.
Remote Control
The Nest Thermostat allows users to control their home’s temperature from anywhere. You can use a smartphone, tablet, or computer to make adjustments. This remote control feature is convenient and energy-efficient. You can turn off the heating or cooling when you are not home. This helps save on energy bills and ensures comfort when you return.
Learning Capabilities
The Nest Thermostat learns your schedule and preferences. It automatically adjusts the temperature based on your habits. This feature provides personalized comfort without constant manual adjustments. The thermostat gets smarter over time. It becomes more efficient at maintaining the perfect temperature.

Credit: www.googlenestcommunity.com
Frequently Asked Questions
How Many Wires Do You Need For A Nest Learning Thermostat?
You need a minimum of two wires for a Nest Learning Thermostat. Four wires are recommended for full functionality.
Can I Install A Wi-fi Thermostat With Only Four Wires?
Yes, you can install a Wi-Fi thermostat with only four wires. Use a C-wire adapter or a thermostat with battery backup. This ensures proper functionality and power supply.
Can Nest Learning Thermostat Work Without C Wire?
Yes, the Nest Learning Thermostat can work without a C wire. It uses battery power but may require additional setup.
What Thermostats Work With 4 Wires?
Many modern thermostats work with 4 wires, such as Nest, Ecobee, Honeywell, and Emerson Sensi. Ensure compatibility by checking your specific model’s requirements.
Conclusion
Using the Nest Learning Thermostat with 4 wires is possible. It simplifies home heating and cooling. Installation is straightforward and user-friendly. Ensure your system is compatible. Consult the manual for specific instructions. Enjoy the benefits of smart temperature control. Save energy and reduce utility bills.
Nest makes managing your home’s climate easy. Ideal for those seeking efficiency and convenience. Upgrade to smart technology without hassle. Make your home comfortable year-round. Smart thermostats are a wise investment. Experience modern comfort with Nest.
Check Best Thermostat Pricing in Amazon
** As an Amazon Associate, I earn from qualifying purchases.