
Check Best Thermostat Pricing in Amazon
** As an Amazon Associate, I earn from qualifying purchases.
Understanding A/C thermostat wiring can seem complex. But it’s essential for proper home cooling.
In this guide, we break down the A/C thermostat wiring diagram. Proper wiring ensures your air conditioning system runs efficiently. A clear diagram can help you understand the connections and functions of each wire. This knowledge can save you time and money on professional services.
Whether you’re installing a new thermostat or troubleshooting an existing one, having a clear wiring diagram is key. Let’s explore the wiring basics and make your A/C system work smoothly.
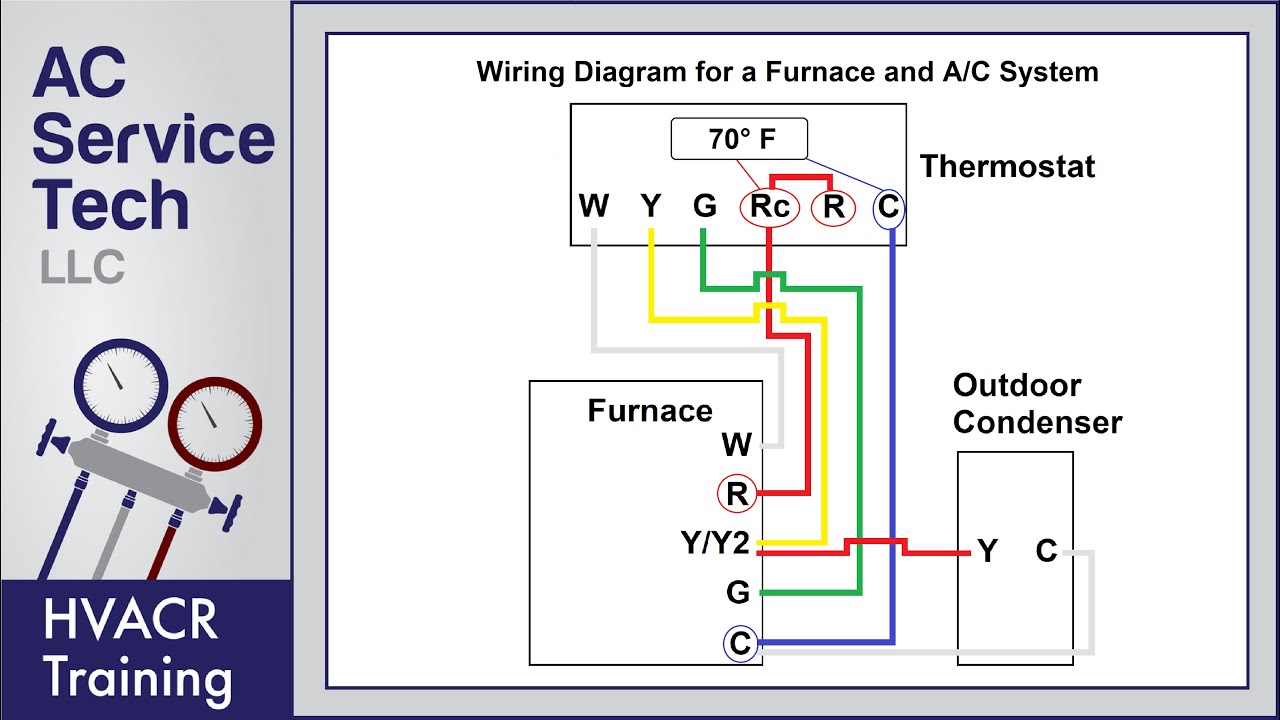
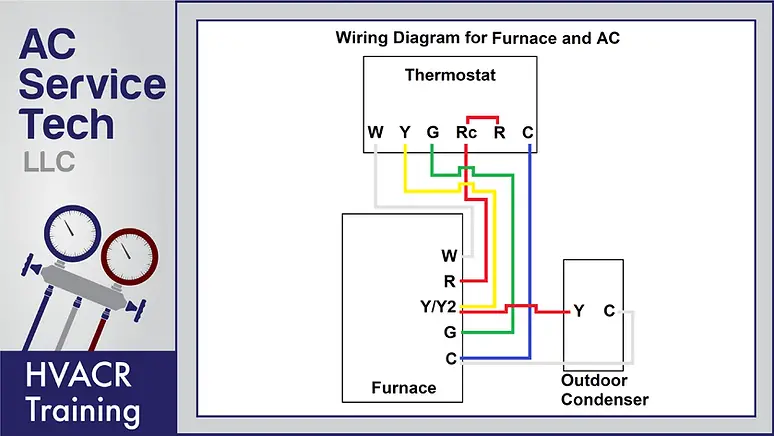
Credit: www.youtube.com
Introduction To Thermostat Wiring
Understanding a thermostat wiring diagram is important for home comfort. Thermostats control your home’s heating and cooling systems. Knowing the wiring helps in proper installation and troubleshooting.
Importance Of Proper Wiring
Proper wiring ensures your thermostat works correctly. Poor wiring can lead to system failures. It might also cause your system to run inefficiently. This can increase your energy bills. Proper wiring ensures safety and efficiency.
Common Types Of Thermostats
There are several types of thermostats. Each type has different wiring needs. The most common are programmable, non-programmable, and smart thermostats.
Programmable thermostats allow you to set schedules. Non-programmable thermostats are basic and easy to use. Smart thermostats offer advanced features. They can be controlled via smartphones. Understanding each type helps with proper installation.
Essential Tools And Materials
When you’re setting up or repairing your AC thermostat, having the right tools and materials is crucial. Equipping yourself with the essentials not only makes the job easier but also ensures you do it safely and correctly. Let’s break down the essential tools and materials you’ll need.
Tools Needed
First, you need a few basic tools. These tools are easy to find and often, you might already have them at home.
- Screwdrivers: Both flathead and Phillips screwdrivers are necessary. Thermostat units often use different types of screws.
- Wire Stripper: This tool is essential for stripping the insulation off the wires without damaging them.
- Needle-Nose Pliers: These are great for bending and positioning wires, especially in tight spaces.
- Drill: You may need a drill to create mounting holes for your thermostat.
- Voltage Tester: Safety first! Use a voltage tester to ensure there’s no live current before you start working.
Materials Required
In addition to tools, you’ll need a few materials to complete the wiring process. These materials are specific to thermostat installation and repair.
- Thermostat: Of course, you need the thermostat itself. Ensure it’s compatible with your AC system.
- Thermostat Wire: This is a multi-stranded wire used to connect the thermostat to the HVAC system. Commonly, an 18/5 thermostat wire is used.
- Wire Nuts: These are used to securely connect wires together. They come in various sizes to accommodate different wire gauges.
- Mounting Hardware: Screws and anchors to mount the thermostat to the wall securely.
- Electrical Tape: For insulating and securing wire connections.
Have you ever started a project and realized halfway through that you were missing something crucial? Gathering all these tools and materials beforehand can save you a lot of frustration. Plus, it helps ensure your thermostat installation goes smoothly and safely.
Safety Precautions
Working with A C thermostat wiring diagrams can be daunting. Safety is the top priority. Simple steps can prevent accidents and injuries. Before starting, understand the safety rules. Follow them strictly.
Electrical Safety
Electricity is dangerous. Always turn off the power before working. Use a voltage tester to check wires. Ensure no current flows. Never touch exposed wires with bare hands. Insulate all connections properly. This prevents shocks and short circuits.
Personal Protective Equipment
Wear personal protective equipment (PPE). Gloves protect your hands. Use rubber gloves for electrical work. Goggles shield your eyes from sparks. Wear long sleeves to protect your arms. Proper footwear ensures safety on the ground.
Keep a first aid kit nearby. Be ready for any accidents. Knowing these safety tips helps prevent injuries.
Understanding The Wiring Color Codes
Understanding the wiring color codes is crucial for anyone looking to install or repair their AC thermostat. These codes ensure that each wire connects to the correct terminal, preventing any potential mishaps. With a clear grasp of these color codes, you’ll make the installation process straightforward and stress-free.
Standard Color Codes
Most AC thermostat wiring diagrams follow a standard color code. Typically, the red wire is used for power. It’s connected to the R terminal, which powers up the thermostat.
The white wire often connects to the W terminal. This wire controls the heating system. If you’re adding a new thermostat, make sure this wire is correctly connected to avoid any heating issues.
Next, the yellow wire goes to the Y terminal. This wire is responsible for cooling. When you set your thermostat to cool, this wire signals the AC to start.
Lastly, the green wire connects to the G terminal. It controls the fan. Whether you want the fan to run continuously or only when heating/cooling, this wire is key.
Variations In Color Codes
Although there are standard color codes, variations can exist. Sometimes, the blue or black wire is used as a common wire (C wire). This wire provides a return path for the 24V power, crucial for modern thermostats.
In some older systems, you might find that the wires don’t follow the standard colors. For example, the white wire might be used for cooling instead of heating. Always double-check the wiring diagram specific to your system.
Another variation could be in multi-stage systems. These have additional wires, like a second-stage heating wire (W2) or cooling wire (Y2). Make sure to identify these wires correctly to ensure proper functionality.
Have you ever encountered an unexpected wire color? It can be confusing. But with the wiring diagram and a little patience, you can decode it. Make sure to label any unfamiliar wires before disconnecting them.
In essence, understanding these color codes is like learning a new language. Once you’re familiar, the process becomes intuitive. Are you ready to tackle your thermostat wiring with confidence?
Step-by-step Wiring Instructions
Are you ready to master your A C thermostat wiring? This step-by-step guide will make the process easy and straightforward. Whether you’re a DIY enthusiast or a complete beginner, these instructions will help you get the job done right.
Preparing The Area
Before you start, ensure you have all the necessary tools. You’ll need a screwdriver, wire stripper, and your new thermostat. Double-check that the power to your HVAC system is turned off to avoid any shocks.
Check Best Thermostat Pricing in Amazon
** As an Amazon Associate, I earn from qualifying purchases.
Clear the area around your thermostat. Remove any obstacles that might get in your way. This will give you a clear view and enough space to work comfortably.
Label the wires connected to your old thermostat. Use masking tape and a pen to mark each wire. This will make it easier to connect them to the new thermostat later.
Connecting The Wires
Once you’ve prepared the area, you’re ready to connect the wires. Start by connecting the wire labeled ‘R’ to the ‘R’ terminal on the new thermostat. This is typically the power wire.
Next, connect the wire labeled ‘W’ to the ‘W’ terminal. This wire controls the heating function. If your system has a cooling function, connect the wire labeled ‘Y’ to the ‘Y’ terminal.
Don’t forget the ‘G’ wire. This wire powers the fan. Connect it to the ‘G’ terminal. Lastly, if you have a common wire, labeled ‘C,’ connect it to the ‘C’ terminal to ensure your thermostat has continuous power.
Before you finish, double-check all connections. Make sure each wire is secure and in the correct terminal. This will prevent any issues when you turn the power back on.
How did you find the wiring process? Was it easier or more challenging than you expected? Your experience can help others, so feel free to share your insights!
Credit: www.qwik.com
Testing The Thermostat
Testing the thermostat is a crucial step in ensuring your AC system works efficiently. It helps diagnose issues and ensures the wiring is correct. Let’s break down the process to test your thermostat properly.
Initial Power On
Start by turning on the power to your AC unit. Ensure the thermostat is set to the desired temperature. Observe if the AC unit responds. Check if the cooling system activates. If it does, the initial setup is likely correct. If not, you may need to check the wiring connections.
Troubleshooting Common Issues
If the AC unit does not respond, you may need to troubleshoot. Check if the thermostat display is blank. This could indicate a power issue. Ensure the thermostat is connected to a power source. Inspect the wiring for any loose connections. Tighten any loose wires you find.
Next, confirm the wiring matches the diagram. Each wire must be in the correct terminal. Look for any signs of wear or damage on the wires. Replace damaged wires immediately. Test the thermostat again after addressing these issues. The AC unit should respond if everything is correct.
Tips For Efficient Wiring
Understanding the AC thermostat wiring diagram is essential for efficient wiring. Proper wiring ensures your AC system runs smoothly and effectively. Whether you are a beginner or experienced, these tips will help you achieve efficient wiring.
Avoiding Common Mistakes
Many people make mistakes during thermostat wiring. One common error is not turning off the power before starting. This can lead to electric shocks. Always ensure the power is off at the breaker panel.
Another mistake is using the wrong wire type. Use the recommended wire gauge for your thermostat. Incorrect wire gauge can cause malfunctions. Follow the manufacturer’s instructions for wire specifications.
Incorrect connections are another issue. Label each wire before removing the old thermostat. This helps you match the wires correctly with the new one. Take photos of the existing setup for reference.
Ensuring Long-term Reliability
For long-term reliability, use high-quality materials. Invest in good quality wires and connectors. Cheap materials can fail over time and cause issues.
Secure the wires properly. Loose wires can disconnect and cause the system to fail. Use wire nuts and electrical tape to ensure strong connections.
Regularly check the wiring for wear and tear. Over time, wires can degrade. Inspect them annually and replace any damaged wires. This helps maintain system efficiency.
Keep the wiring clean and organized. Dust and dirt can affect connections. Use cable ties to keep wires neat and avoid tangling.

Credit: cyncsupport.gelighting.com
Frequently Asked Questions
What Color Wire Goes Where On A Thermostat?
The typical thermostat wire colors are: Red (power), White (heat), Yellow (cooling), Green (fan), and Blue/Black (common). Always refer to your thermostat’s manual for specific wiring instructions.
What Are The Color Codes For Hvac Wires?
HVAC wire color codes are: red for power, yellow for cooling, white for heat, green for fan, and blue for common.
What Does W1 And W2 Mean On A Thermostat?
W1 and W2 on a thermostat refer to the first and second stages of heating. W1 activates the primary heat source, while W2 activates the secondary heat source.
Do I Use R Or Rc On A Thermostat?
Use “R” for a single transformer system. Use “RC” for systems with separate heating and cooling transformers.
Conclusion
Understanding a C thermostat wiring diagram is crucial. It simplifies troubleshooting. Proper wiring ensures efficient operation. Always follow safety guidelines. Consult professionals for complex issues. This guide helps beginners. Clear steps make installation easier. Accurate connections prevent malfunctions. Regular checks maintain system health.
Save energy with correct thermostat settings. Reliable wiring enhances comfort. Make informed decisions for your HVAC system. Keep this guide handy for future reference.
Check Best Thermostat Pricing in Amazon
** As an Amazon Associate, I earn from qualifying purchases.